How to Reduce Bulk in Seams While Sewing
Hello, my friends! Stephanie from Stephie B's Designs is here again on this lovely March day to teach you how to reduce bulk in seams. Sounds exciting, doesn't it?! Well, although it may not sound exciting, the methods I'll be showing you below are crucial for crisp, flat, and clean seams. Trust me, you want to know these. :)
How to Reduce Bulk in Seams | Trim, Grade, Notch, & Clip
In this tutorial I'll cover trimming, grading, clipping, and notching seam allowances - to include how to handle inside and outside corners, and inward and outward curves. These are techniques all sewists must learn as they progress their skill.
I've been sharing lots of projects with you over the past few months (Aromatherapy Heating Pad or Microwavable Soup Bowl Cozy anyone?!), so this is a nice change, we're going back to sewing basics!
Ok! Buckle up and let's get started! We've got a lot to cover. :)
First things first... what is a seam allowance?
If you're just starting out on your sewing journey - as we all did at one point - you've probably seen the term seam allowance (commonly referred to as SA) in the patterns you're using or in conversations with fellow sewists.
The SA is the space between the seam and the raw, cut edge of the fabric. Most SAs are anywhere between 1/4in to 1/2in depending on the pattern. Pattern designers will always indicate what the the SA is somewhere within their written instructions, generally before you begin to sew. This is an important measurement, because that extra space is included in the pattern pieces; in order for a garment to fit as expected, the correct SA must be used.
...and then trimmed, graded, notched, or clipped! That's why learning how to reduce bulk in seams is important.
Trimming
What? Trimming refers to the process of cutting off the excess fabric from the SA.
When? This method is used in many patterns, but you'll see it most of the time when sewing lined bodices, necklines, collars, and facings, when using a thick fabric, or any other time you need to reduce the SA bulk.
You'll likely see the phrases "trim the SA," "trim to reduce bulk," or "trim away the excess SA" as you progress through a pattern.
How? Very simple! Cut the SA of both layers down to 1/4in or 1/8in, or to about half the width. You can trim both sides together, or if working with a heavy weight fabric, trim one side at a time.

Why? When two layers are sewn together then the fabric is turned right side out, those two layers become four layers thick with the SA. Trimming the SA reduces those extra layers (the bulk!) so the seam lays flatter once pressed and oftentimes topstitched.
Grading
What? Grading is when the two (or more) SAs are trimmed to different widths.
When? Grading is used in many of the same circumstances as trimming; when a SA will be enclosed (collars, necklines, sashes, etc.).
How? First trim the SA of one fabric - preferably the one that will lay closest the body, e.g. the facing - down to about 1/8in. Trim the next layer to about 1/4in, and subsequent layers (if applicable) slightly wider as you get further away from the body.

Why? By removing one (or more) SA layers, you're preventing a bump along the seam that would be clearly visible once the fabric is flipped right side out and pressed.
Clipping Outer Corners
What? When sewing an item with an outer corner, such as on a collar or sash, you'll use a slightly different trimming method to remove the excess fabric from the corners so they lay flat once turned right side out and pressed.
When? When following a pattern, you'll see phrase such as "clip the SA at the corner" or maybe even "trim the corner."
How? Being very careful not to cut the seam, cut off the SA diagonally at the corner. I recommend reinforcing the corner stitches with a second seam or backwards stitches, especially if the corner will be tugged or pulled at during use, but it's not necessary.

You can stop right there with that single clip and will have a great looking corner... or you can follow the next two steps for an even flatter, crisper corner!
After clipping off the corner, grade the SA...

... then taper the SA towards the corner.

Done! Your corner will be flat and amazing. You're welcome. ;)

Why? Clipping off the corner (then trimming and grading if desired) is very important to ensure outer corners are not bulgy/bulky when turned right side out, and that they lay flat once pressed.
Clipping Inner Corners
What? Similar to clipping the outer corner, inner corners also need some attention in order to lay properly once turned right side out.
When? Anytime you have an inside corner; a great example is when constructing a welt pocket.
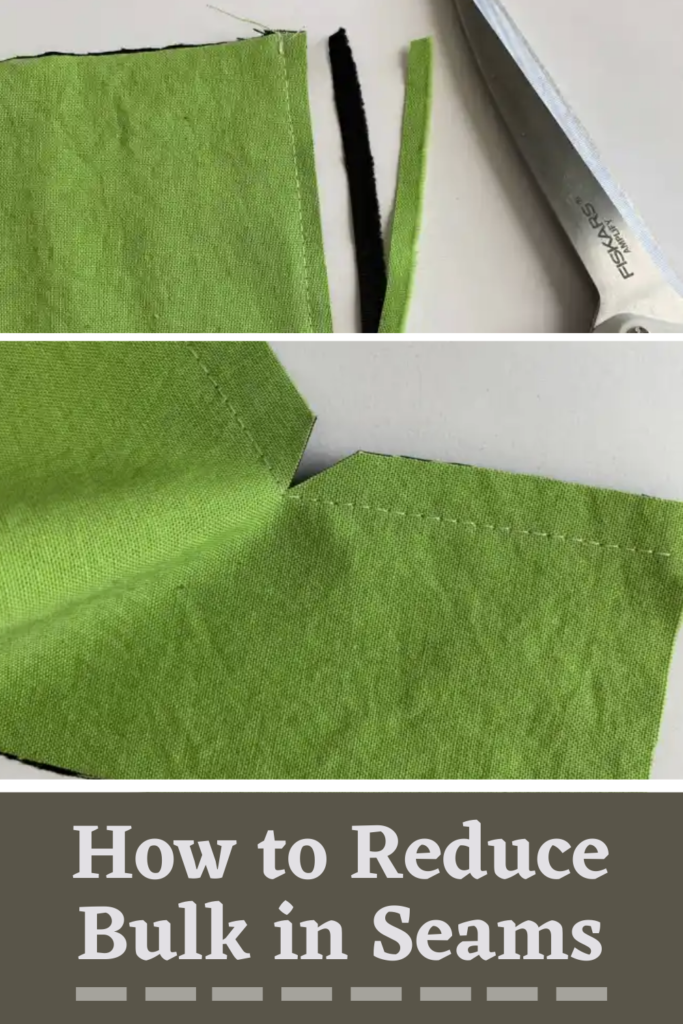
How? Trim the SA, then clip from the raw edge into the inner corner, at a roughly 45" angle.
As I mentioned above, clipping must be done very carefully. You'll be cutting as close to the seam as possible, being cautious not to cut the thread. Also like above, I recommend reinforcing the corner stitches.

In case it's difficult to see where the corner has been clipped in the image above, the SA in the image below is slightly pulled apart.

Why? If inner corners are not clipped prior to turning right side out, the corner will bulge due to the extra fabric trying to squeeze into that small bend. With it clipped, the fabric can lay on top of one another, therefore reducing the bulk and resulting in a beautiful corner.
Have you ever heard the phrase "clip valleys, notch mountains?" You haven't?! Well, that little phrase is going to help us through the last two steps in this tutorial; clipping inward and outward curves.
Clipping Inward Curves
What? Inward curves, like the one pictured below, are concave and are the "valleys" I just mentioned, so they will need to be clipped.

When? You'll typically see these types of curves around the necklines and armcyes of the bodices.
How? Start by trimming the SA down to about 1/4in to 1/8in. Then - as carefully as you can - clip from the raw edge to the seam at 1/4in intervals, or more if necessary for a sharp curve.

Why? The seam of an inward curve is LONGER than the SA, so when it is turned right side out, the SA would pull under tension and the curve would not lay correctly. Clipping relieves that pressure so the seam and SA can lay flat.
Notching Outward Curves
What? As shown in the image below, outward curves are convex, and are the "mountains" I mentioned in that fun little phrase up above. That means they must be notched.

When? Princess seams are a great example if when you might see an outward curve. The bottom of round tote bags are another example.
How? First, trim the curve down to about 1/4in.

Next, using your scissors or pinking shears, clip "V"-shaped notches along the curve.

Why? The seam in an outward curve is SHORTER than the SA, resulting in extra fabric in the SA that must be removed. If you were to leave the curve un-notched, the SA would bulge once turned right side out due to that extra fabric, and would not be able to lay flat - similar to the corners we just learned about.
PHEW! That was the last one! We're almost done! Bear with me a few more minutes! :)
When NOT to Trim, Grade, Clip, or Notch
Now that I've walked you through a few "when to" techniques, lets's discuss "when not to" trim, grade, clip, or notch the SA.
When working with very lightweight (e.g. chiffon or silk) or loosely woven fabrics (gauze), it is not recommended to trim the SA because the seam needs the weight and stability that the extra fabric adds. These types of fabrics may also/instead require special sewing techniques such as the use of understitching or French seams.
~~And that's it!~~
That was a lot of information, I know. Hopefully, you come back often as you encounter these situations and refer back to what I've written on how to reduce bulk in seams.
Keep checking back here on Peek-a-Boo Pages for more tutorials - more are published all the time! Plus, there are soooo many great projects and how-tos just waiting for you. Please comment below and share your trimming, grading, clipping, and notching adventures, and please share the pin below so others can benefit from this tutorial. Thank you!!