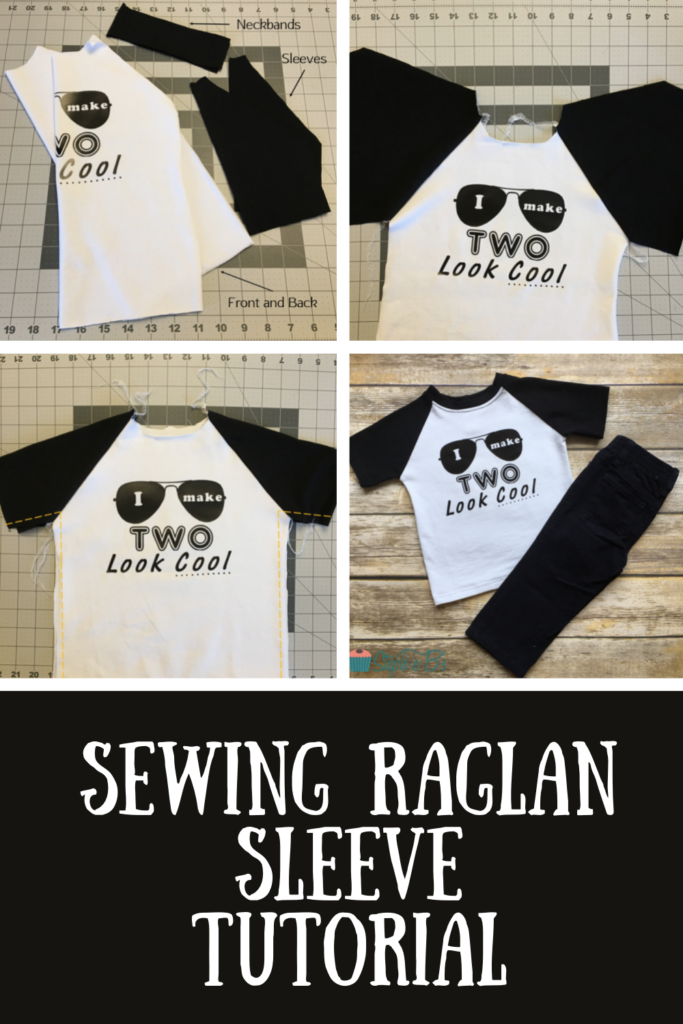
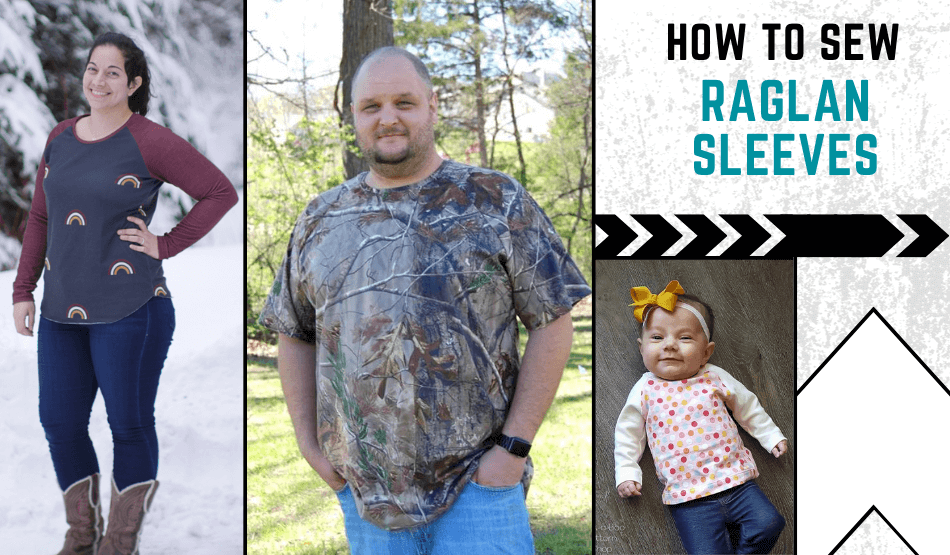
Hi! It’s Stephanie from Stephie B’s Designs here today to give you a sewing raglan sleeve tutorial. At the end of this article other blog contributors also provided tutorials on (1) How to make a fancy raglan tee; (2) How to Sew a Raglan Cardigan, and, (3) How to Make a Raglan Sleeve Jacket.
Sewing Raglan Sleeve Tutorial | How to Sew Raglan Sleeves
First off, I LOVE raglans, and they are super simple to sew up! My son has six in his current size and I have plans for larger sizes as we speak. In fact, the shirt I’m sewing for this tutorial is one I’m making for him to wear on his upcoming second birthday! Learning how to sew raglan sleeves is simple – lets get started!
Sewing Pattern
I always use the Grand Slam Tee and Dress pattern from Peek-a-Boo Pattern Shop for basic raglan shirts, so that is the pattern I am basing today’s tutorial off of. I HIGHLY recommend the Grand Slam. It’s perfect for boys and girls, and really is a go-to pattern for not only my household, but my business as well. If you’re looking for something a little more feminine, another one of my favorites is the Rosemary Raglan. (It has a cute little skirt! Love!!)
Getting Started
So let’s begin learning how to sew raglan sleeves!
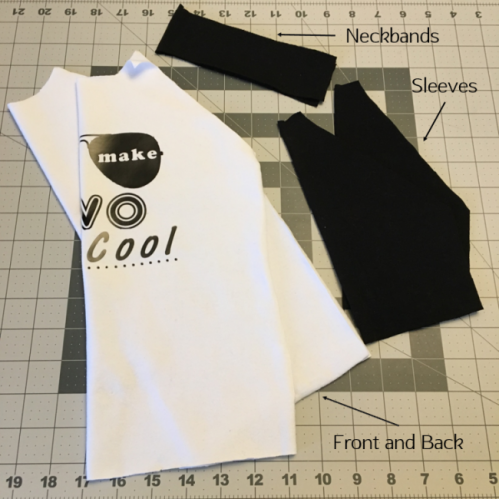
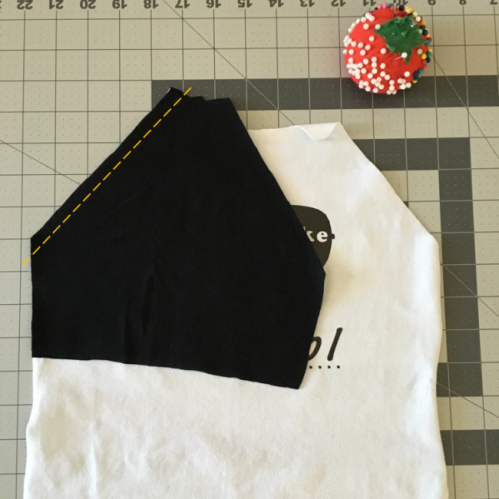
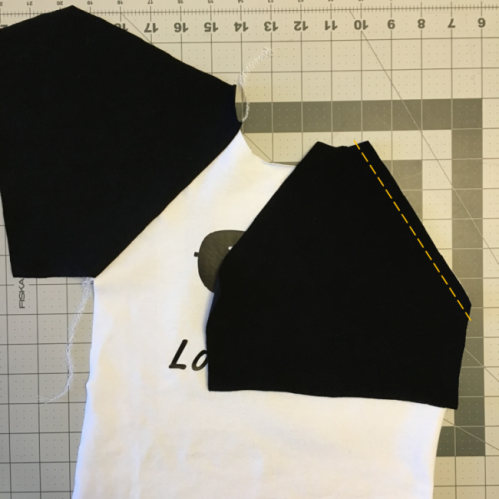
Once you’ve cut out all your pieces, grab the front piece and one of the sleeves. With right sides together (RST), align the angled edge of the sleeve along the angled edge of the front and sew or serge together.
Repeat with the second sleeve along the remaining angled edge of the front.
Once you’ve finished sewing both arms to the front, it should look like the picture below when the sleeves are spread apart.
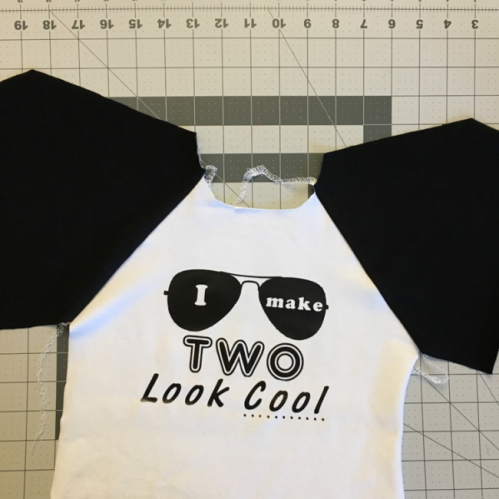
Next, with RST, sew the back piece to the remaining sleeve edges.
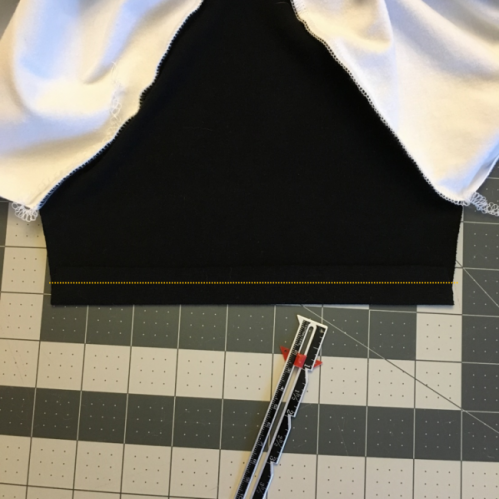
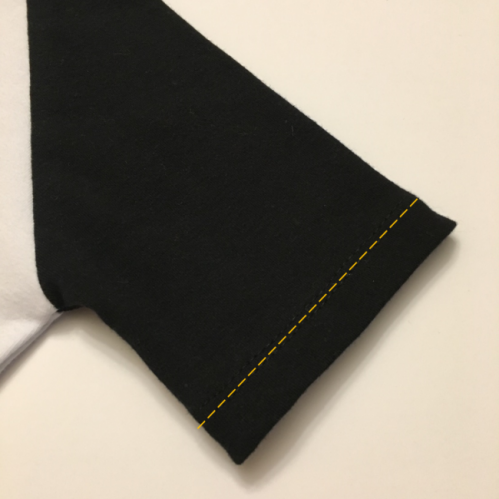
There are two choices for the sleeve hem:
- You can measure and iron the hem before sewing the side seams (my preference). You may even choose to topstitch the hem at this point using a zig-zag, stretch stitch, or double needle.
Or…
- You can wait until the side seams are sewn up to measure, iron, and sew all at once.
At this point you’ll sew up the side seams and add the neck band.
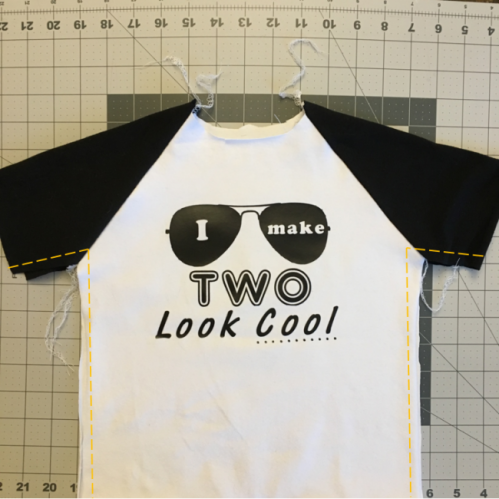
If you haven’t done so already, topstitch your sleeve hem using a zig-zag, stretch stitch, or double needle.
Finally, hem the bottom of the shirt, and there you have it!! Quick and easy. It takes me longer to cut out the pieces than it does to sew up the shirt!
Now you know how to sew raglan sleeves. Good luck with your raglans!
Making Raglan Sleeves | How to Make a Fancy Raglan Tee
Next, Sara is here to show us how to make a fancy raglan tee.
Hi everyone! This is Sara here to show you how to make a fancy raglan tee. One of the things I really like about sewing is to be able to grab a simple pattern and hack it (or flip it, or alter it if you prefer)! I love all the creative processes behind it. Sometimes I alter it just a bit and sometimes I go all the way and almost make a new pattern. 🙂
This time I thought about making a simple raglan tee – the Grand Slam tee pattern – into a fancy tee. All I did was cut the front piece two times – one with my regular knit and the other with a fancy swiss dot knit – and add a little something to the sleeves.
My girl loved it! And the best part is I am sharing with you a quick tutorial on how to make it! It only takes adding a few simple steps to the Grand Slam instructions.
Fancy Raglan Supplies
- A fancy light weight knit (see pattern’s yardage requirements) – swiss dot knit, tight raschel, mesh, stretchy lace, soft light weight tulle, etc.
- Pins and measuring tape
Follow these steps between steps 6 and 7 on the Grand Slam instructions.
Tutorial for the front layer
Fancy Raglan Front Step A: Grab your fancy knit. Fold it. Lay the front pattern piece on it about 6 inches from the fold line. Angle out the side at about 3 inches from the bottom edge. Optional: You can also add some length to the top layer if you want. Make sure to round the side edges and/or finish them. Cut.
Fancy Raglan Front Step B: Gather the neckline by stitching two rows of long stitches (for more detail on gathering check my January contributor’s post on How To Gather) and pulling the threads. Start and stop about 0.5 inches from both edges. Distribute the gathering evenly to match the other front piece at the neckline and sides.
Tutorial for the sleeve band
Fancy Raglan Sleeve Step A: Cut two stripes (of the fancy knit) with 2” x sleeve bottom width.

Sewing a Raglan | How to Sew a Raglan Cardigan
Ready to learn how to sew a raglan cardigan? I’m so excited to share my Grand Slam hack with you today! The Grand Slam was one of the first patterns I tested for Amy, and is for sure one of my most-used patterns too. I’ve shared a few twists before, like how to add a hood in this tutorial – but for this one, I really wanted to mix it up a bit more. As spring (finally!) approaches here in the Northeastern US, I thought a few cardigans would be a nice addition to the kiddos’ wardrobes.
Raglan style sleeves are often really conducive to jacket/cardigan patterns as they typically have a slightly lower armscye (armhole/opening) and/or a roomier shoulder than set-in sleeves. This makes them great for layering! Whether or not to size up here is up to you, and will depend in part on how roomy the fit of the pattern is on your child as a shirt, and also what fabric you’re using.
For Miss P’s cardigans, I used interlock so I kept her typical size but used the athletic fit rather than the slim fit, and took a slightly smaller seam allowance to give her a little more breathing room. (Since the SA for this pattern is 1/2″, I used between a 1/4″ and 3/8″ SA depending on how much extra room I wanted.) For A’s shawl collar cardigan, I sized up one size. As you can see in the pics, it’s quite roomy for him. I’d make some alterations next time, but I was afraid the fleece would be too snug if I didn’t size up. Oops.
How to Turn a T-Shirt Into a Cardigan
To make a cardigan, the main alteration you’ll need to make is to cut the front bodice piece right down the center. (Unless you want an asymmetrical cardi, which would be cool too. 😉 ) Instead of cutting your pattern piece on the fold, you’ll cut down that fold line to give yourself one left bodice and one right bodice. Make sure to cut them into mirror images so you have one of each.
If you’re going to be adding a placket as part of the binding you don’t need to add any width onto the front bodice pieces. The shawl collar shown above has a placket “built-in” as part of the cowl, so I didn’t have to add anything.
For this one, I started with the cowl from the Comfy Cozy Robe pattern and added length to make sure it would stretch all the way around the neck and down to the waistband. (Next time, I’ll taper the cowl further and make the placket narrower as it approaches the waistband, as this looked a bit wide for the overall size of the cardigan. And I’d use smaller buttons, but those were the model’s choice and he wasn’t open to negotiations. 🙂 )
I also made a version for my little guy that used the Boardwalk hood – I extended the binding around the hood all the way down to the waistband there, too, and that made a perfect placket for the hoodie.
Adding Elbow Patches to the Cardigan
And, hello ELBOW PATCHES!! Love them on everything and this was a great place for them. I used the applique templates that are included with the Grand Slam pattern (bonus!) and they were a great fit. (You’ll see the hearts on Miss P’s pink cardigan, too.)
Now, if you aren’t adding binding around the front edges of your cardigan, you’ll need to add a little extra width to make a placket (which will get folded back to make a finished edge). I added about 1″ to each side when I cut out my front bodice pieces. Here’s what I had:
You’ll notice in the picture above with the pattern piece that I shortened the bodice here – that was to account for the ruffle, which was cut to 3″ long for this cardigan. I wasn’t quite sure how long I wanted to make my ruffles, so I tried a few variations. The ivory cardigan below had a short ruffle that was approximately 1.5″, and the teal was cut to 9″.
Cutting Fabric for Your Cardigan
For all three of these cardigans I cut between 1-2 widths of fabric, ruffled them (I used my serger, but you can use your preferred method), and then just cut off the excess. The teal cardi was hemmed, but I left the ruffles raw on the ivory and pink ones. I love using interlock for cardigans because it’s a pretty stable knit, so it is easy to sew with and also won’t roll or curl up on you.
You’ll want to start assembling the cardigan per the pattern instructions – but make sure to add the elbow patches before you sew up the sleeve seams. It’ll be MUCH easier to topstitch them this way! I like to clip the cardigan closed and mark the patch placement by holding it up to my kid before ironing on the patch – I use Heat n Bond lite to adhere the patch and then topstitch with a fairly short straight stitch.
Then you’ll sew up the sleeve and side seams, and prepare your ruffle if you haven’t already.
You’ll want to pin (or clip – I love Wonder Clips and use them for everything these days) the ruffle to the bottom edge of the cardigan, right sides together. I found it easiest to leave the last inch unruffled on each end, as that will become part of the placket. Sew the ruffle to the cardigan, and press the seam up toward the bodice. Topstitch if desired.
Next, you’ll want to press your placket about 3/4″ toward the inside of the cardigan, from the neckline to the bottom of the ruffle, and add a small strip of interfacing if you’ll be using snaps or buttons to close your cardigan.
Topstitch the placket with a slightly lengthened straight stitch from neckline to where the ruffle meets the bodice, and then all that’s left is to bind the neckline and hem the sleeves. You can see that I scooped the front neckline a little lower than is indicated by the pattern piece, so I’ve got little “wings” at the top of the sleeves that I need to trim back a little. I actually like to do this for all of my Grand Slams (even the regular, non-cardigan shirts) as I have found that the neckband sits better and flatter for me this way.
There are a number of ways you can bind the neckline, but for this I decided to just do a narrow binding. I cut my binding strip to 2″ long x the width specified in the pattern, plus about an inch extra. If you’re using regular binding or something that has a lot of stretch you may not need to add much, but this interlock had little stretch. Pin/clip the binding to the neckline right sides together, and wrap the ends around to the wrong side about a half inch on both the left and right front bodices.
Serge (or sew – with a stretch stitch) the binding to the neckline, and press the seam allowance up.
You’ll notice that the ends that we wrapped around the placket form a nice finished edge here. Pull the binding up over the seam allowance, and wrap it over to the wrong side of the cardigan, pinning frequently to hold it in place. I use a long straight stitch to topstitch the binding since the cardigan won’t have to get pulled over my daughter’s head, and then just trim off the excess from the inside making sure not to cut through my topstitching.
Add buttons or snaps as desired (as you can see, my daughter wanted all of hers to have only 2 snaps at the top and have more of a “flyaway” look at the bottom), hem sleeves, and find a kiddo to make happy.
Sewing Raglan Sleeves | How to Make a Raglan Jacket
Hi, it’s Nienke from the Contributor Team, with my take onhow to sew a raglan sleeve jacket using the Grand Slam Tee! Inspired by the sporty raglan lines and by sheer necessity – our eldest is a dedicated gymnast, but often freezing during warming up – I made the Grand Slam into a sports jacket. It’s somewhat along the lines of the Happy Camper Reversible Jacket, but with raglan sleeves, obviously, and with my daughter’s favorite feature: thumb holes!
How to Sew a Raglan Sleeve Jacket
Starting from the long sleeve tee version of the Grand Slam, cut back bodice and sleeves as prescribed. However, cut the front bodice as two separate mirrored pieces, so not on the fold. Add 3/8″ seam allowance to the mid-front line as well. Sew these parts together as usual, along raglan seams and underarm/side seams. To create the standing collar, use the width of the neckband as called for in the pattern, plus twice the seam allowance of 3/8″ that was added to the front bodice parts. The collar piece should be twice the desired height of the collar, plus a total of 3/4″ for two seam allowances. I used 7″. With the right sides together, pin and stitch the collar onto the neckline, as pictured below.
Raglan Sleeve Jacket Zipper
Next on, the zipper! I used a 20″ separable zipper. To attach the zipper, pin it to one of the front bodice parts, right sides together. At the bottom start an inch from the bottom, ending at approximately 1/3 of the collar.
Using a zipper foot, stitch the zipper to the bodice. After zipping it up, pin the zip to the second bodice part, thus ensuring the seams of the collar match. I have a special talent for unmatching seams with zippers…. After carefully pinning and triple checking its position, stitch the second half of the zipper into place.
Then, fold the top part of the collar back down, with right sides together, so that the raw edge of the collar just passes the collar seam. Stitch along the edge, along the same seam you just made when attaching the zipper. After stitching both sides this way, clip the top corners to avoid bulk.
Turn the backside of the collar to the back again. The top of your zipper should look like the picture below now.
Pin the raw edge of the collar in place, so that it just covers the seam where collar meets bodice. Topstitch into place, working from the outside of the jacket, to ensure it all looks neat.
Use the same method to finish the zipper at the bottom, folding up the hemline, from the point where the zipper ends, right sides together. Stitch along the zipper seam and clip the corners. Then, turn the hem back to the wrong side of the fabric again. Pin it into place and stitch it down.
Raglan Sleeve Jacket Cuffs and Thumb Holes
To create the sleeve cuffs with thumb holes, you first need to decide on the sizing. Measure the bottom of the sleeve pattern piece, 3 3/4″ for my size, then take 80% of that amount. For this one it came to 3″. However, on hindsight, it would have been more convenient when creating the thumb hole, to add some extra seam allowance. This 3″ (plus some extra seam allowance if you like) is the width of your cuff pattern piece, to be cut on the fold, just like the original sleeve pattern piece. The heigth is calculated just like on the collar: twice the desired heigth, plus twice your seam allowance. I used a 6″ heigth.
Cut two cuffs, on the fold. Then fold them in half, along the fold you used when cutting, right sides together.
Find the center of the side seam, pictured below.
Measuring from the center, mark the desired thumb hole. I started half an inch from the center, leaving an opening of one inch after that. However, the hole is a bit narrow. If you’re an organised sewist, use some chalk or other marking tool. My markers are always confiscated by the kids, or they like to run off by themselves, so I just marked with pins.
Now sew from one corner to your first marking, then skip the designated hole and continue sewing at the next mark. Skip the next hole again and finish towards the corner again. Make sure to secure your stitching by going back and forth a few stitches at the beginning and end of your seams.
Now fold your cuff in half, wrong sides together, as pictured below. The holes should be right on top of eachother.
Topstitch along the hole, to make sure your kid doesn’t get caught in between the layers. Here the extra seam allowance would be useful, my small seam allowance kept peeking out of my “button hole”.
Attach the cuff onto the sleeves, matching up the seams.
And you’re done!
Well – you might be all raglaned out now. I hope you enjoyed this sewing raglan sleeve tutorial. Hopefully, you’ve learned both how to sew raglan sleeves and some different applications for your knowledge. As always, come visit us in the Peek-a-Boo Pattern Shop Facebook Group to share what you make and ask questions. If you enjoyed this article, then check out some of these too: