Sewing Marking Tools | A Comprehensive Guide
A wise person once said, "Measure twice, cut once." This is especially true in sewing, where precision and sewing marking tools are crucial. Marking tools help you accurately transfer pattern markings onto fabric, ensuring your finished product looks as good as the original design.
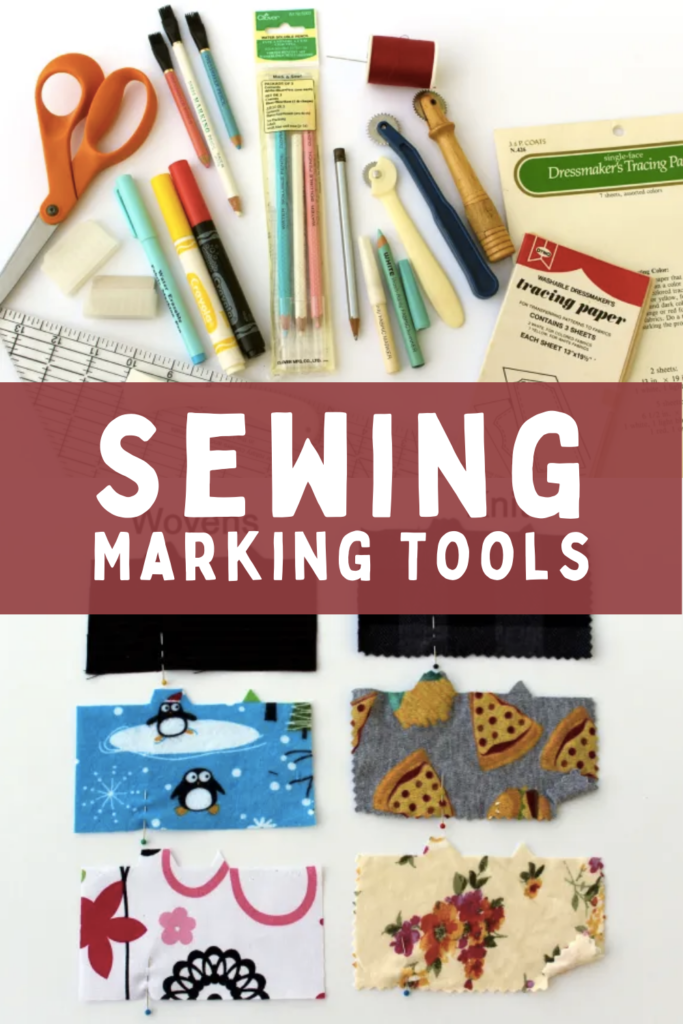
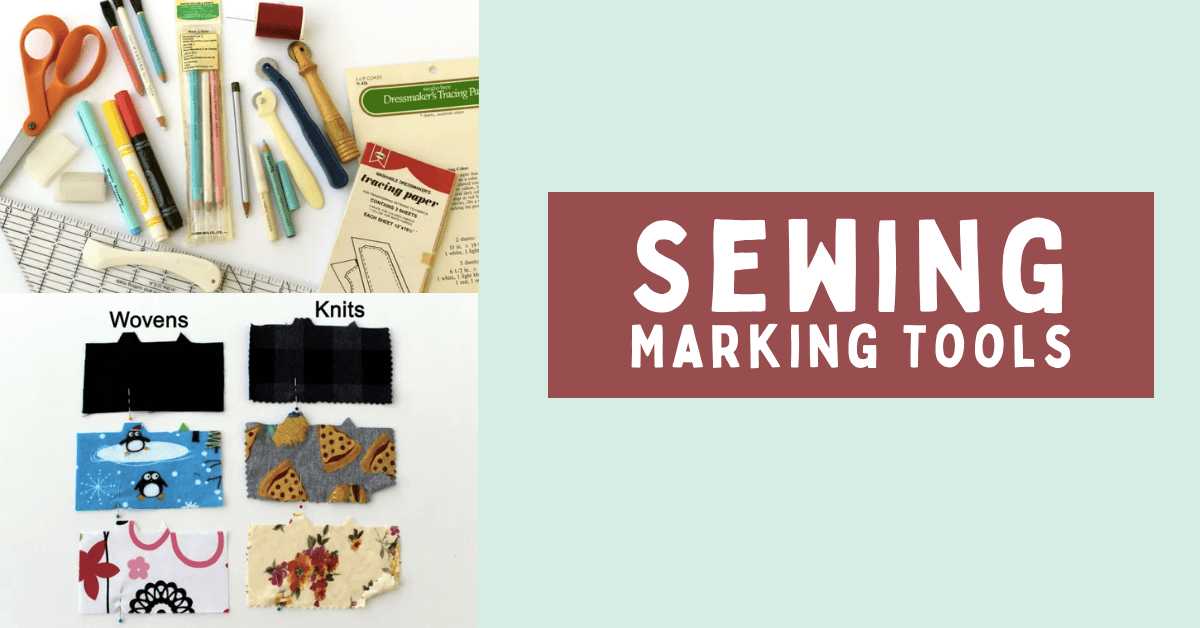
A long-time sewist is bound to have a handful of sewing or fabric marking tools in their arsenal of supplies. A beginner may be unclear about where to start and how to invest their money. However, this post will cover all of the different types of sewing marking tools, how to mark fabric, and samples of what they look like on fabric. Each different type of fabric marking technique includes the pros and cons along with a conclusion on its best uses.
Guide to Sewing & Fabric Marking Tools
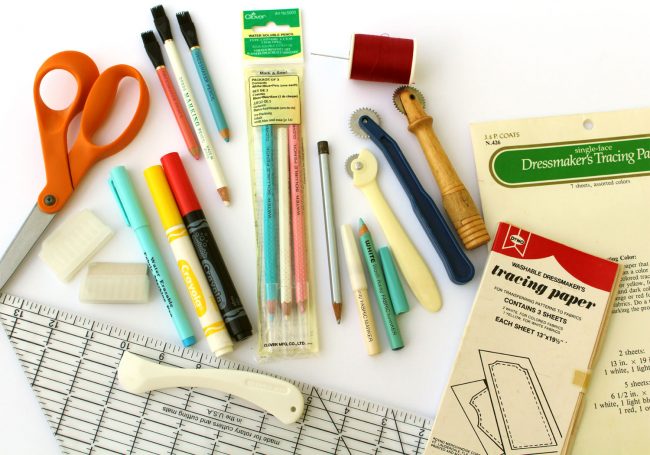
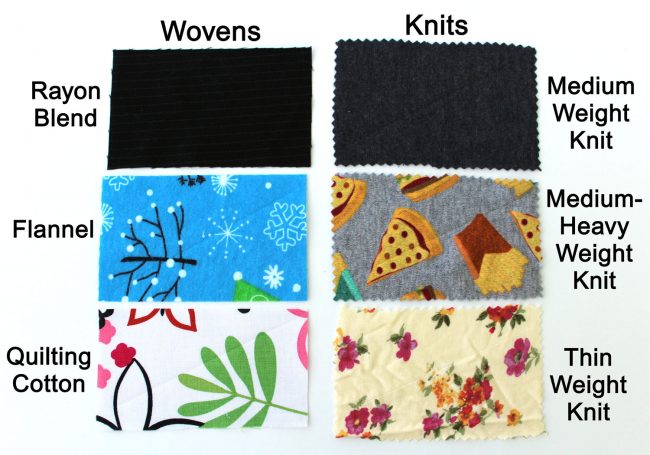
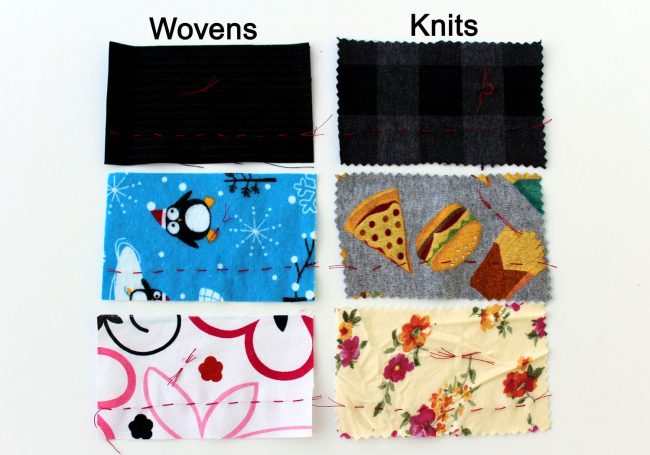
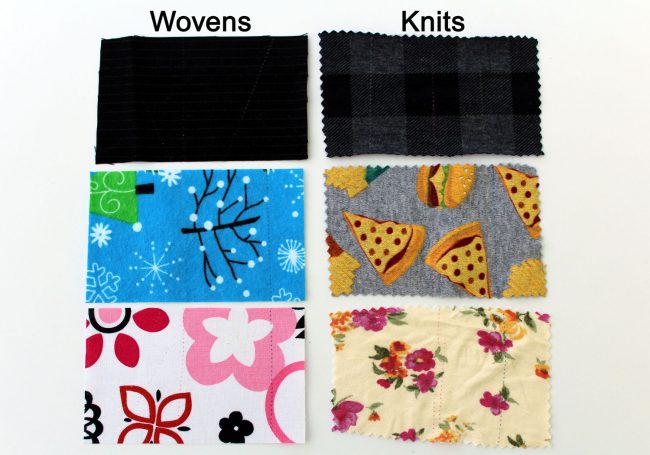
A note about the fabric samples: I cut 6 pieces of fabric, 3 woven and 3 knit. Each set has a dark, medium and light colored fabric. On the first example photo I labeled the fabric types. The wovens include a rayon blend, flannel and quilting cotton.
The knits include a variety of cotton jerseys, a medium weight, a medium-heavy weight and a thin (almost tissue) weight. Using each sewing marking tool I attempted to mark each fabric sample identically and in the same spot and direction. The results will be found underneath each corresponding photo.
Fabric Marking Tools Technique 1: Hera Marker
A Hera Marker is a plastic tool that makes a “line” on the fabric by creating a very fine crease. You hold the tool in your hand similar to how you hold a rotary cutter. Next, using a ruler rub the tool along the ruler edge, marking the fabric with a faint line. Sometimes you have to go over the line multiple times.
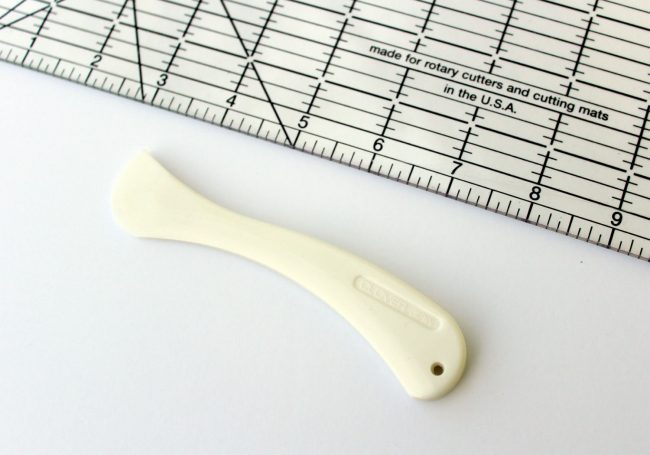
Pros: Fast to use. Disappears after washing and sometimes just fades on its own. Can be used to mark top stitching lines.
Cons: Hard or impossible to see on some fabrics. Can distort the fabric, especially on the bias. Sometimes hard to find this tool in stores. This method would not work on velvet or chunky knits.
Hera Marker Samples
Wovens: Impossible to see on the dark (I literally could not find the line.) The medium colored is a bit better and if you look you can faintly see it on the diagonal. You can see the line clearly on the light quilting cotton.
Knits: Difficult to mark all of the knits. Hard to see on the dark knit. It showed up on the medium colored sample. Impossible to see on the light colored knit.
Conclusion: The Hera marker is best used on quilting cottons and stable wovens. It is not the best choice for knits, but does work better on stable knits.
Marking Tools Technique 2: Marking Fabric with Notches and Pins
Notches and pins are one of the simplest fabric marking tools. You either mark with a sewing pin or using scissors cut a notch in the fabric. Notches can be cut into the seam allowance or a notch can be cut on the outside of the seam allowance.

Pros: Quick and uses the tools you already have on hand. Notches on the outside of the seam allowance are hard to miss. Pins are easy to see.
Cons: Pins can fall out. Not very accurate. It can be difficult to mark a dart with just pins and notches, though it can be done. Limited uses. Can compromise a seam if you cut into the seam allowance.
Notches and Pins Samples

Wovens: Easy to see the outer notches and pins in all the samples. The notches (or cut lines) into the seam allowance are difficult to spot and easy to forget about.
Knits: Easy to see the outer notches and pins in all the samples. The notches (or cut lines) into the seam allowance are difficult to spot and easy to forget about. I folded back the fabric on the bottom two right samples so that you could see where the notches were cut into the fabric.
Conclusion: If your pattern has minimal markings, my preferred method is marking with outer notches and pins. It is fast and uses the tools you are already using.
Sewing Marking Tools Technique 3: Marking Fabric with Chalk and Soap Slivers
There are lots of different types of chalk marking tools to keep in your sewing room......tailor's chalk, school chalk sticks, chalk pens, chalk pencils, chalk marker, chalk wheels, chalk cartridges, etc. Tailor’s chalk is sold in square/rectangle blocks or circular/triangle shapes and is usually in some form of plastic storage case with various colors - red chalk, yellow chalk, etc. School chalk is sold in packs and is fairly easy to find in different colors.
I bet we all have some of those soap slivers laying around in the shower. All three are used basically the same, drawn directly on the fabric. Tailor’s chalk can be sharpened, my example below shows the sharpener (gold metal piece) on top of the storage container. School chalk can be easily sharpened also. Also, soap can be carved into shape.
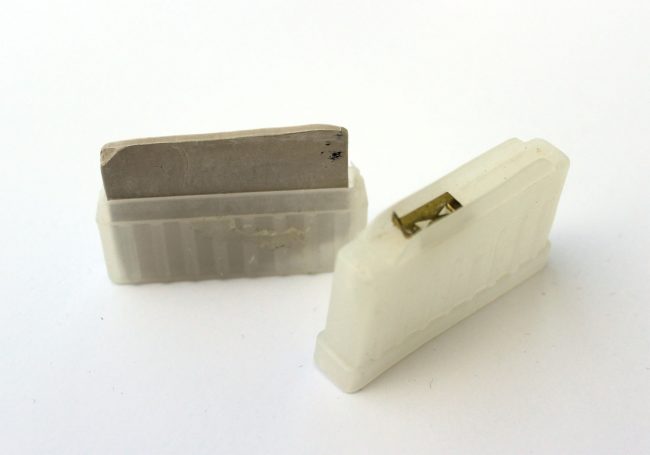
Pros: Washes away easily. Fairly accurate. Soap slivers are virtually free. Tailor’s chalk and school chalk are inexpensive. Glides smoothly on the fabric.
Cons: May wipe off during construction of garment. It typically comes in white only so it is hard to see on white fabrics. The soap slivers can leave chunks of soap on the fabric. Soap and school chalk are messy on your hands and both break easily. Wouldn’t work well on chunky knits.
Chalk and Soap Slivers Examples

I didn’t have school chalk, though I think the markings would be similar to the tailor’s chalk. The soap markings are to the left on each sample and the tailor’s chalk is on the right.
Wovens: You can see the soap and tailor’s chalk clearly on both the dark and medium, though the soap doesn’t create a neat or fine line. Both are visible on the light fabric, though the soap line is harder to see. Surprisingly the tailor’s chalk showed up rather well on the white.
Knits: Plain to see on the both the dark and medium fabrics. Impossible to see on the light fabric. All were easy to mark. You can see on the dark sample the soap left some chunks and it isn’t a neat or fine line.
Conclusion: I personally think tailor’s chalk is great for marking a variety of fabrics. It is inexpensive and lasts a long time. I was also surprised by the soap sliver and would totally use that if I couldn’t find my tailor’s chalk.
Sewing Marking Tools Technique 4: Tailor’s Tacks
Thread, needle and scissors are all you need for this sewing marking tool. You can use any color of thread, though I find red a good choice because it is easy to see. Use a large running stitch on the fabric to mark long lines. To mark dots put the pattern down on the fabric and sew through both the pattern and both layers of cut fabric, thus marking all at once.
Typically dots are marked by threading the needle with doubled thread and taking a small stitch, leaving a tail. No need to knot the thread. Take another small stitch in the same spot and leave a loop of thread. Cut the thread leaving a tail. Carefully pull apart the two layers of fabric, cutting the thread in between. Cut the loop on the pattern side and carefully pull off the pattern leaving the threads in the fabric.
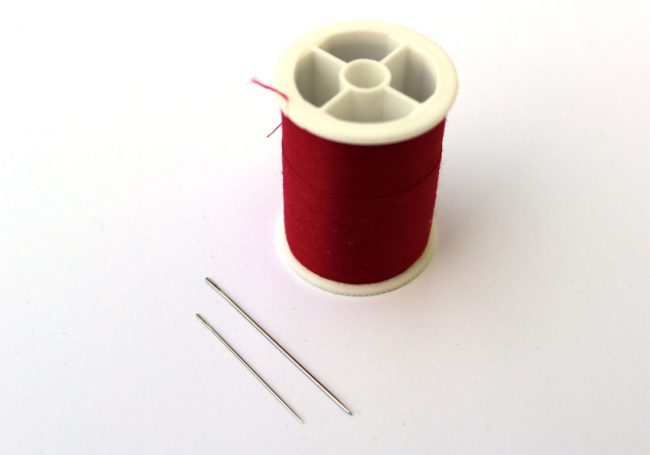
Pros: Very accurate. Does not stain. Can mark both sides of the fabric at the same time. Uses tools you already have on hand. Inexpensive. Very easy to see as you can choose your thread color.
Cons: Can be time consuming. Have to remove the threads when finished. You may have to use another marking tool to know where to stitch lines. The threads can end up being pulled out, thus losing the marks.
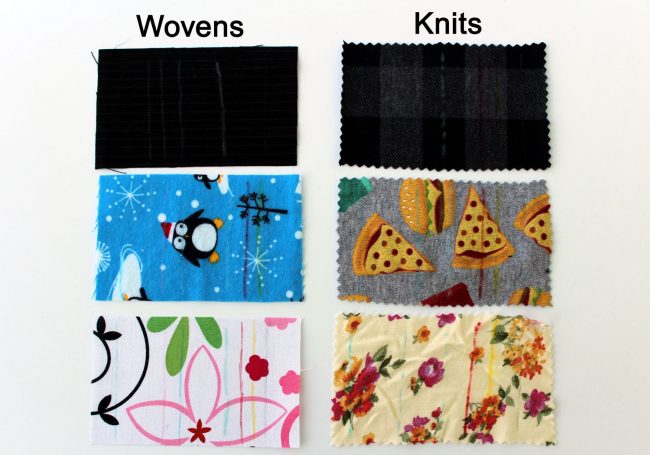
Tailor’s Tacks Samples
Wovens: Easy to see and stitch on all three samples.
Knits: Easy to see and stitch on all three samples.
Conclusion: One of the best methods for marking jeans. Perfect for chunkier knits and hard to mark fabrics. Overall this is one of the best methods for marking fabrics, though it is a slower technique.
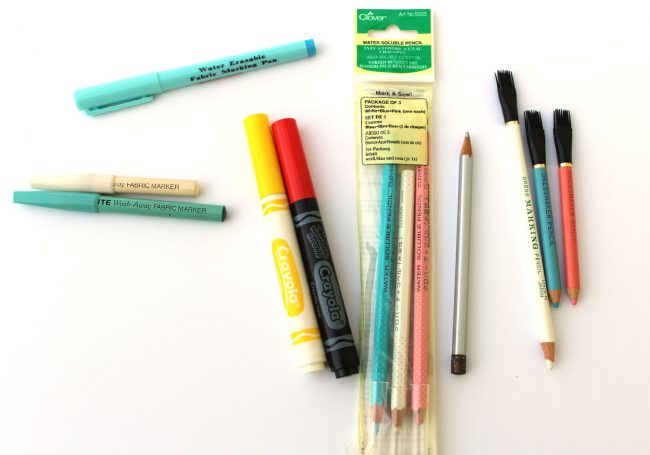
Sewing Marking Tools Technique 5: Marking Fabric with a Pen or Pencil
A variety of marking pens and pencils are currently available as sewing marking tools. Each with their own set of pros and cons. I’ll break them down into three basic categories:
- Pens: Water erasable pens (usually blue,) Iron/heat removable (usually purple,, disappearing over time ink and Frixion Erasable Gel fabric marking Pens that are removable with iron/heat.
- Pencils: Silver Quilters pencil (washes/rubs out,) Water soluble (comes in a variety of colors like blue, white and pink,) Dressmaker pencils with brush erasers.
- Markers: Crayola washable school markers, Specialty fabric markers, Fine Tip Soluble Markers, etc.
Pros: Easy to use. The Crayola marker glided with ease on all of the fabrics. The pencils last a long time. Easy to store and maintain (just sharpen the pencils.)
Cons: Difficult to draw/write on the knits, with the exception of the Crayola marker. The pens tend to run out quickly or dry up. Both the iron removable and water removable pen lines sometimes come back, making them hard to remove. Sometimes the pencil marks don’t wash out easily. None of these would work on chunky knits.
Pens and Pencils Samples
I don’t own an iron/heat removable pen or a Frixion pen, so they weren’t included in this test. On my samples, I drew lines with each pen/pencil/marker in this order from left to right: Water erasable blue ink pen, Dressmaker pencils with brush erasers in white, pink and blue, Water soluble blue pencil, Crayola washable school marker in red and yellow, Silver Quilter’s pencil.
Wovens: All of the lines show plainly on the light fabric with the exception of the white Dressmaker pencil. All of the lines show fairly well on the medium fabric with the exception of the Water erasable blue ink pen but that fabric is blue. The dark fabric didn’t fare as well. The Water erasable blue ink pen and Crayola markers didn’t show at all. The Dressmaker pencils and Water soluble pencil show very clearly.
Knits: All of the lines show plainly on the light fabric with the exception of the white Dressmaker pencil. Around half of the lines showed on the medium fabric. The white and pink Dressmaker pencil did not show. The Water soluble blue pencil barely shows and the Silver Quilter’s pencil does not show. All of the lines show on the dark fabric with the exception of the Water erasable blue ink pen.
Conclusion: Pens, pencils and markers all have their place and for marking a dot or darts on woven fabric, most of these work well. It really is a matter of personal choice and picking the right color pen/pencil to fabric color. Surprisingly to me the Crayola markers worked remarkably well on all of the samples.
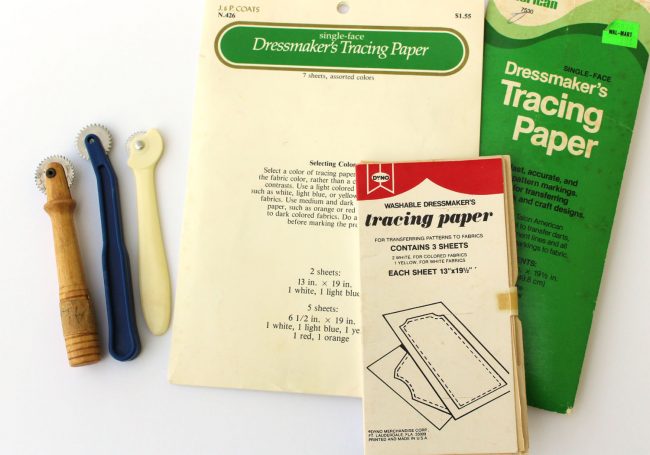
Sewing Marking Tools Technique 6: Dressmaker’s Tracing Paper and Tracing Wheel
Dressmaker’s Tracing Paper is usually sold in packages that include several colors: white, yellow, blue, red or orange. These papers are used in conjunction with a tracing wheel as the sewing marking tool. One side of the tracing paper is coated with the coloring and the back is usually white. Tracing wheels can be a smooth metal disk or a serrated metal disk with a wooden or plastic handle. The dressmaker’s tracing paper is sandwiched either between the pattern and the fabric or folded with coated side out and sandwiched between the two layers of fabric (marking at the same time.) The tracing wheel is then rolled over the pattern markings, thus pressing/transferring the colored dots or lines onto the fabric.
Pros: Accurate. Doesn’t rub off. Great for darts or when you need to mark a lot of things. Can mark both sides of fabric at the same time. Can reuse papers for a long time.
Cons: Slow, takes more time. Hard to remove marks, must follow directions exactly to remove the marks. Can be hard to see. The tracing wheel tends to distort knit fabric. Doesn’t work with chunky knits.
Tracing Paper and Tracing Wheel Samples
I made lines on all the examples using white, yellow, pink and dark blue.
Wovens: Hard to see white and yellow on the light fabric. Pink is visible on the light and the dark blue is obvious. Yellow is hard to see on the medium fabric. Pink, white and dark blue are visible. White, yellow and pink are visible on the dark fabric. Dark blue was not.
Knits: White and yellow are not visible on the light. Pink and dark blue are visible on the light. Pink and dark blue are the only visible ones on the medium fabric. White, pink and yellow are visible on the dark, the dark blue was not.
Conclusion: Great for wovens, the variety of colors ensures that you will find one that will show up on the fabric. Accurate. The greatest downfall to me with this product is the difficulty in removing the lines, especially when they don’t just come off in the wash. Not necessarily a great choice for knits, though it does work.
There you have the sewing marking tools.
How to Choose the Right Sewing Marking Tools for Your Sewing Project?
To choose the right marking tool for your sewing project, consider the fabric type, visibility, removability, personal preference, and comfort level. Go through the list above and find the perfect tool for your sewing needs.
Hopefully this post has taught you something you didn’t previously know in the world of sewing marking tools. A variety of these tools give great results for marking a piece of fabric. Make sure to use some scrap fabric to start. Do you have a favorite tool or technique that wasn’t mentioned here? Leave a comment and let me know! If you need more help, or would like to share your project, come join the Peekaboo Pattern Shop Facebook Group! You can also follow us on Instagram or join our email newsletter below. Happy Sewing!