How to Use a Sewing Machine | A Beginner's Guide
For today's project we're going to learn how to use a sewing machine. This is our thing here at Peek-a-Boo Pattern Shop. Whether you're into quilting, decor, or making clothes like us, you need to learn how to use a sewing machine. Now, if you need to learn the parts of a sewing machine, you’ve come to the right place – our Sewing Machine Guide. These machines have come a long way in the industry over the years. To think that hand sewing was just a normal part of life for so many centuries to where we are today with modern machines (computerized even). Speaking of sewing machines, we have a whole post on everything Sewing Machine – check it out.
The period during the Industrial Revolution gave way to the machine advancements we currently have today and continue to improve upon. Thanks to this pivotal moment in history, sewing enthusiasts alike can complete more projects today, faster, in shorter amounts of time. Let’s take a look into what makes our machines work.
Your machine may or may not look like mine, but most of the parts will also be on your machine (You may even have additional gadgets if your machine is more advanced). This guide aims to help you identify the basics so you can begin your sewing journey immediately. If you're looking for more tips and tricks, be sure to check out our blog for additional resources.
What are the basic components of a sewing machine and how do they work?
The basic components of a sewing machine include the needle, bobbin, presser foot, and feed dogs. The needle carries the thread through the fabric while the bobbin holds the bottom thread. The presser foot holds the fabric in place, and the feed dogs move the fabric forward as you sew.
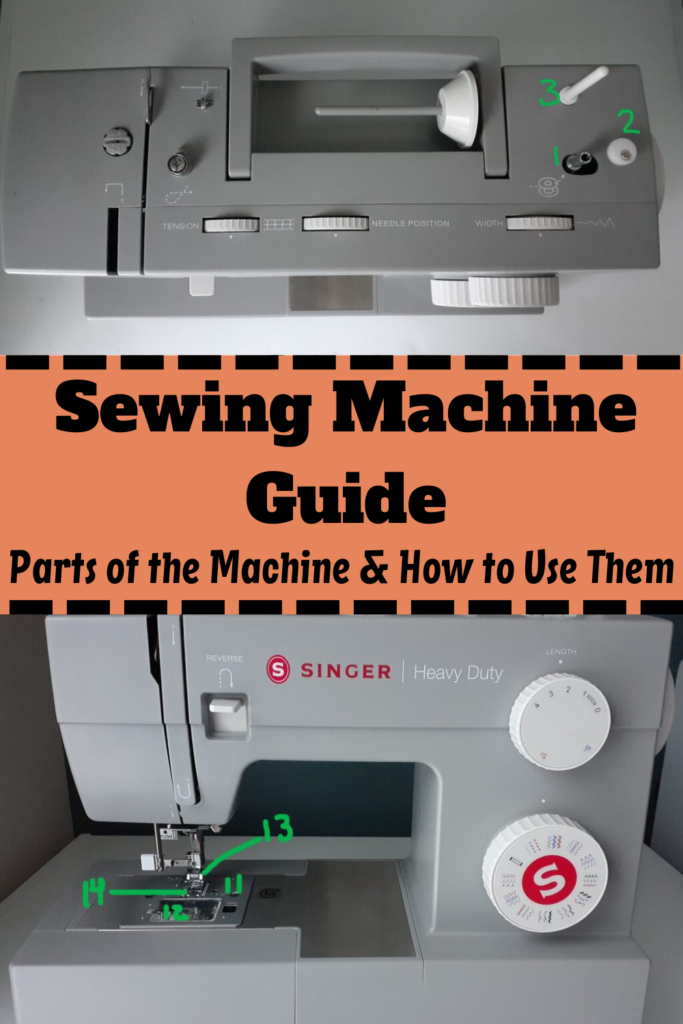
Getting Started: The Basic Parts of a Sewing Machine
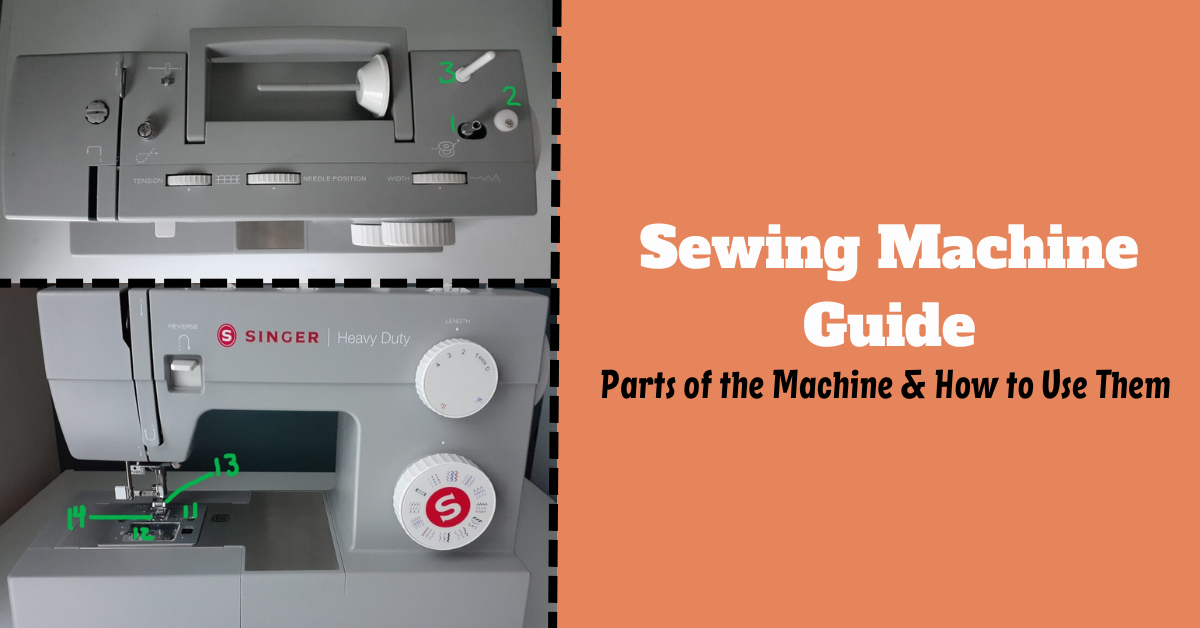
If you are going to learn how to use a sewing machine, you need to know the sewing machine parts. They include the following (labeled below):
- 1. Bobbin Winder: Typically located on the top right of the machine. You place your emty bobbin case onto the silver metal piece, slide it to the right and allow the thread to wind around until complete.
- 2. Bobbin Stopper: The bobbin stopper tells the machine when to stop winding the thread by allowing the newly filled bobbin case to run into it and stop once full.
- 3. Vertical Spool Pin: Holds your spool of thread upright as you sew. Excellent for larger spools of thread.
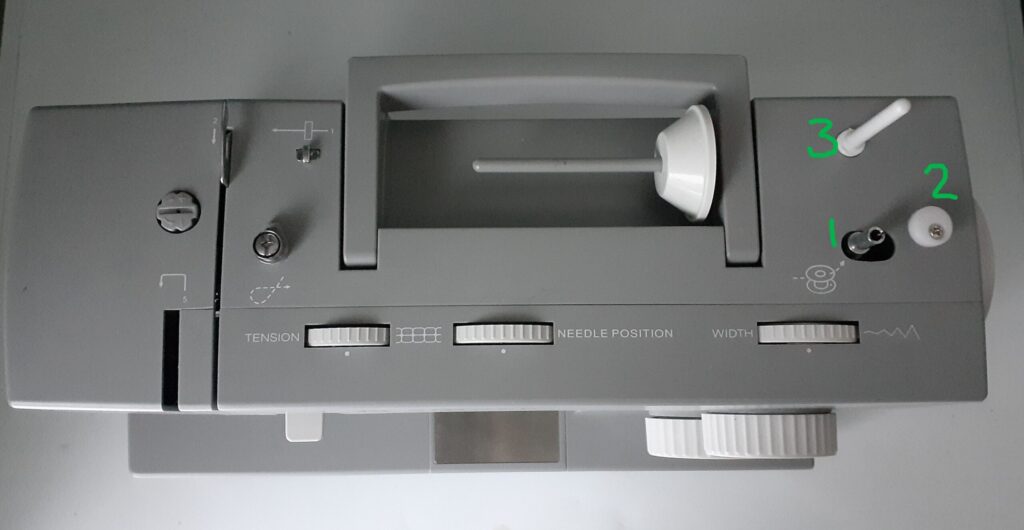
- 4. Hand Wheel: This wheel on the side of the machine manually lifts your needle up and down by using a hand. Located on the side of the sewing machine. (Usually, the right).
- 5. Buttonhole Stitch Balance Adjustment Slot: Controls the width or narrowness of your buttonhole stitching when creating buttonholes. Allows you to turn the dial accordingly.
- 6. Light and Power on Off Switch: Responsible for turning the machine on and off. Also controls the power to the light bulb inside of your machine. Just flip the switch on or off with your finger.
- 7. Main Plug Socket: The port in which you would plug your cord into that operates the foot pedal and the machine. You will find 3 metal prongs inside the machine that connects to the pedal cord. Keep it plugged in a while in use. Unplug it after use for safety and storage.
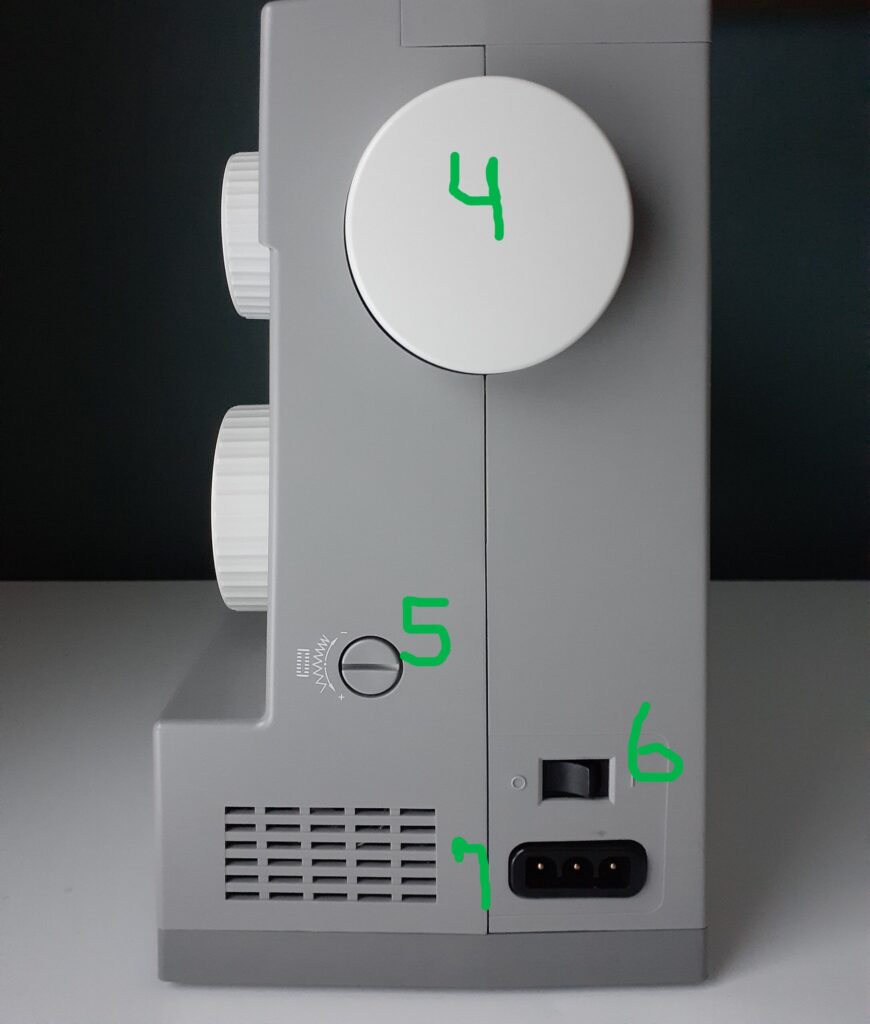
- 8. Stitch Length Dial: Controls the length of your selected stitch. The bigger the number the wider your stitch will be. The smaller the number the narrower the stitch.
- 9. Pattern Selector Dial: A dial with built-in stitch patterns to choose from, such as a straight or zigzag stitch for example. Your project and the fabric base usually dictate which stitch to use for your seams. You may use a decorative stitch for topstitching to add an excellent detail.
- 10. Reverse Lever: Press the reverse lever and hold down to sew in reverse. Release to continue going forward. Important for locking in your beginning and ending stitches.
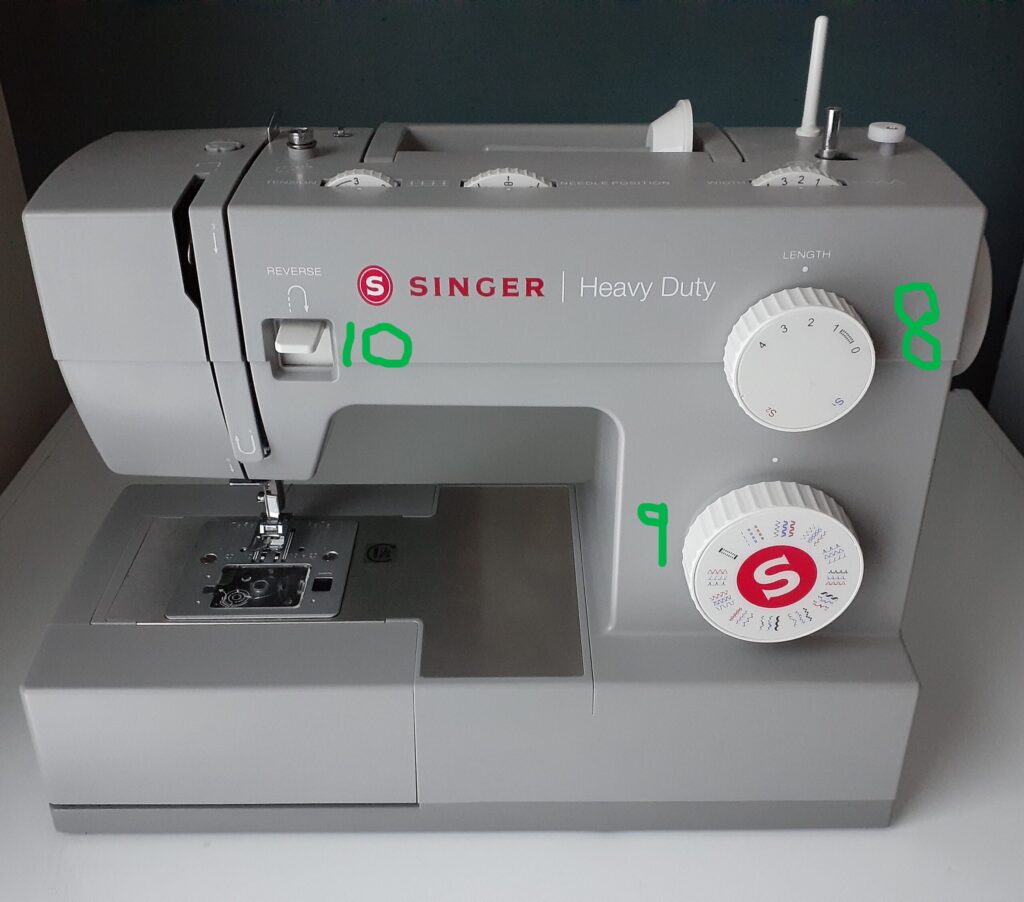
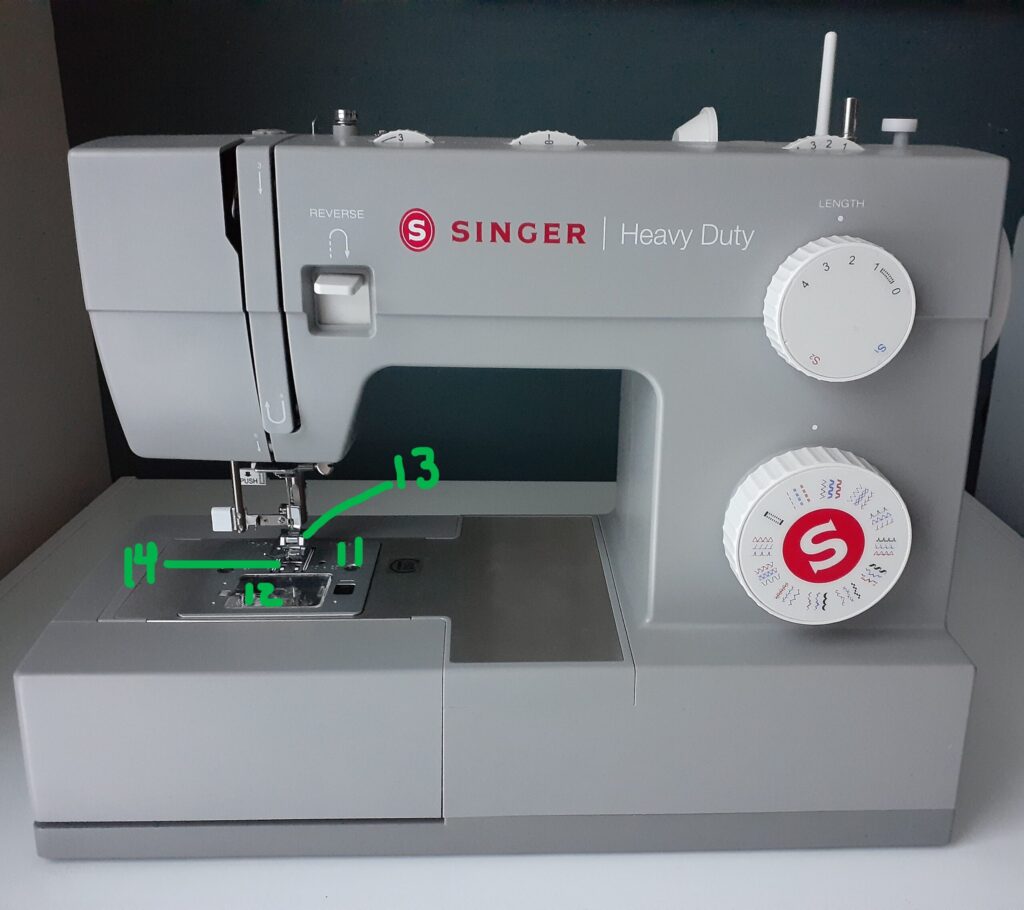
- 11. Needle Plate: Allows the fabric to move forward as you sew. Located right underneath the sewing machine needle and presser foot. Remove this plate for a thorough cleaning of your machine as needed. Lint likes to collect here!
- 12. Bobbin Cover: Protects the bobbin by covering it. There is a press release button that opens it up as needed for refilling your bobbin case and cleaning.
- 13. Presser Foot: Holds your fabric down in place as you sew. There are many different kinds of machine feet available to help assist you in completing your projects more smoothly. Use the specific type made for your machine brand and model.
- 14. Feed Dogs: Metal teeth gently feed your fabric through as you sew.

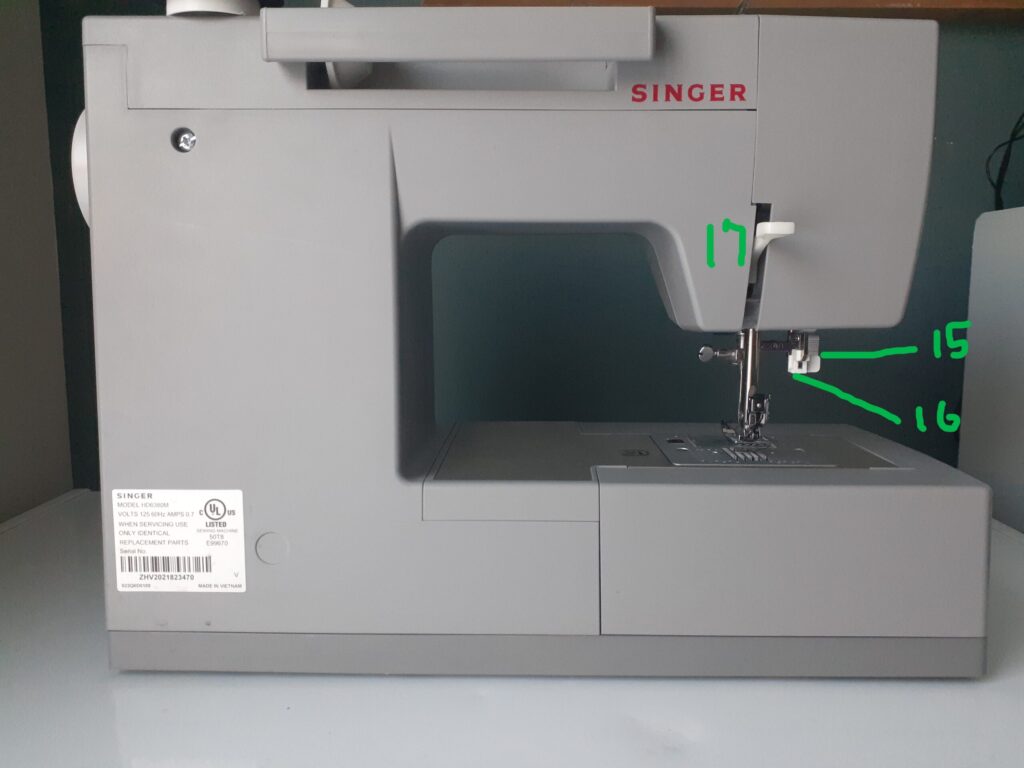
- 15. Automatic Threader: The mechanism that assists you in threading the needle for you. Raise the needle to its highest position. Hook the thread under the thread guide. Pull down the needle threader all the way and pass the thread through into the hook. Release the threader to pull the thread through the eye of the needle and pull your thread through.
- 16. One Step buttonhole Lever: A built-in one-step feature that allows the buttonhole foot to measure your button and produce the same results each time with better accuracy.
- 17. Presser Foot Take-Up Lever: A lever that lifts the presser foot up and down. Raise the lever up for threading and removing your fabric. Lower the lever down to secure the fabric as you sew.
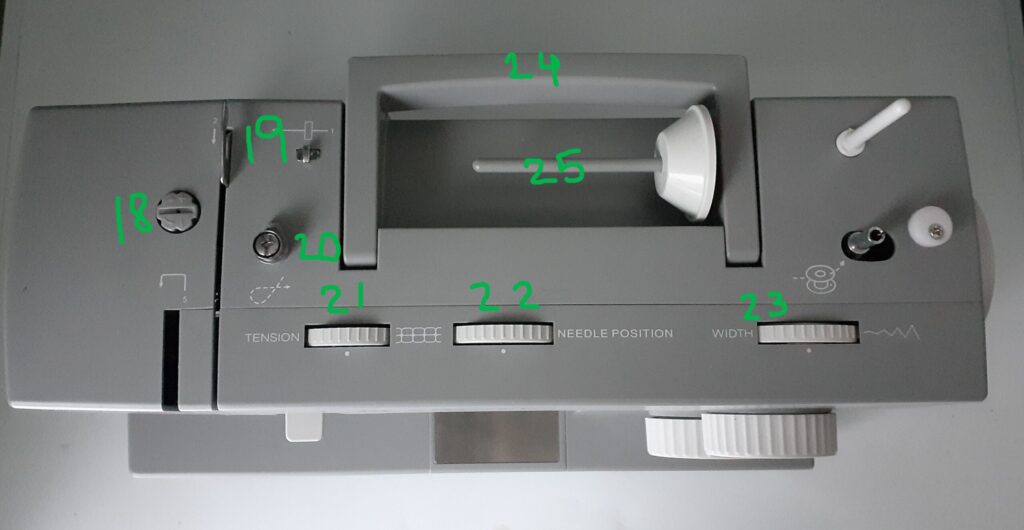
- 18. Presser Foot Presser Adjustment: It allows you to adjust the downward pressure in reference to the type of fabric being fed through. The plus direction will tighten it, and the minus will loosen.
- 19. Upper Thread Guide: A guide that assists you in how to properly thread your machine in order numerically and/or with arrows. Follow the arrows and numbers for threading your needle. If you’re ever having an issue with your machine, rethread this part step by step and it may solve the problem for you.
- 20. Bobbin Thread Guide: A guide used to assist the thread direction around the pretension disc for aiding in the filling of an empty bobbin case with thread. Just like the step above, follow the arrows or numbers on your machine as a step-by-step guide.
- 21. Thread Tension Dial: Controls the amount of tension on the thread. You won’t be able to get proper tension if your machine is not threaded properly. Also, if your machine has lint in the tension disc’s, it will also have an impact on your tension as well. With that being said, balance is key! Not too tight and not too loose. Different fabric bases will require more or less tension. I always test on scraps to the same fabric I will be using for said project before beginning for this reason.
- 22. Three-Needle Position Dial: It allows you the choice to move your needle position to the left, right or center depending on your project needs. This can come in real handy for smaller seam allowances for example.
- 23. Stitch Width Dial: Controls the width and narrowness of the zigzag stitch.
- 24. Handle: Used for lifting and transporting on the top of your machine.
- 25. Horizontal Spool Pin: Holds your spool of thread horizontally.
I hope this post has helped to enlighten you as to which parts function, when and why, and how learning your machine will help you to make the best decisions for your projects. Understanding the basics will give you a head start of figuring out how to sew.
Getting Ready to Sew: Thread Your Sewing Machine
To prepare your machine, follow the step-by-step guide in the instruction manual. Begin by plugging in the power cord and switching on the machine's power switch. Next, attach the presser foot to the machine, ensuring it is securely in place. Now, it's time to thread the machine. You have to locate the spool pin and insert a spool of thread onto it.

Make sure the bobbin is wound correctly according to the instructions and place it in the bobbin case, adjusting the bobbin tension as needed.

Lastly, thread the upper end of the thread through the machine's threading path, following the designated path indicated in the instruction manual.

OK....maybe we made it seem a little easier than it is sometimes. Luckily, we have a tutorial on How to Thread a Sewing Machine.
The Art of Winding and Threading the Bobbin
As shown above, winding the bobbin is an essential, but sometimes problematic, process. To wind the bobbin, begin by placing the thread spool on the spool pin and securing it with a spool cap. Guide the thread through the bobbin winder tension knob, ensuring that it is properly aligned.
Next, wind the thread around the bobbin several times, making sure it is evenly distributed. Place the bobbin on the bobbin winder, ensuring it is snugly fitted. Push the bobbin winder to the right to engage the winding mechanism and start winding. The machine will automatically stop when the bobbin is full, so you don't have to worry about overfilling it.

Once the bobbin is wound, trim the excess thread and carefully remove the bobbin from the winder. It's important to note that different sewing machines may have slight variations in the winding and threading process, so it's always a good idea to consult your machine's instruction book. Again, if you're having trouble, check out our post on How to Thread a Bobbin.
Starting the Sewing Process
Essential Supplies / Fabric for Beginners
If you don't have the right supplies, you aren't going to get very far. Every sewist should have a wide variety of tools, including machine needles, thread colors, and textiles. When it comes to fabric, if you're making clothing, you should have a wide variety of apparel fabric available in your stash. From cotton lycra to quilting cotton, double-brushed poly, and more. You can make something for every season. We provide a detailed Apparel Fabric Guide for our sister site KnitFabric.com so you can see exactly what you need for every project. Here's a preview:

Additional Supplies
Sewing Feet
It's beneficial to purchase additional presser feet for specialized techniques to enhance your skills and expand your capabilities. These attachments can help you achieve professional finishes and add versatility to your projects. We also have a good post on Here if you are interested in these more advanced items - we'll show you how to use the Zipper Foot, Walking Foot, Rolled Hem Foot, Blind Hem Foot, and more.

Seam Ripper for The Rogue Stitch
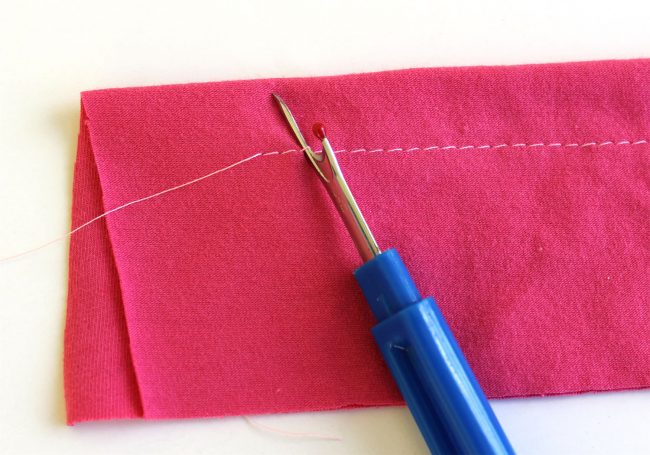
Lastly....mistakes happen when learning something new. They have for us. They especially happen for beginners. A good seam ripper is an invaluable tool for quick and easy fixes. With a trusty seam ripper, you can undo stitches and start again with ease.
Techniques to Start Sewing a Seam
To begin a seam on a sewing machine, start by aligning the edge of your fabric with the seam allowance guide on the needle plate. This ensures that your stitches will be placed at the correct distance from the edge. Once aligned, begin with a straight stitch, keeping the fabric flat and taut as you guide it under the presser foot. Use the foot pedal to control the speed of the machine, starting off slowly if you're new to sewing.
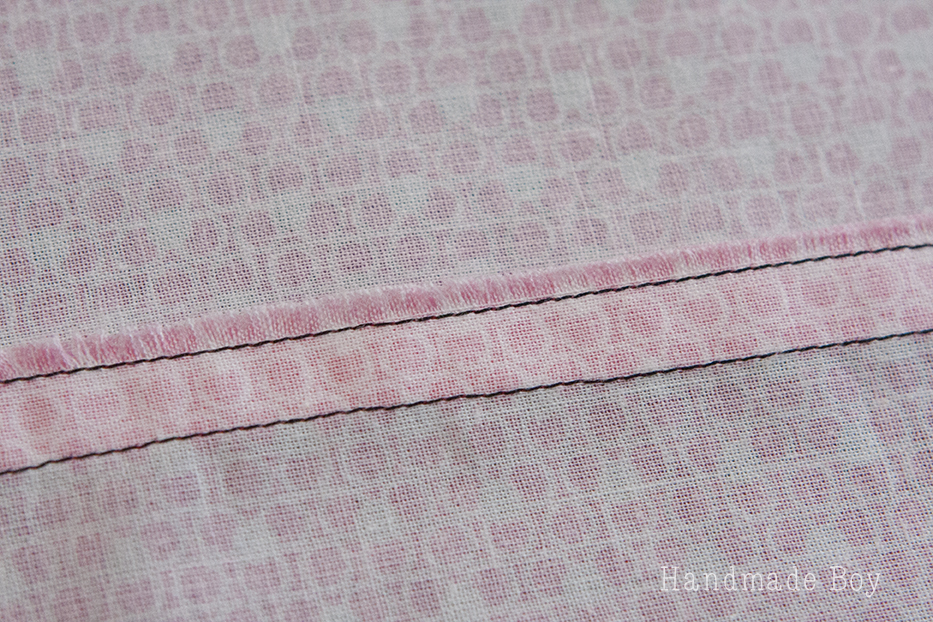
As you sew, practice maintaining a straight line and achieving even stitch lengths. This will help create professional-looking seams. Remember to backstitch at the beginning and end of each seam for added reinforcement. Backstitching involves making a few stitches in reverse before continuing forward to secure the seam. It prevents the thread from unraveling and adds strength to the seam. Once you get the basics down, move on to a variety of other seams. We have a post on 11 Ways of How to Sew Seams in Your Projects.
Common Challenges Faced by Beginners
Beginners often encounter common challenges when using a new machine. One common issue is tension problems, leading to uneven stitches or puckering fabric. To overcome this, you can adjust the thread tension dial on the top of the machine.

Another challenge is thread bunching, which can be resolved by rethreading the machine and ensuring proper bobbin placement. Skipped stitches are also a common problem, usually caused by using the wrong needle for the fabric. By choosing the correct needle, you can overcome this issue. Jamming is another frustrating challenge, but it can be solved by cleaning the bobbin area and removing any tangled threads. If you continue to face persistent issues, seeking guidance from a repair shop is recommended. Remember, these challenges are common among beginners, and with practice and patience, you can overcome them.
Doing Buttons with Your Machine?
When learning how to use a sewing machine, you'll undoubtedly come across buttons. Sewing buttons with your machine is a quick and convenient way to attach buttons to your garments. Most modern machines come with a buttonhole foot that allows you to easily create buttonholes of various sizes.

To sew a button, start by selecting the appropriate stitch on your machine, typically the buttonhole stitch. Place the button in the buttonhole foot and lower the presser foot. Align the fabric under the foot and slowly lower the needle into one of the holes of the button. Hold on to the thread tails as you begin sewing, making sure that the needle goes in and out of each hole several times to secure the button in place. Once you have completed all the holes, raise the needle, lift the presser foot, and remove your garment from the machine. Doing buttons with your machine is not only efficient but also ensures that they are securely attached for long-lasting wear.

Knit Fabric with a Sewing Machine
You might have noticed that we are pretty into knit fabric here at Peek-a-Boo Pattern Shop and KnitFabric.com. As I'll mention below, we love using sergers for knit fabric but you can also learn how to use a sewing machine to sew knit fabric. We realize that many of our beginner sewists will start out with their regular machines before upgrading to a serger, so here are a few tips:
- Get the Proper Needle: Use a Ballpoint needle for Stretch Fabric
- Thread: Use Spun Polyester Thread
- Feet: Experiment with a Teflon Foot
- Stitches: Use something more than just a straight stitch. Try your zig zag stitch, triple stitch, or lightning bolt stitch.
- Hemming: If you are hemming, then you can use a double needle.
Check out our post on Sewing Knit Fabric if you are interested in exploring this topic a little further.
Embarking on Your First Project
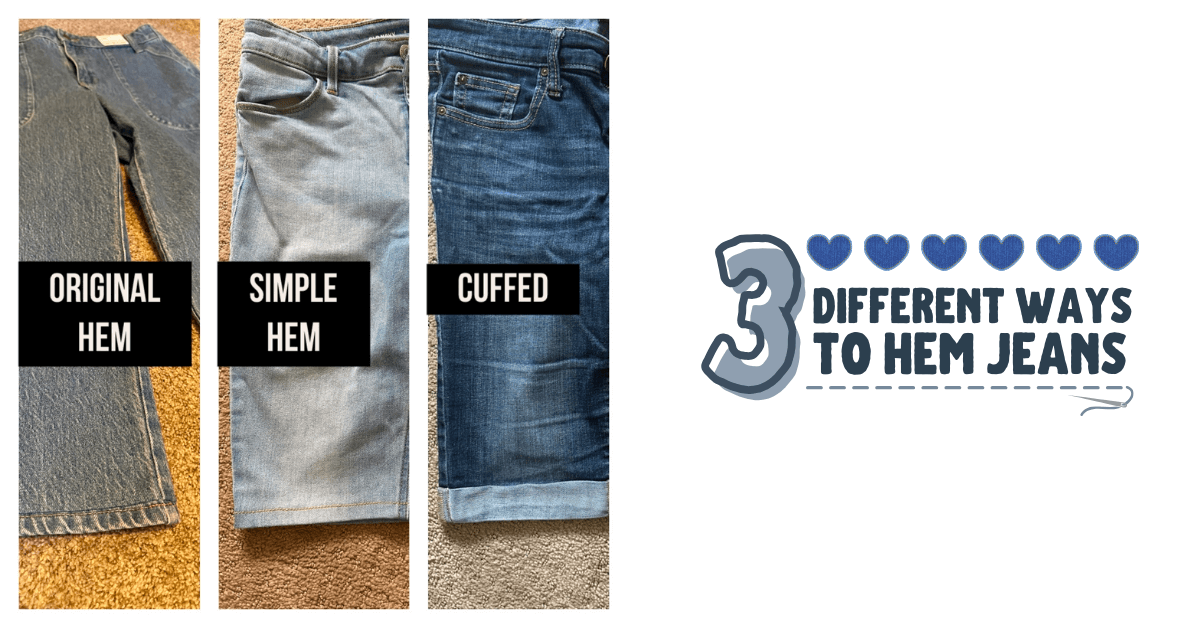
If you are just getting started, then you might be better off starting small. We have a variety of great Projects to help you practice doing a few straight seams. Maybe try to make a tote bag, apron, or pillowcase. These simple projects will still allow you to practice essential techniques like hemming and finishing edges.
You can practice your skills and build confidence before moving on to more complex projects. Keep in mind a few things as you start out:
- Basic Terminology: If you don't know terms like "Seam Allowance" or "Interfacing" then you should probably take a look at our Sewing Terms post.
- Take Accurate Measurements: Especially when sewing clothing - always measure. Don't assume your size.
- Practice on Scrap Fabric: This will allow you to test different stitches, experiment with tension settings, and get comfortable with the feel of the machine. Remember to always backstitch at the beginning and end of each seam to secure your stitches.
Embarking on your first sewing project is an exciting milestone in your journey as a sewist. By starting with simple projects, familiarizing yourself with sewing terminology, taking accurate measurements, following sewing patterns, and practicing on scrap fabric, you'll be well-prepared to confidently tackle your first project.
Getting Started Sewing Clothing
Alright, once you get your feet wet with one of our simple projects, it's time to learn how to use a sewing machine for clothing. Maybe you are afraid because you remember when Grandma got out her old tissue paper patterns and made quite the production....Fortunately, there is a better way. Many, many, many of our PDF Sewing Patterns (almost 200) are beginner friendly. Maybe you should start with something simple like our Mix Tape Tee:
We also have a wide variety of beginner sewing patterns for women, men, and children alike. Check them out. The number one feedback we always receive is that sewing the pattern was easier than they thought. Here are a couple reviews:
"Easy to follow. As a beginner, it was nice to have a pattern that’s easy to follow and understand. I was able to finish the dress for my little girls :)" - Candace
"I've just started using PAB patterns and I'm blown away. I made two of the Dakota Dolman tees in just a little over two hours. The two hours included hunting through the fabric stash and cutting the fabric. If I had everything ready to go I believe that I could have make them both in an hour. I also had a little trouble with my machine and caused a small delay. My granddaughter loved the shirts and I will definitely be making more. I've been sewing for years, so I didn't have to stop to review any instructions. You can tell she loved them by the smile on her face." - Jeree
If you're in the mood for a quick and easy accessory, we have you covered there too. Why not create a DIY Headband? It's a fun and fashionable project that can be completed quickly. These simple project ideas for first-time sewers will help you develop your sewing skills and give you the satisfaction of completing your own handmade items. So gather your materials and let your creativity soar!
Tips to Enhance Your Sewing Skills
Once you have the basics down, it's time to enhance your sewing skills. This involves a combination of experimentation, practice, and investing in quality tools.
Advanced Sewing Tools | Serger and Coverstitch Machines
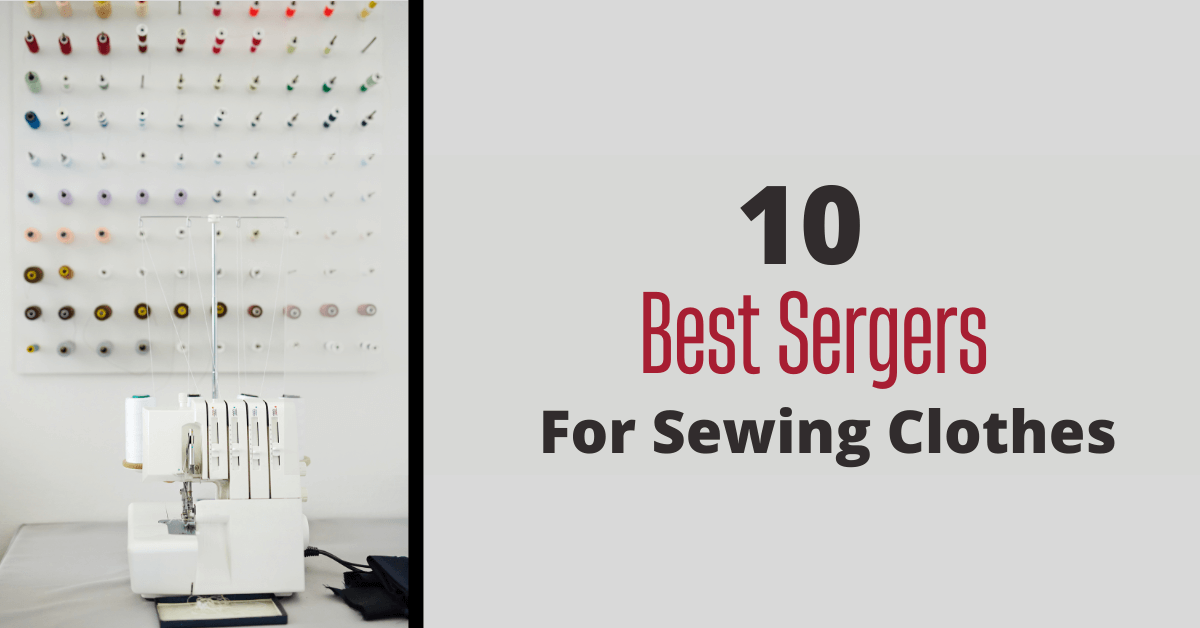
Honestly, once you start sewing much clothing, you'll probably want to invest in a serger. A serger is a very important machine to give you faster, smoother, and stronger seams than a sewing machine. The serger creates a durable overlock stitch that finishes raw edges and keeps the seams together. If you want a serger, check out our Serger Guide.
The second machine you might consider as you get better and better is a cover stitch machine. Acoverstitch is a professional-looking hem with a cover stitch on the front (2 or 3 parallel lines) and a chain stitch on the back (a tough stitch similar to what a serger would make). The chain stitch holds hems together – even on stretchy fabric that gets a lot of movement – like knit fabric. Once again, check out our Coverstitch Machine Guide.
Investing in good quality sewing tools is crucial for successful sewing. Sharp scissors and seam rippers are essential for precise cutting and seam removal. These tools make your sewing process smoother and more efficient. These tips can enhance your sewing skills and elevate your projects to the next level.
Other Ways to Learn How to Use a Sewing Machine
- Experiment With Stitches: Some sewing machines have a TON of stitches. One way to add variety to your projects is by experimenting with different stitches and stitch lengths. This allows you to create unique designs and textures. Additionally, a presser foot with a guide can help you sew straight lines, giving your projects a professional finish.
- Pracitce Sewing Curves and Corners: To improve your precision, practicing sewing curves and corners is important. This helps you navigate tricky areas and ensures clean, seamless results. Another useful tip is to take note of the needle position and adjust it as needed for different sewing techniques. This allows you to control the fabric better and achieve the desired outcome.
How to Maintain Your Sewing Machine for Long-Term Use?
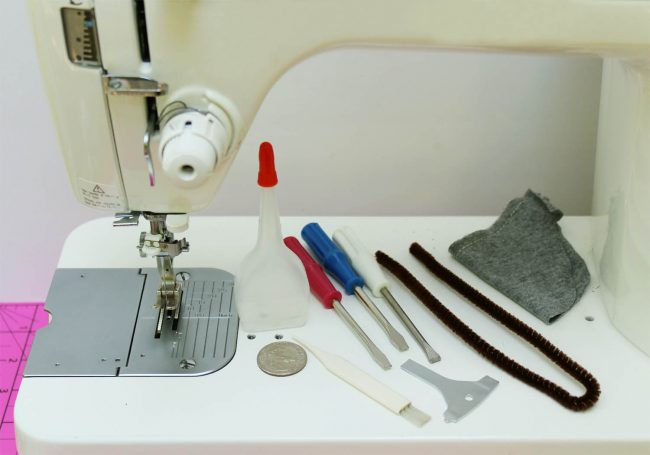
Before leaving, we should spend a few minutes reviewing sewing machine maintenance. Nice sewing machines are a big investment. You need to do some routine maintenance to keep them going strong. Learn how to do a few things like: (1) Cleaning Your Sewing Machine; (2) Oil your Machine; and (3) Getting Professional repairs and maintenance when necessary. For more info, check out our post on Sewing Machine Maintenance.
Conclusion
To become proficient in learning how to use a sewing machine, it is essential to understand the basics, prepare your machine correctly, and learn various techniques. By familiarizing yourself with the different parts of the sewing machine, threading it correctly, and winding and threading the bobbin, you set yourself up for success. Once you are ready to start sewing, join the upper and lower threads and practice sewing a seam. As a beginner, facing challenges, such as making mistakes or encountering difficulties is common. However, these can be overcome with patience and practice. As you gain confidence, you can embark on your first sewing project, starting with simple ideas and gradually enhancing your skills. Remember, sewing is a skill that can be self-taught, and numerous resources are available to guide you along the way. Finally, don't forget to maintain your sewing machine for long-term use by regularly cleaning and oiling it.
I hope you enjoyed learning how to use a sewing machine. Come join us again soon. Happy sewing!