Petal Dress Free Pattern Tutorial

Easter is just around the corner…You know your little girl needs this petal dress:)

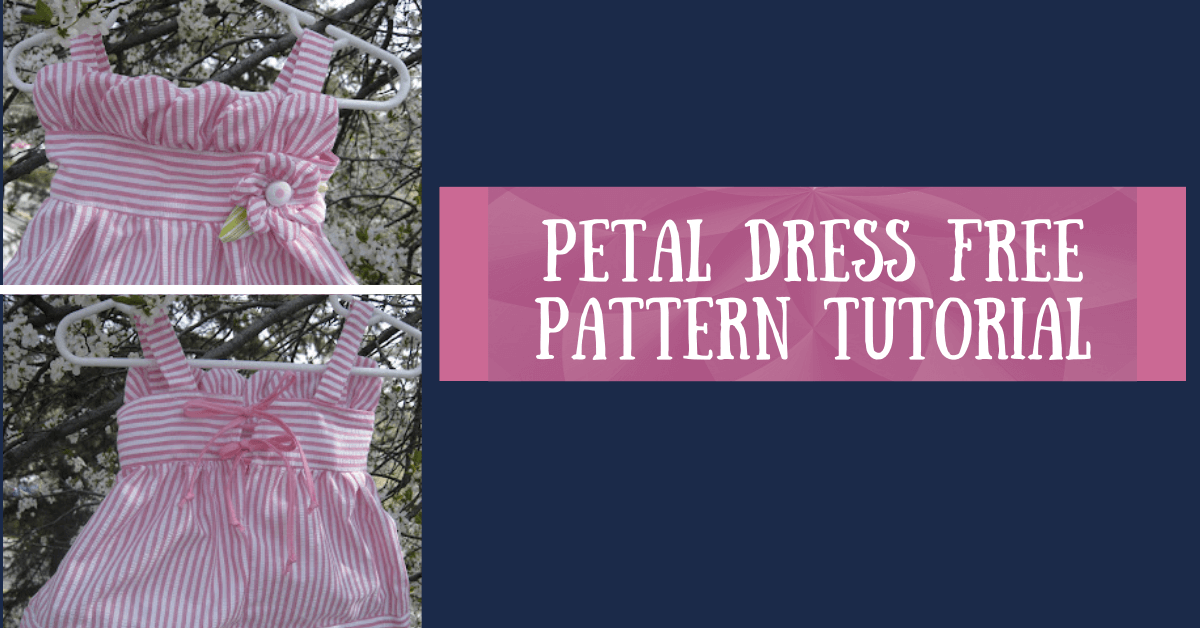
DIY Petal Dress for Easter

With a happy little flower and darling petal top. 
 
Petal Dress Free Pattern Tutorial
 
And of course some lovely little bows in back.
 
Petal Dress Free Pattern Tutorial
 
This was actually for a baby shower gift. Ready to get started with the dress? I promise you can do it!

Petal Dress Materials:

  • 1/2 yardish fabric: I used seersucker. Stripes are really what makes this dress adorable
  • Bias Tape (or learn to make your own bias tape)
  • Scrap of green fabric for leaves
  • Button

Petal Dress Instructions

  •  
Petal Dress Step 1: Print out your pattern and cut the pieces. This pattern is for a 0-3 mos. dress size, so just enlarge as needed. (***click on the picture and then print it so it fills your whole sheet of paper). Make sure the stripes on the petals and skirt are vertical. for the rest of the pieces you’ll want horizontal stripes.
 
Petal Dress Free Pattern Tutorial
 
Petal Dress Free Pattern Tutorial
 
Petal Dress Step 2: With right sides together (RST) sew 2 large petals together around the outer curved edge. Turn right side out and then gather the bottom. Repeat until you have 6 large petals
Petal Dress Free Pattern Tutorial
Petal Dress Step 3: Sew the skirt together at the side seams. Cut the back skirt piece in half and sew it back up 1/2 way.
Petal Dress Free Pattern Tutorial
Petal Dress Step 4: To make your straps fold the piece in half, sew up 1 short end and the long end, turn right side out and then topstitch around the sides.
Petal Dress Free Pattern Tutorial
Petal Dress Step 5: Sew up the side seams of the hem piece and with RST together attach it to the bottom of the skirt.
Petal Dress Free Pattern Tutorial
Step 6: Fold the hem over to the inside of the skirt, tuck in the raw edges and then topstitch all the way around to finish the hem.
Petal Dress Free Pattern Tutorial
Step 7: Gather the top of the skirt so it’s the same length as the bodice.
Petal Dress Free Pattern Tutorial
Step 8: Line up your petals across the center of the bodice, so that they overlap slightly. For this size they should measure 9″ from end to end- for other sizes they should measure the same as 1/2 of the total bodice length. Sew the petals in place
Petal Dress Free Pattern Tutorial
Step 9: With RST sew the bodice to the skirt.
Petal Dress Free Pattern Tutorial
Step 10: Fold the edges over twice and stitch down to finish the raw edges in the back of the skirt.
Petal Dress Free Pattern Tutorial
Step 11: To create the bows and hide the seams wrap each seam in bias tape and stitch along the edge. Leave a nice long tail on each end and then stitch the bias tape shut to make the bows. Once both ties are in place stitch over them several times at the skirt edge to keep them in place. Tuck your straps under the bias tape and sew down.
Petal Dress Free Pattern Tutorial
Step 12: Sew your 6 small petals together and turn right side out. Arrange them in a circle and them sew together using a basting stitch
Petal Dress Free Pattern Tutorial
Step 13: Pull on the ends to gather the flower together.
Petal Dress Free Pattern Tutorial
Step 14:. Add a button and some leaves and sew to the dress. You may need to tack the petals to the straps with a couple quick hand stitches.
Petal Dress Free Pattern Tutorial
Enjoy!
Petal Dress Free Tutorial
 
***Update***
Turns out there’s a Simplicity pattern that’s very similar to this dress – wow was I surprised! I can assure you that this dress is put together quite differently b/c I made up the tutorial based on a photo on Nordstrom’s website. Small world! At any rate- just wanted to let you know I’m not a pattern thief. Just a Nordstrom knock-off girl:)
 

Other Tutorials You Might Like

I hope you enjoyed the petal dress, you might like some of these: 

30 Responses

    1. I just finished making this for my daughter, need to still do the flower but I finished the top! Turned out great! I’d love to share a picture with you! She is 18 months so I just made it a little bigger and got it right on my first try! Thank you so much for this tutorial! It is such a cute top!

        1. Rose, would you mind sharing the measurements that you used for your 16 mth little girl. I’m trying to figure out how to make the same size. Thank you!!

          1. Yes April,
            I’d love to share them with you! Give me a few days, I’ve got sick kiddos and so I’m just check email really quick while they’re napping!
            I gotta find where I put the measurements!!! 🙂
            Send me an email in a few days at [email protected] to help me remember to send them to you!

          2. Hi April, Sorry it took me so long to get back to you!
            Finally all kids are healthy once again!!! 🙂
            Hopefully my explanation of what I did is clear!
            So my daughter is a little on the small side so if the girl your making for is a little bigger around the chest you might want to go a little bigger than what I did!

            12-24 months measurements
            Straps: 3×10.75
            Bodice: 3×19
            Skirt: 19×7.5
            Hem: 19×5.5

            I didn’t know what her seam allowance was so I serged my edges and then did a 1/2 in seam allowance.
            I didn’t make the petals any bigger than what they were when I enlarged like she said.
            Hope that helps!

  1. Lovely dress…loved this pattern..I am going to make it for sure. Thanks for sharing this.

    Can you please provide the length and width of big and small petal. It will help me a lot as I am confused about size when printing.

  2. Just found this tutorial! Thank you! I made mine using a circle skirt for the skirt and it came out so cute! My daughter has an addiction to twirling. 🙂
    I’m not quite done with it and so far I’ve been working maybe 2 1/2 hours. I imagine I have an hour or so more to go.

  3. This may be a silly question….What is RST? I’m new at sewing and this dress seems simple enough to make. Thank you for sharing!

  4. This dress is darling. But how many “nap times” did it take you? This took my mom & I 10 hours to complete! We’re not the most pro-sewers ever, but we have been sewing a while. Wow, absolutely darling, but very time consuming! 😉

  5. That is adorable! I’ve been looking for a good pattern to make my girls a couple of Easter dresses! This may be the one (and yes, I’m a procrastinator…and yes, I have THREE girls to make them for…). 🙂

    Aloha,
    Charlie

Leave a Reply

Your email address will not be published. Required fields are marked *

Share
Pin242