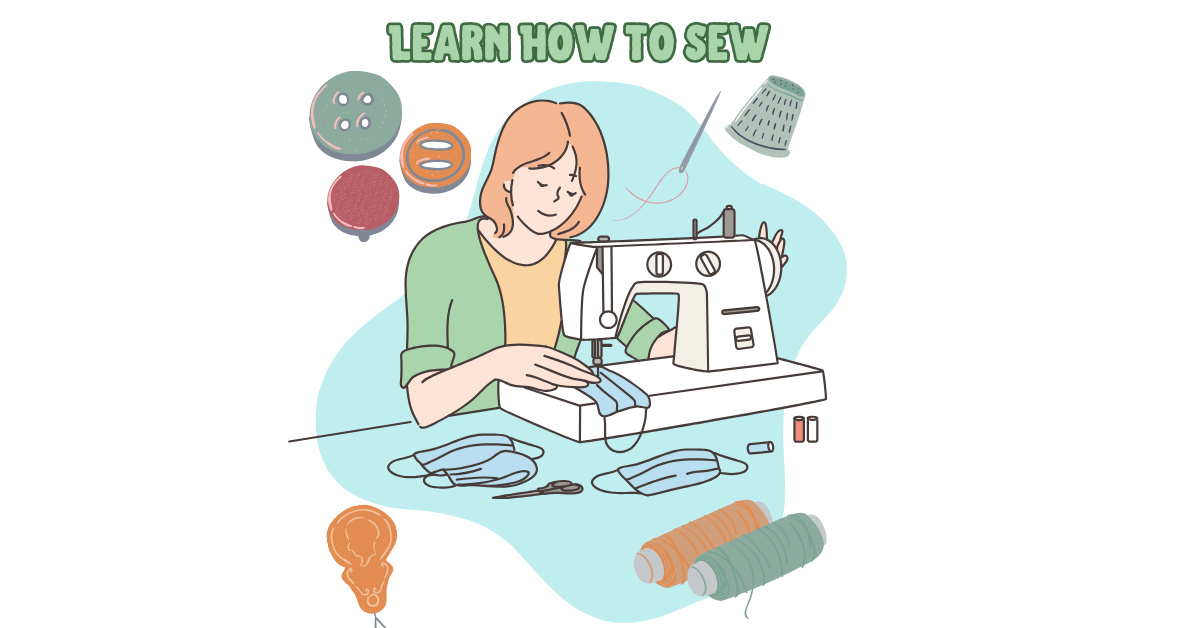
How to Sew Knit Fabric Like a Pro: Beginner's Guide
Learning how to sew knit fabric is essential for everyday clothing construction. You’ll notice that we love sewing with knits around here – we kind of specialize in it. We have hundreds of Clothing Patterns for Knits. Our sister shop says it all in the name KnitFabric.com. We we sell hundreds (maybe thousands…) of different knits. We produce our own knit fabric designs and also bring in popular designs from many other companies and designers. At KnitFabric.com we strive to have higher quality fabrics, at better prices, with flat-rate shipping.
Knit Fabrics are soft, comfy, and can be stretchy and warm too. They're great for a variety of clothing items like t-shirts, leggings, dresses, underwear, outerwear, pajamas, and more.
That being said....knit fabrics can be tricky to work with so a tutorial is in order. Today we will take you through the basics. We will also guide you on how to choose the right needle and identify the suitable thread for sewing stretch fabric. You might want to experiment a bit too.
Understanding the Basics of Knit Fabric
Knit fabric has been around forever and is super popular among sewists. It has loops of interlocking yarn. Its natural stretch, which allows for ease of movement and makes it comfortable to wear. It's also very versatile - you can make tons of different comfortable garments with it that conform well to your body's shape. There are lots of different types of knit fabrics available - including knit cotton jersey fabric, cotton lycra, interlock, french terry, sweatshirt fleece, rayon, and more. Each has distinct qualities and some work better for a different drape, different weather, etc. To help you out, we made a handy Knit Fabric 101 Guide to help you figure out which fabric might be best for your project.
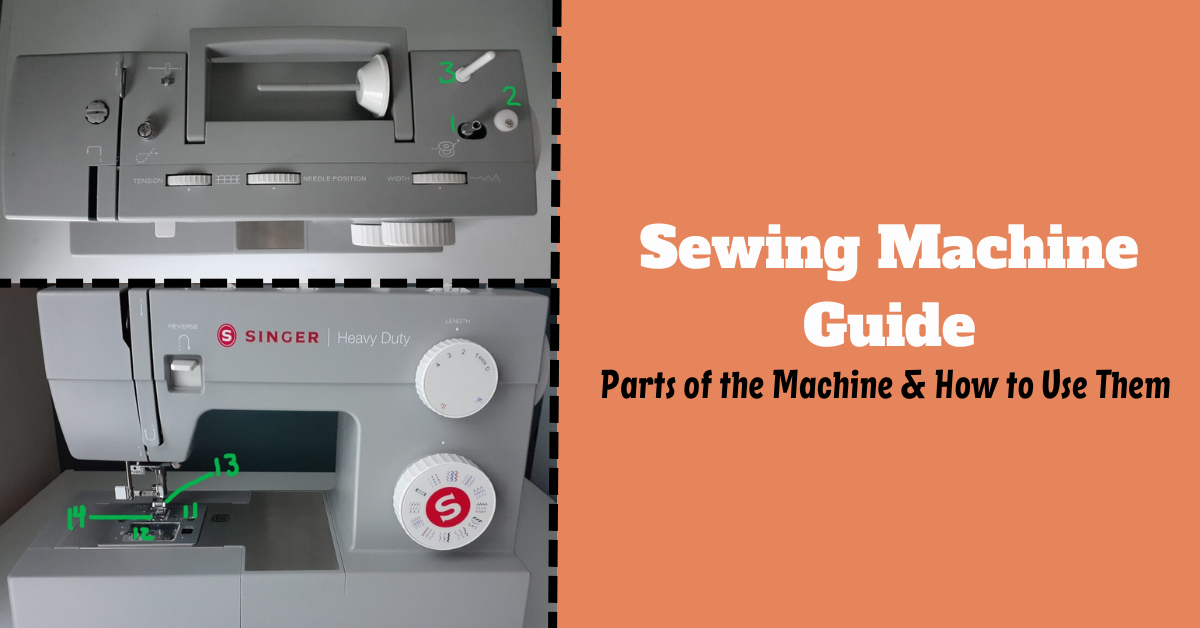
Which Machine Should I Use for Sewing Knits
You might only have your regular home sewing machine with your standard sewing machine needle....if so, that's fine. There are ways that you can sew knit fabric with your regular sewing machine. That being said...if you are doing a lot of clothing construction then you might want to invest in a serger.
A serger is a great tool for sewing with knit or other stretchy fabrics. Unlike a regular sewing machine, a serger is specifically designed to handle the stretch and flexibility of knit fabrics. It uses multiple threads and specialized stitches, such as the overlock stitch, to create strong and secure seams that can withstand the movement and stretching of knit fabrics. The serger's differential feed system allows for precise control of fabric feeding, preventing puckering or stretching of the fabric. Additionally, the serger trims excess fabric as it sews, creating clean and professional-looking edges. This not only saves time but also eliminates the need for additional finishing techniques. Overall, a serger is a valuable tool for anyone working with knit fabrics, providing ease of use, durability, and high-quality results especially for multiple layers of fabric.
We also have an article here on Peek-a-Boo Pages that goes over the 10 Best Sergers for Sewing Clothes. This article gives the pluses and minuses of the Brother 1034D and then gives a variety of other options that one can use for a more advanced serger. Amy uses the Juki 654 now and there are several more advanced options from Janome, Singer, and other brands.
A Few General Tips for How to Sew Stretch Knit Fabric
- PRACTICE SEWING KNIT FABRIC. Practice, practice, practice. Sew multiples of your sewing project, like a raglan tee, in an assembly-line style if possible. This will help you understand how different fabric choices can affect the stretch and recovery of a neckband. It will also assist in mastering the armpit curve with your serger. Keep straightening the curve as you feed it under the presser foot, about a half inch to an inch at a time. This method works well for serging pants rises too.
- Clover Wonder Clips. I haven't used many pins recently, and my sewing has improved. These clips keep my knit fabric flat and force me to slow down since they can't get stuck under the presser foot like pins do. I have to remove them as I go. My kids like to take them from my office, so I have to hide them. Paper binder clips can also be used for a similar effect, I've heard.
- Washaway Wonder Tape. Wonder Tape is a double-sided adhesive that washes away after sewing. It's versatile and can be used for various purposes like holding layers of knits, keeping a collar lining pressed, basting zippers, and pressing hems. It's a must-have tool for sewers.
- Choose Your Knit Fabric Wisely: When sewing with knits for the first time, it's best to start with a stable fabric like interlock. Interlock knit has less stretch, making it easier to sew with. It won't curl up or wrap around pins/clips, allowing you to focus on your sewing. For beginners, even a slightly stretchy knit can work if it's at least medium weight (8-9 oz per yard). After that, move on to other fabrics like cotton lycra, double brushed poly, etc.
- Choosing the Right Needle: For knit fabrics, use a ballpoint needle to avoid damage. For highly stretchable knits like spandex or lycra, use a stretch needle with a rounded point to prevent breaks or snags. Choosing the right needle ensures smooth and professional-looking seams for your knit fabric projects.
- Necessary Adjustments and Preparations for Sewing Knits: To improve stitch quality when working with stretchy knit fabrics, lower the tension on your sewing machine. Use sharp scissors for clean edges when cutting knit fabric. Instead of traditional pins, use pins or clips to avoid snagging. Test stitch on scrap fabric before starting your project to ensure correct settings and a good stitch. These adjustments and preparations are crucial for successful sewing with knit fabric.
- Experiment with Knit Fabric: Enjoy trying new things, like sewing with knits. Knits provide stretch and built-in ease, making fit less precise than with wovens. While some knit patterns have closures, many can simply be pulled over the head. With a few tweaks, woven patterns can also be made from knits, although the reverse is not recommended. Check out Peek-a-Boo Pattern Shop for patterns suitable for both wovens and knits.
How to Sew Knit Fabric: An Example
Now, I’ll share a project I made with knit fabric. One knit pattern I recently tried and loved, is the Peekaboo Pattern Shop - Evelyn Tunic and Dress. Here’s how I did it, with minor modifications to the original pattern. This pattern has been retired but the same general principles apply to the many other knit fabric sewing patterns.
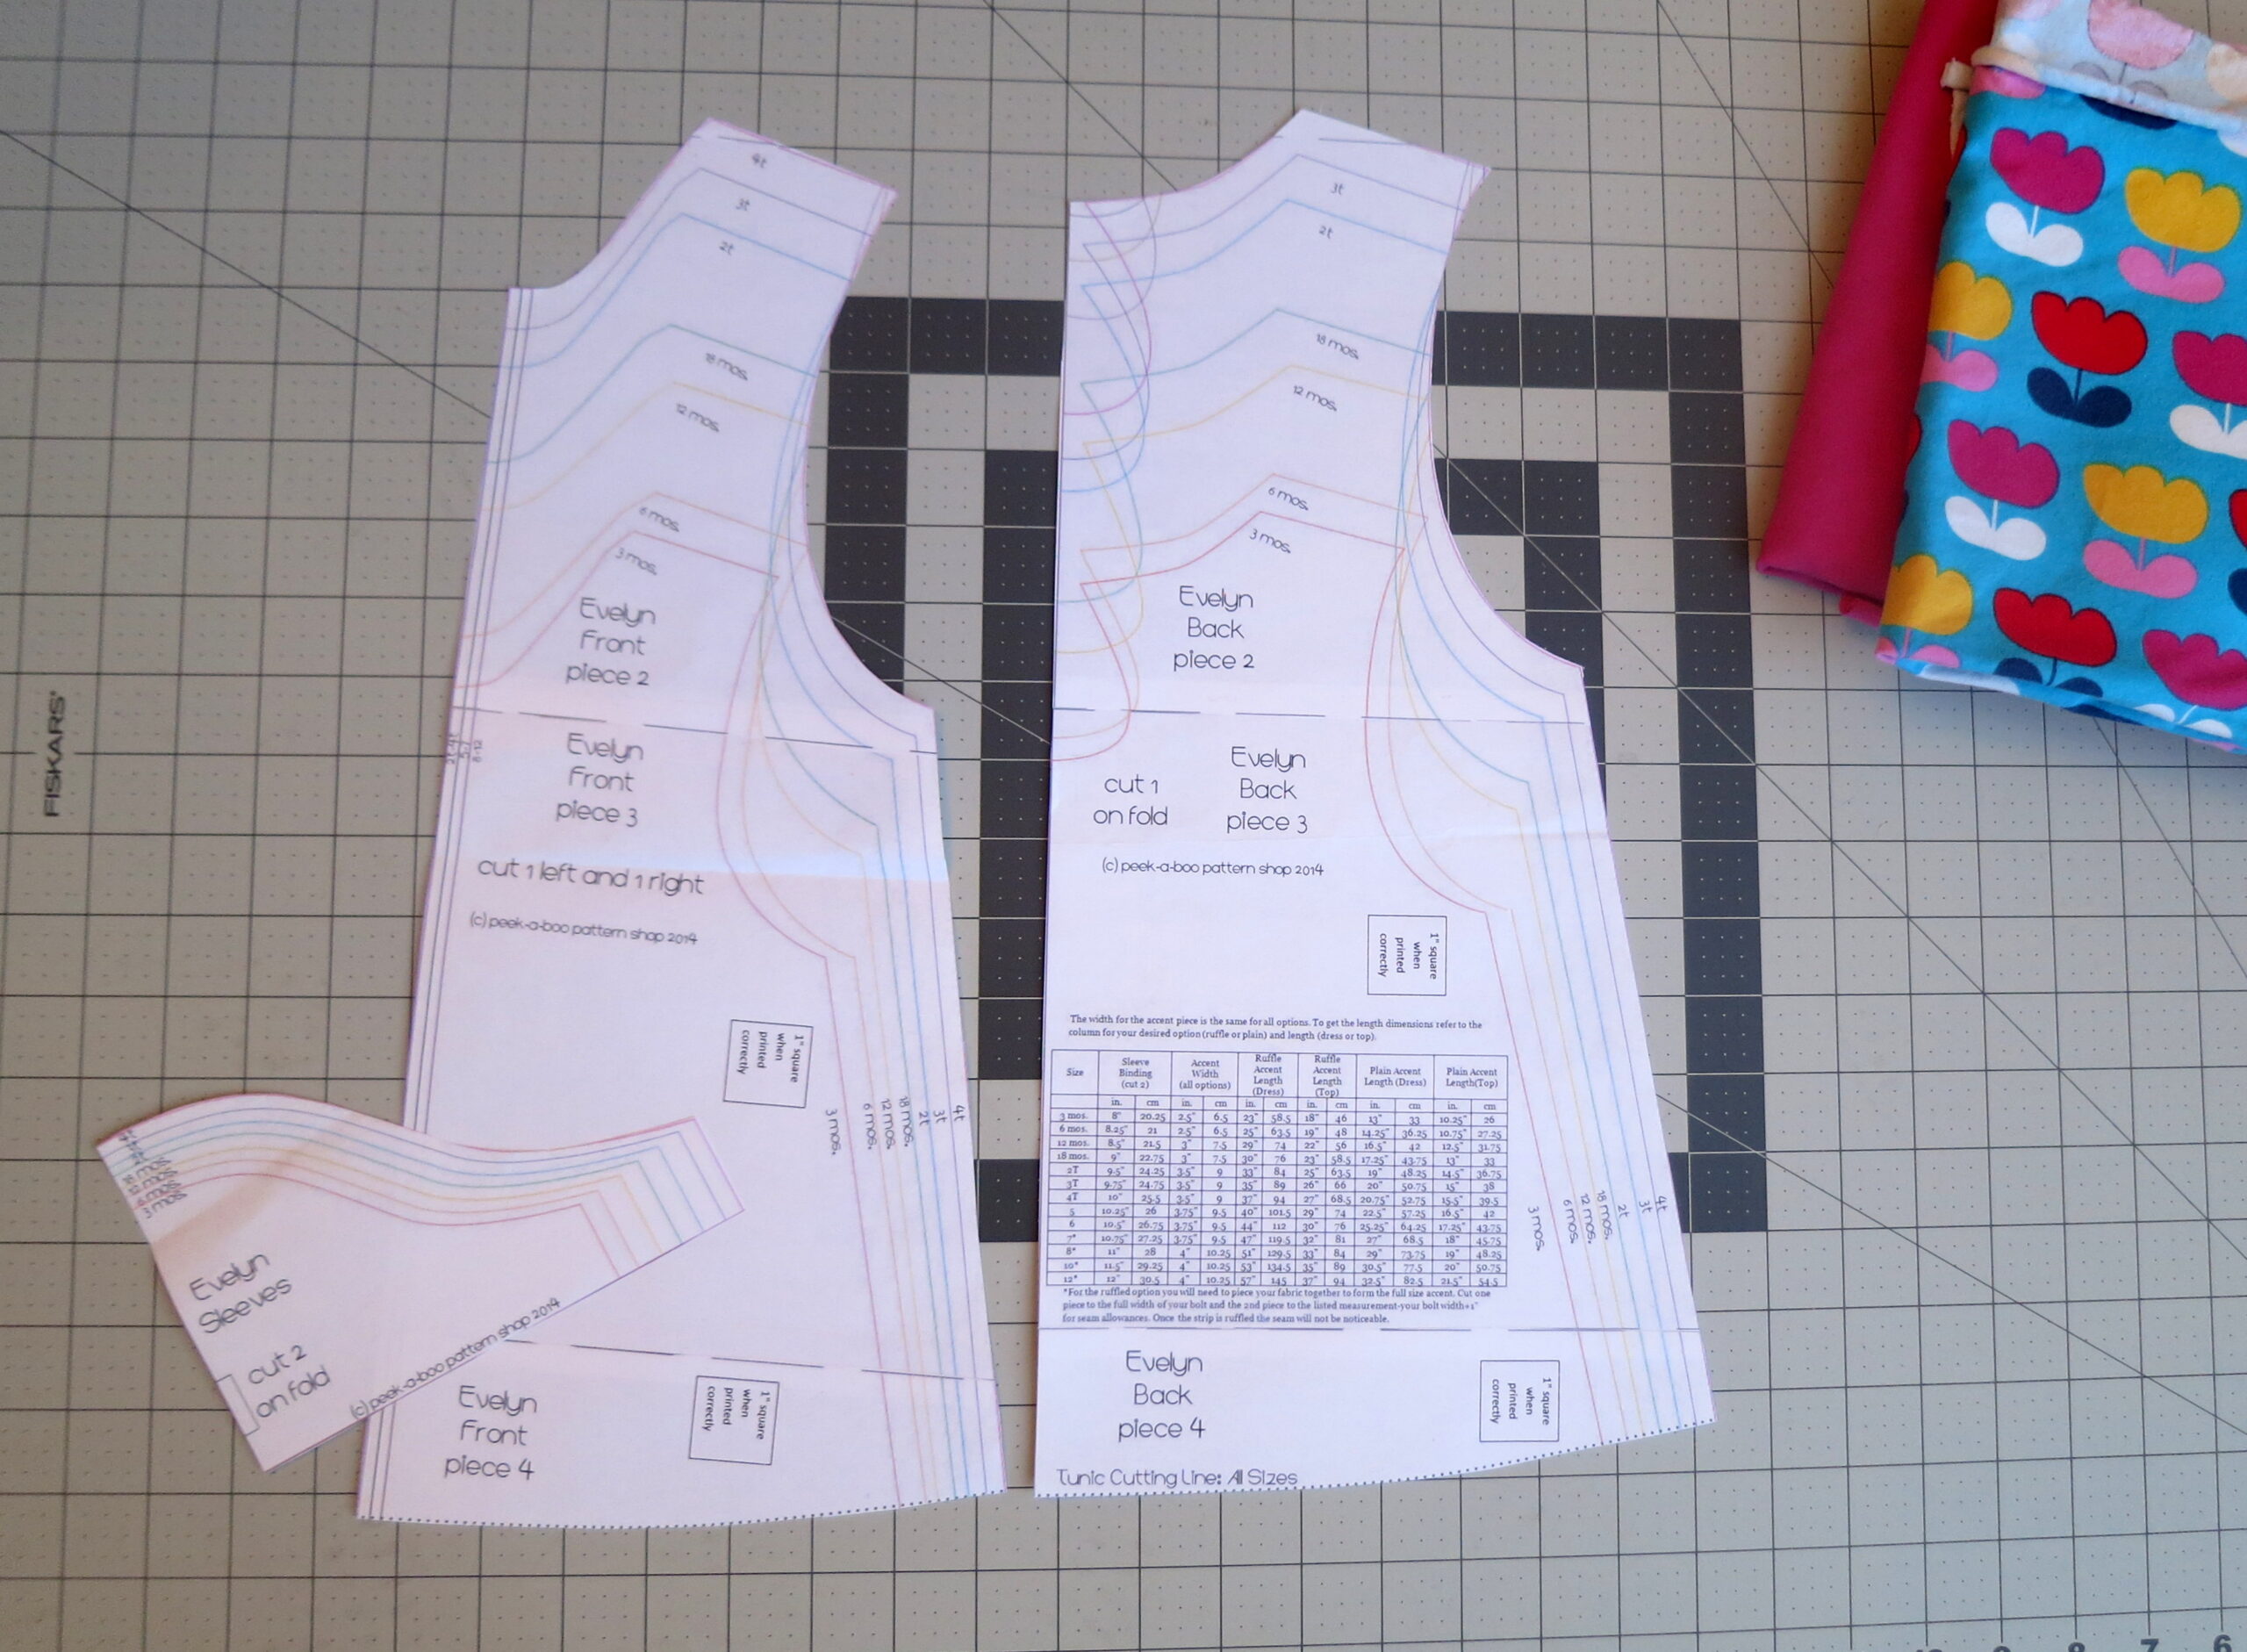
Evelyn Pattern Step 1: I cut the pattern pieces as instructed, with only one minor change – I eliminated the keyhole opening in the back. (For reference, I sewed a size 4 tunic for my 5-year-old. I added a little length to the hem to account for her height, though.) Below is a closeup of how I extended the line at the center back (which is cut on the fold) to the neckline, rather than cutting out the keyhole from the woven version.

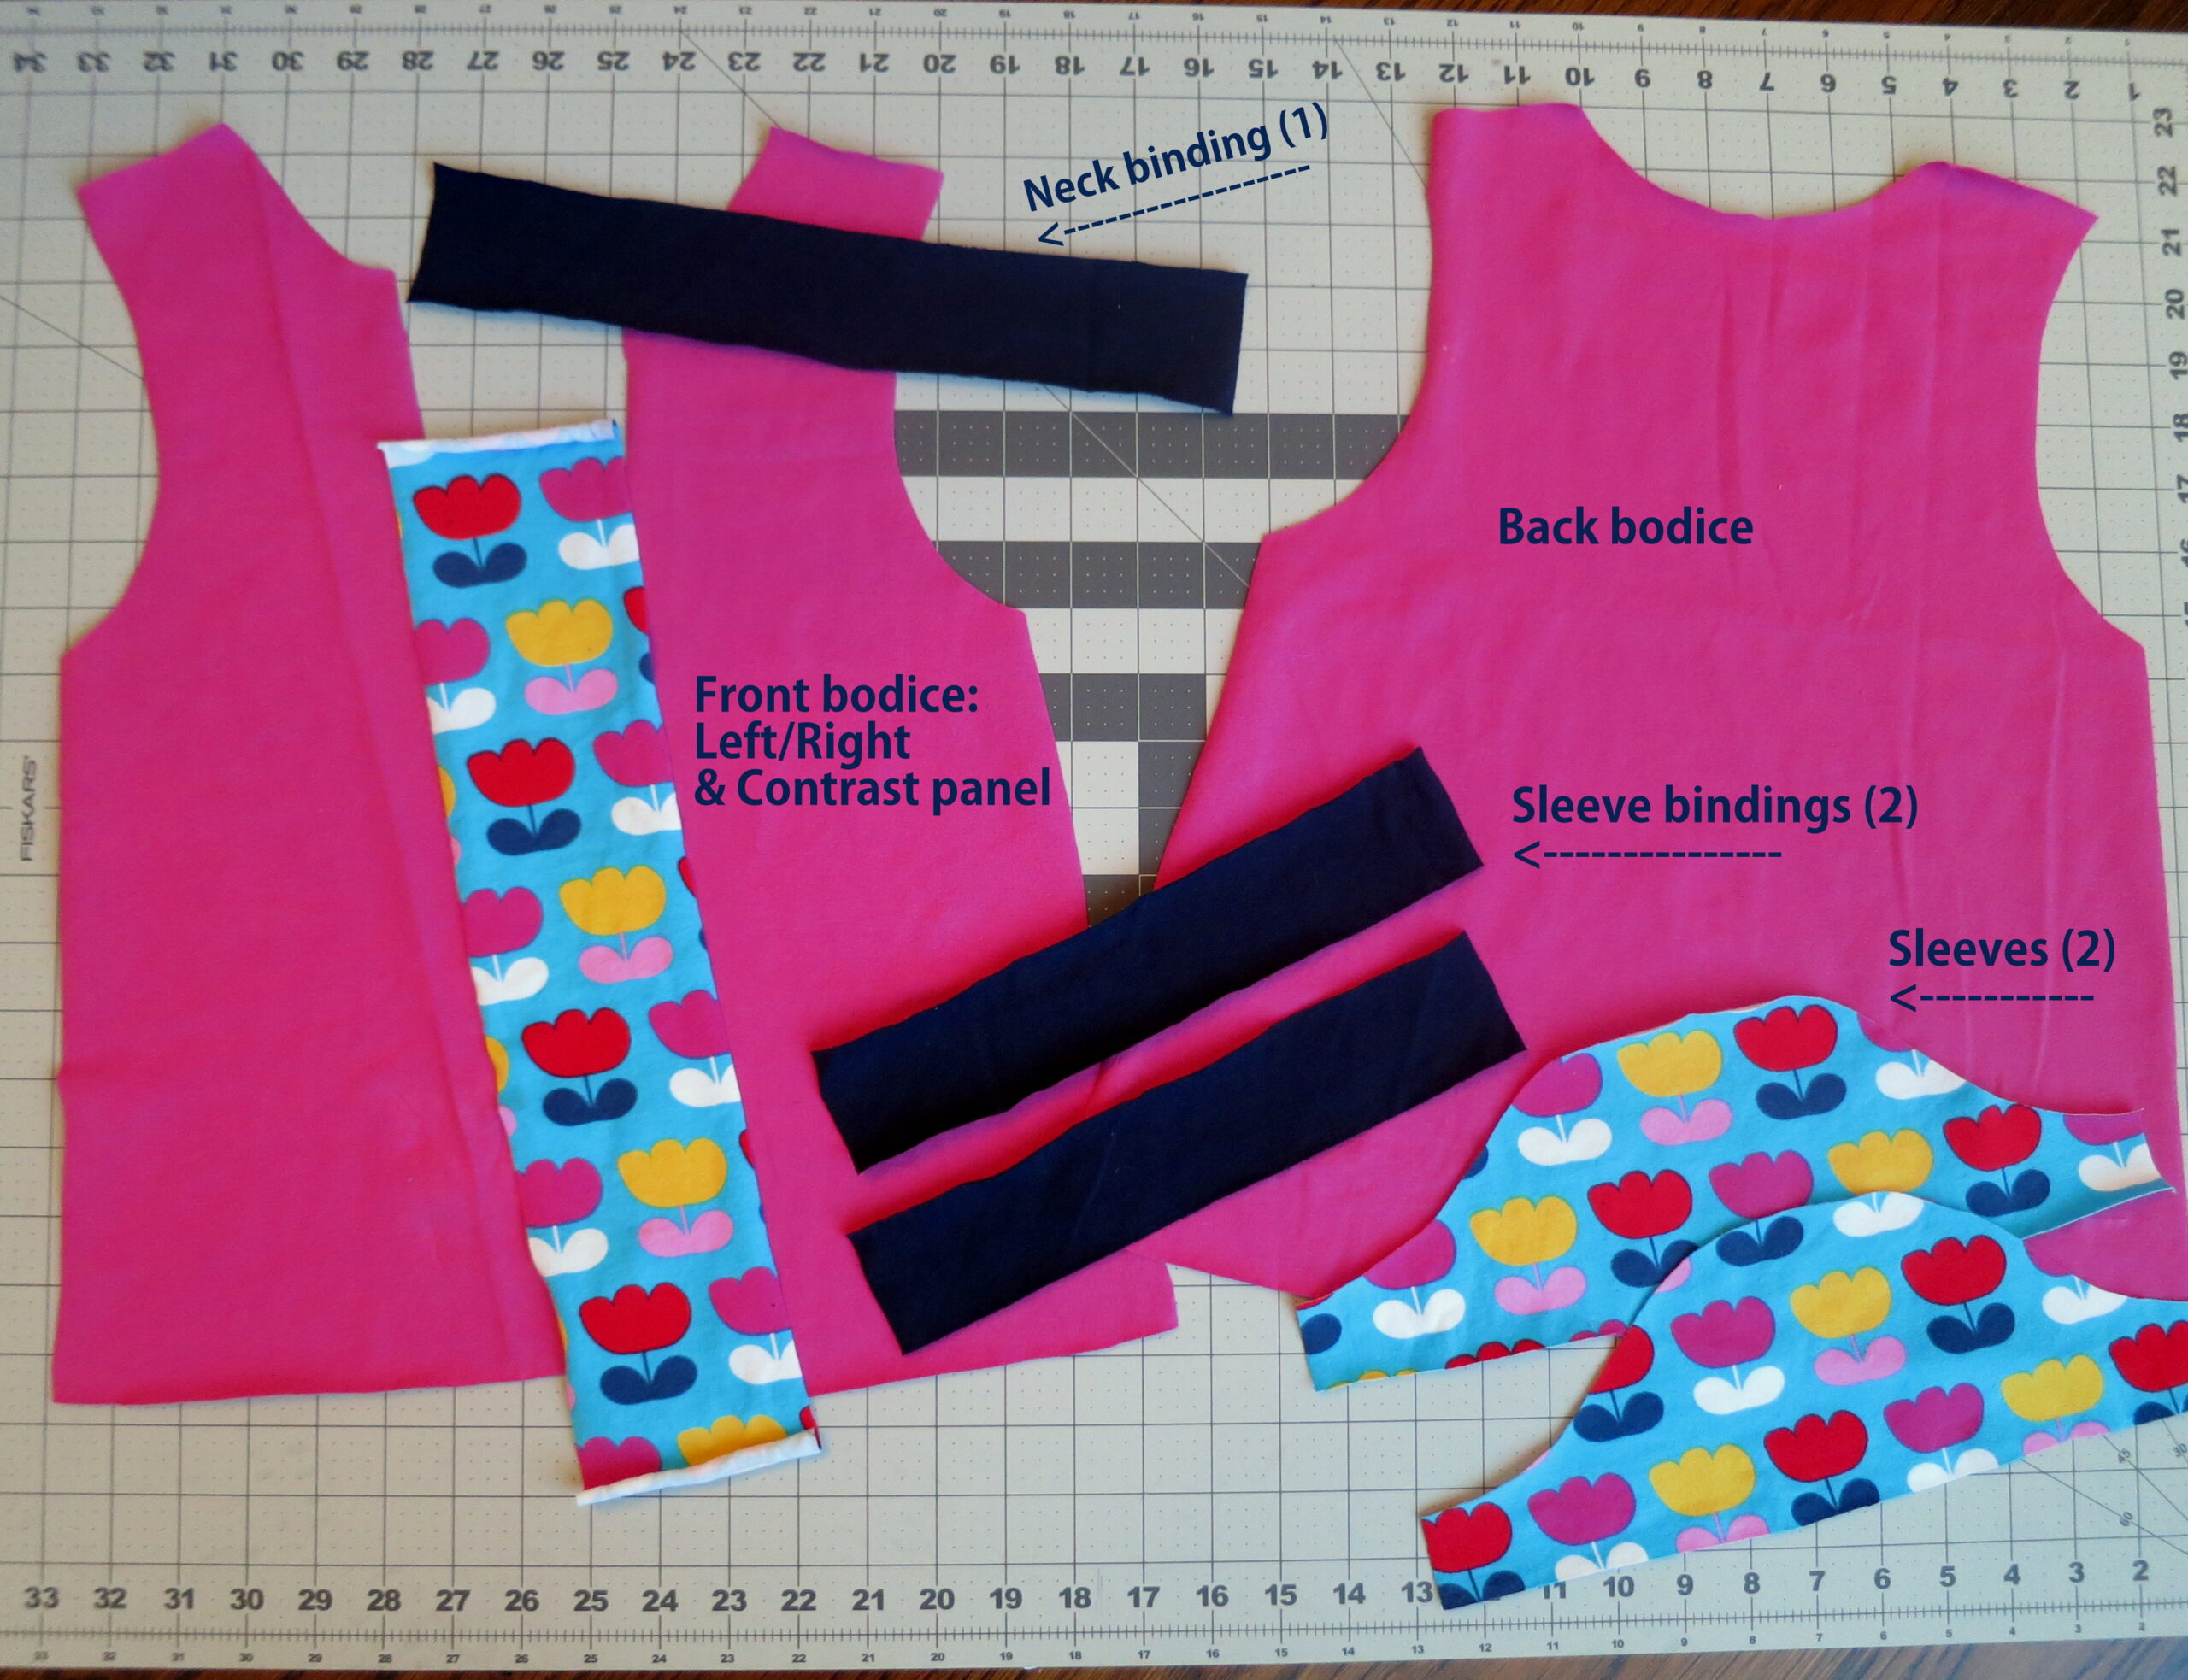
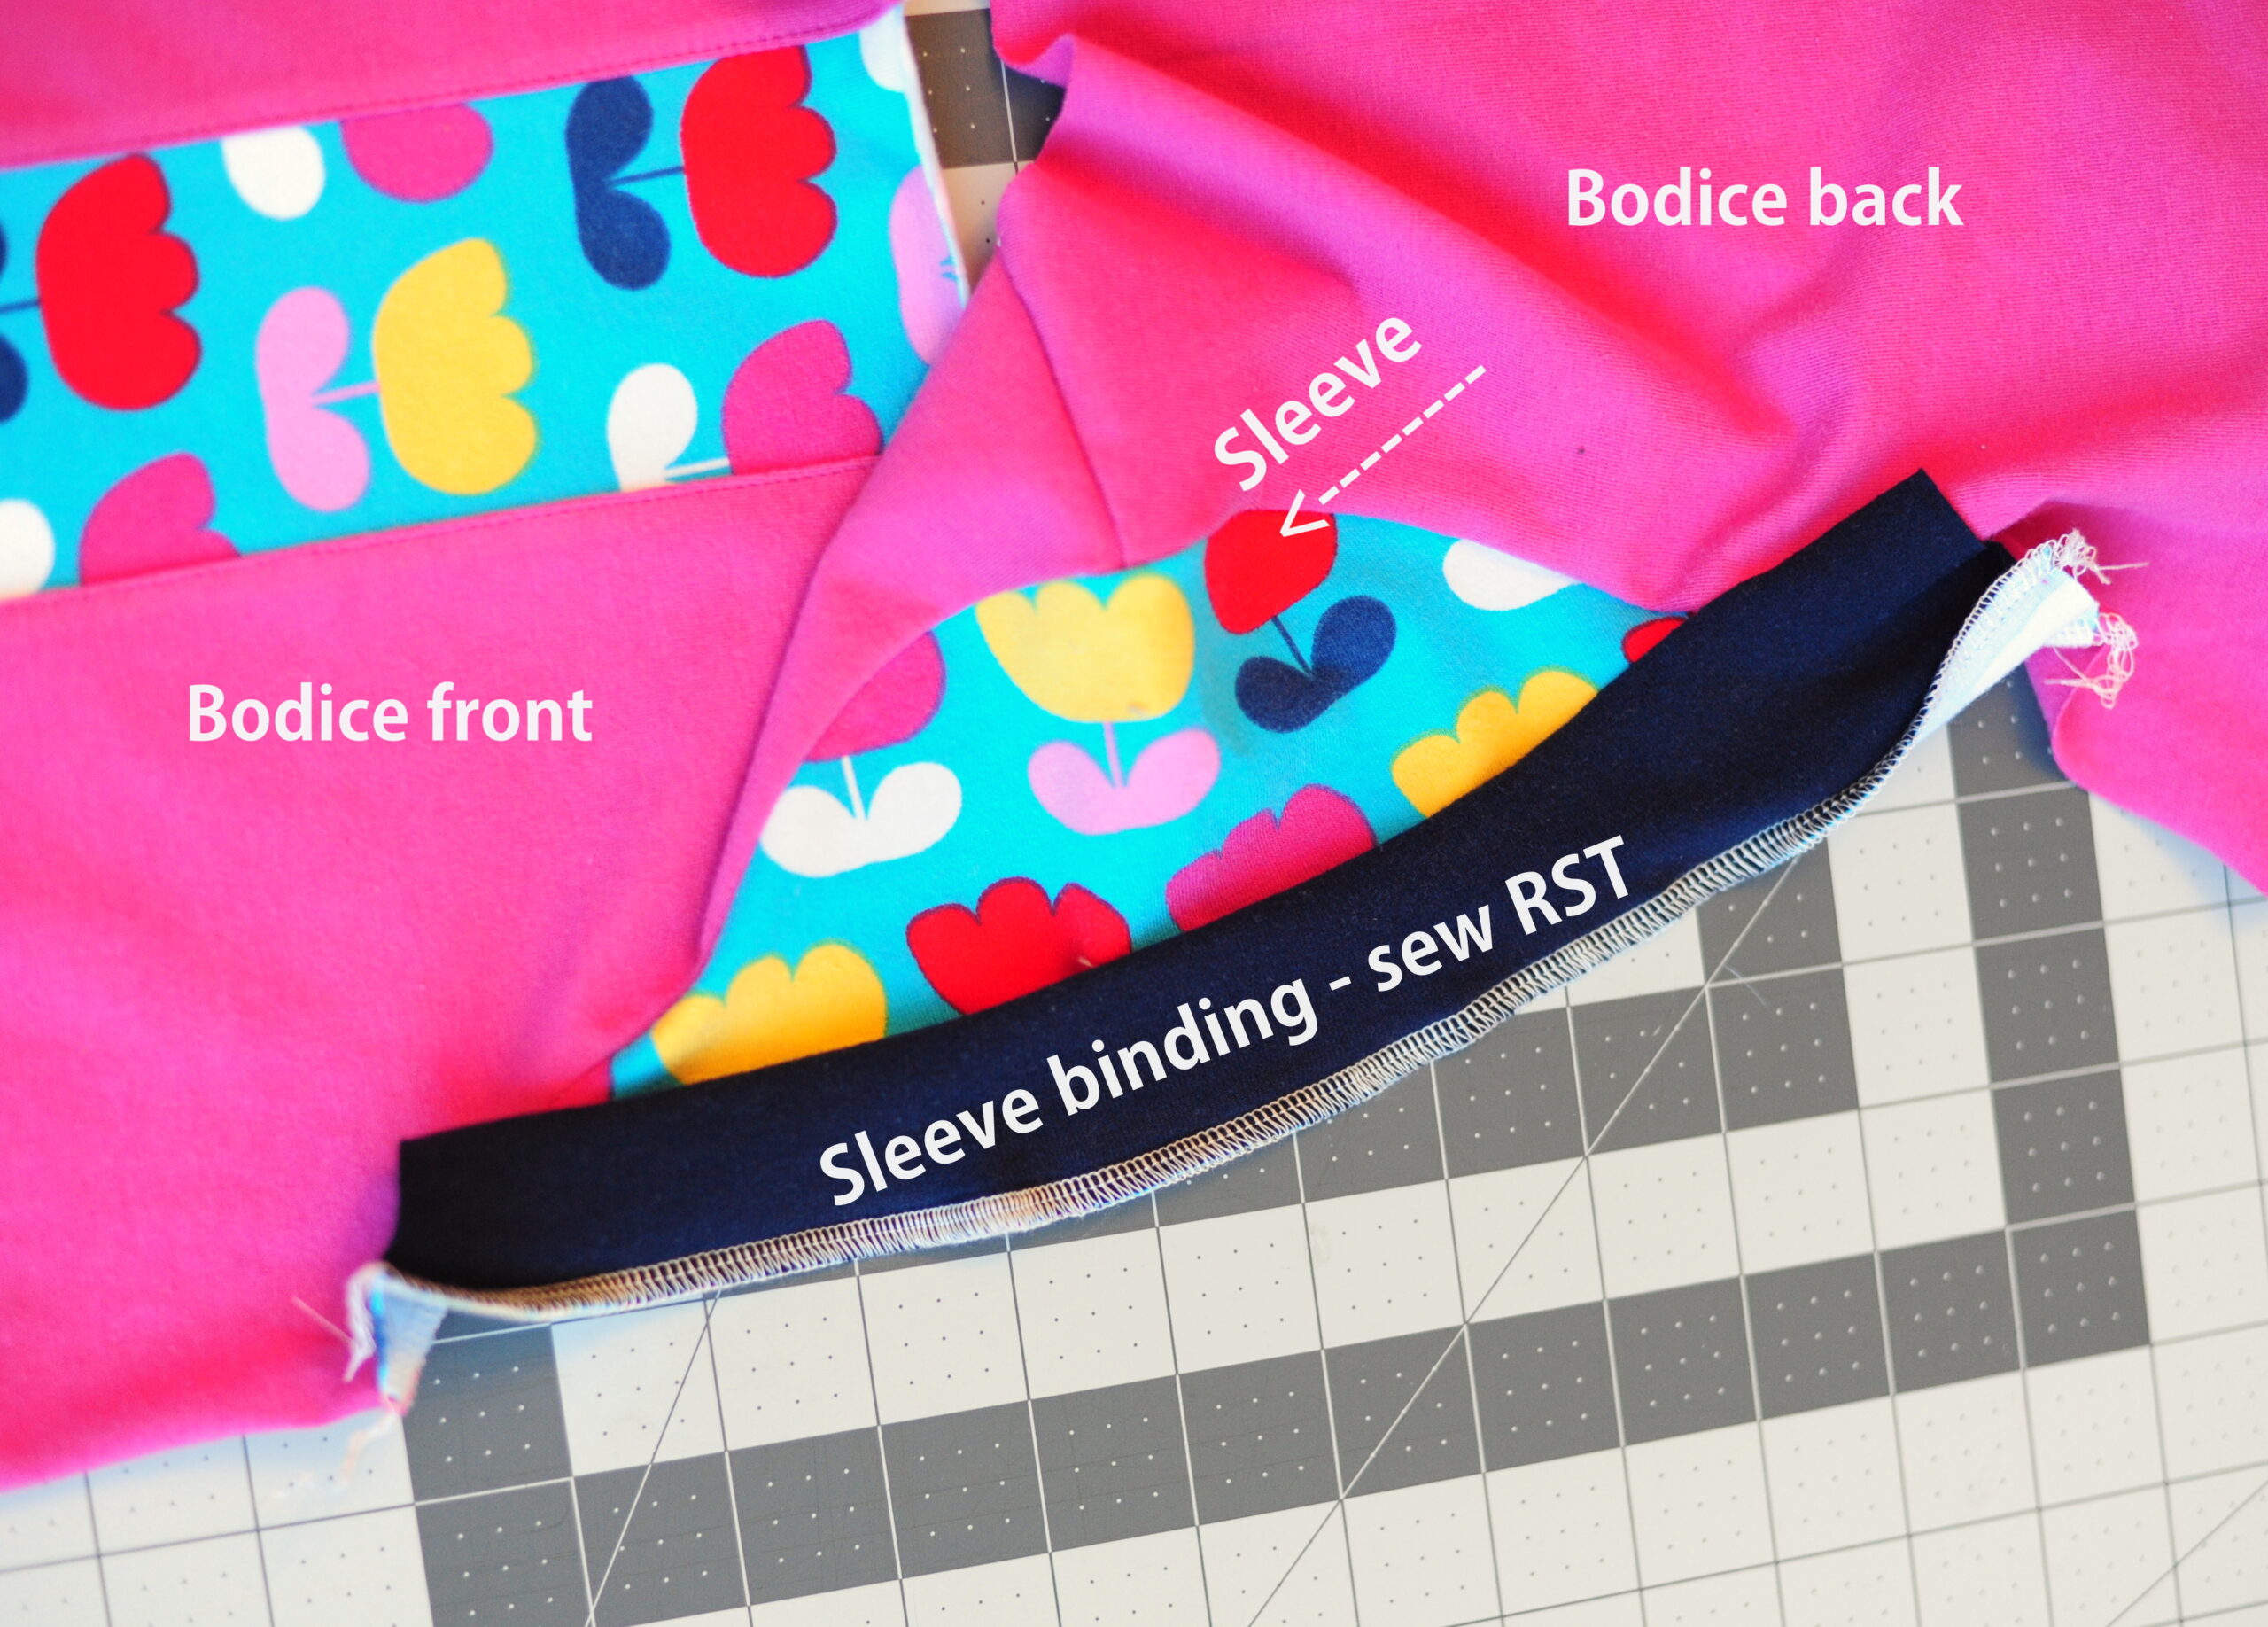
Eveyln Pattern Step 2: In the next photo you can see all of my pieces of knit fabric cut and prepped for sewing. I assembled the bodice and sleeves using my serger, and topstitched the binding and the center panel with my sewing machine. For topstitching the knit I used a ballpoint needle and a lengthened straight stitch.
Eveyln Pattern Step 3: After sewing the front bodice, join front and back as instructed by the pattern. I’d advise taking a moment to try this on your intended recipient in order to make sure the neckline is wide enough to fit over her head. If it seems a little snug, you can scoop the front neckline lower. I usually do this by snipping down about a half inch to an inch right at center front, and then cutting back up to the shoulder evenly on both sides. You can repeat and cut a little more deeply if needed. (In this case, the original neckline was fine for my daughter.)

Evelyn Pattern Step 4: I followed the pattern instructions to sew the sleeves to the bodice, and then serged on the strips that I had cut for my bindings. I cut them to the lengths specified in the pattern this time. In the future, I might shorten the arm bindings a little bit (and just check her arm circumference to make sure I don’t shorten them too much) and gather the sleeve edge before attaching the binding to make the sleeve puff a little more (as it does in the woven version).
Evelyn Pattern Step 5: Next, I flipped – and pressed – the bindings up, and serged the side seams. (This way, I can fold the binding back over to finish it, and the side seam is enclosed in the binding.)
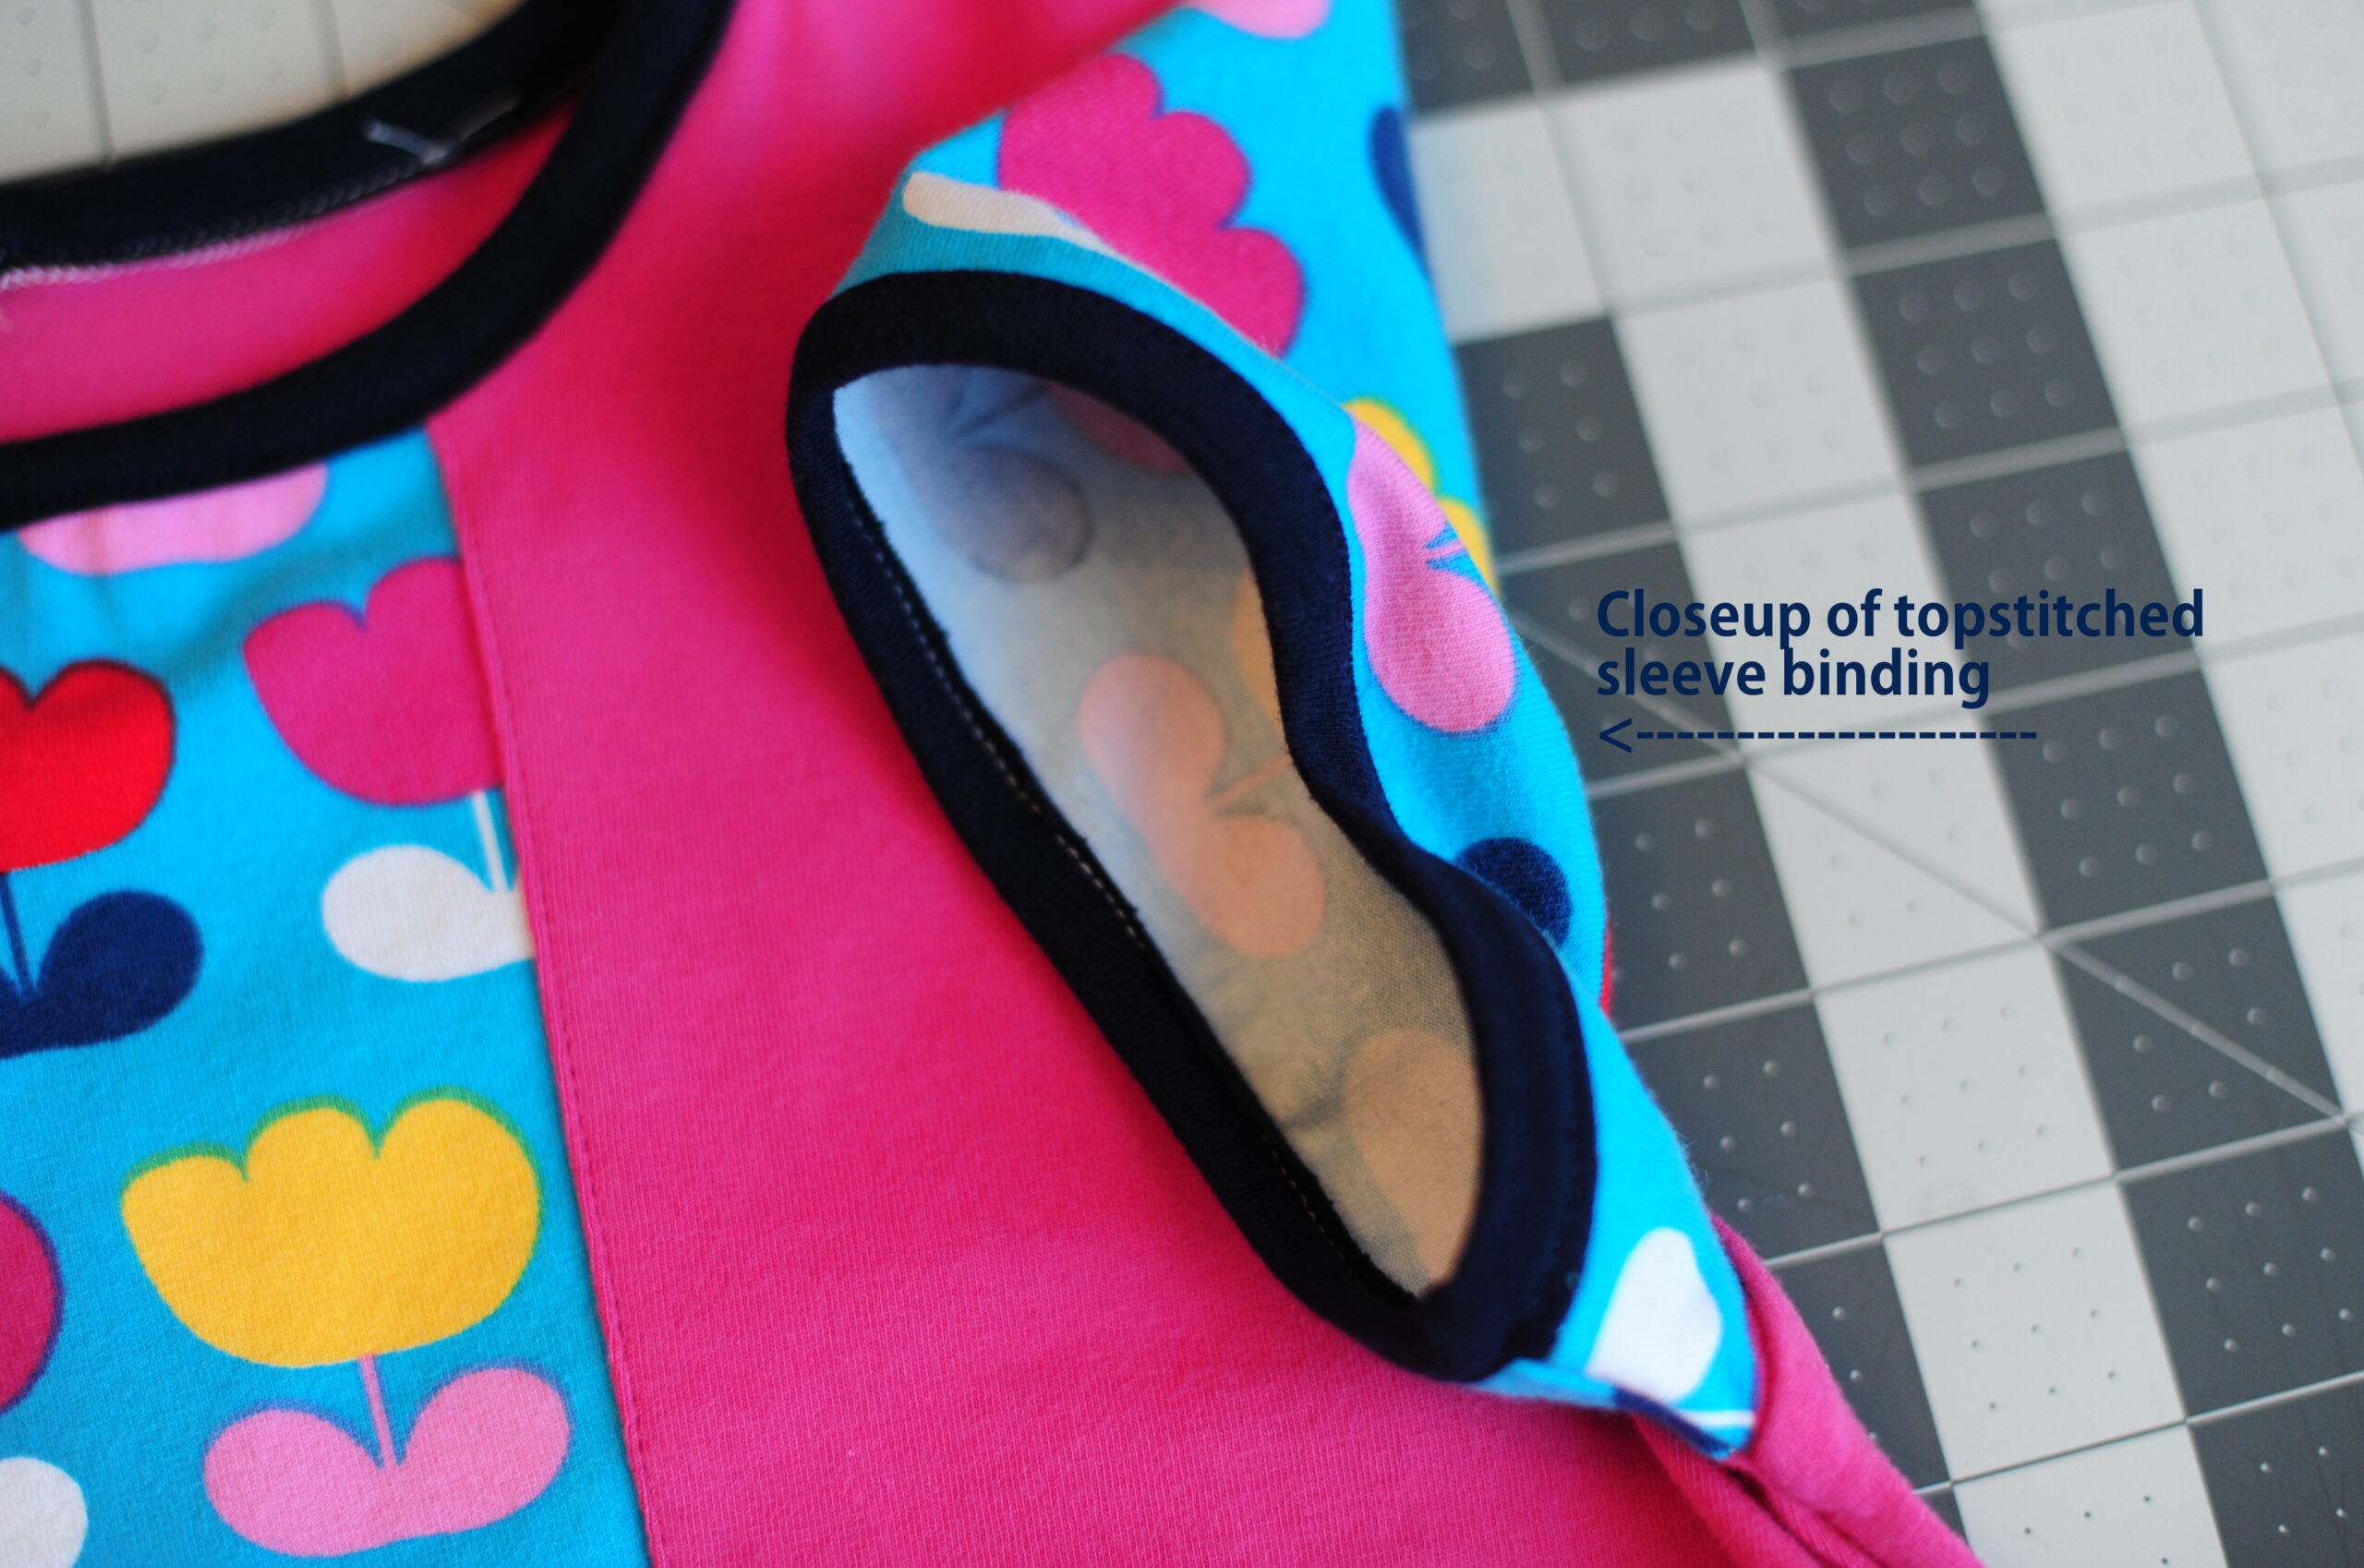
 Evelyn Pattern Step 6: Then it was time to finish the bindings. Here’s how I did them:
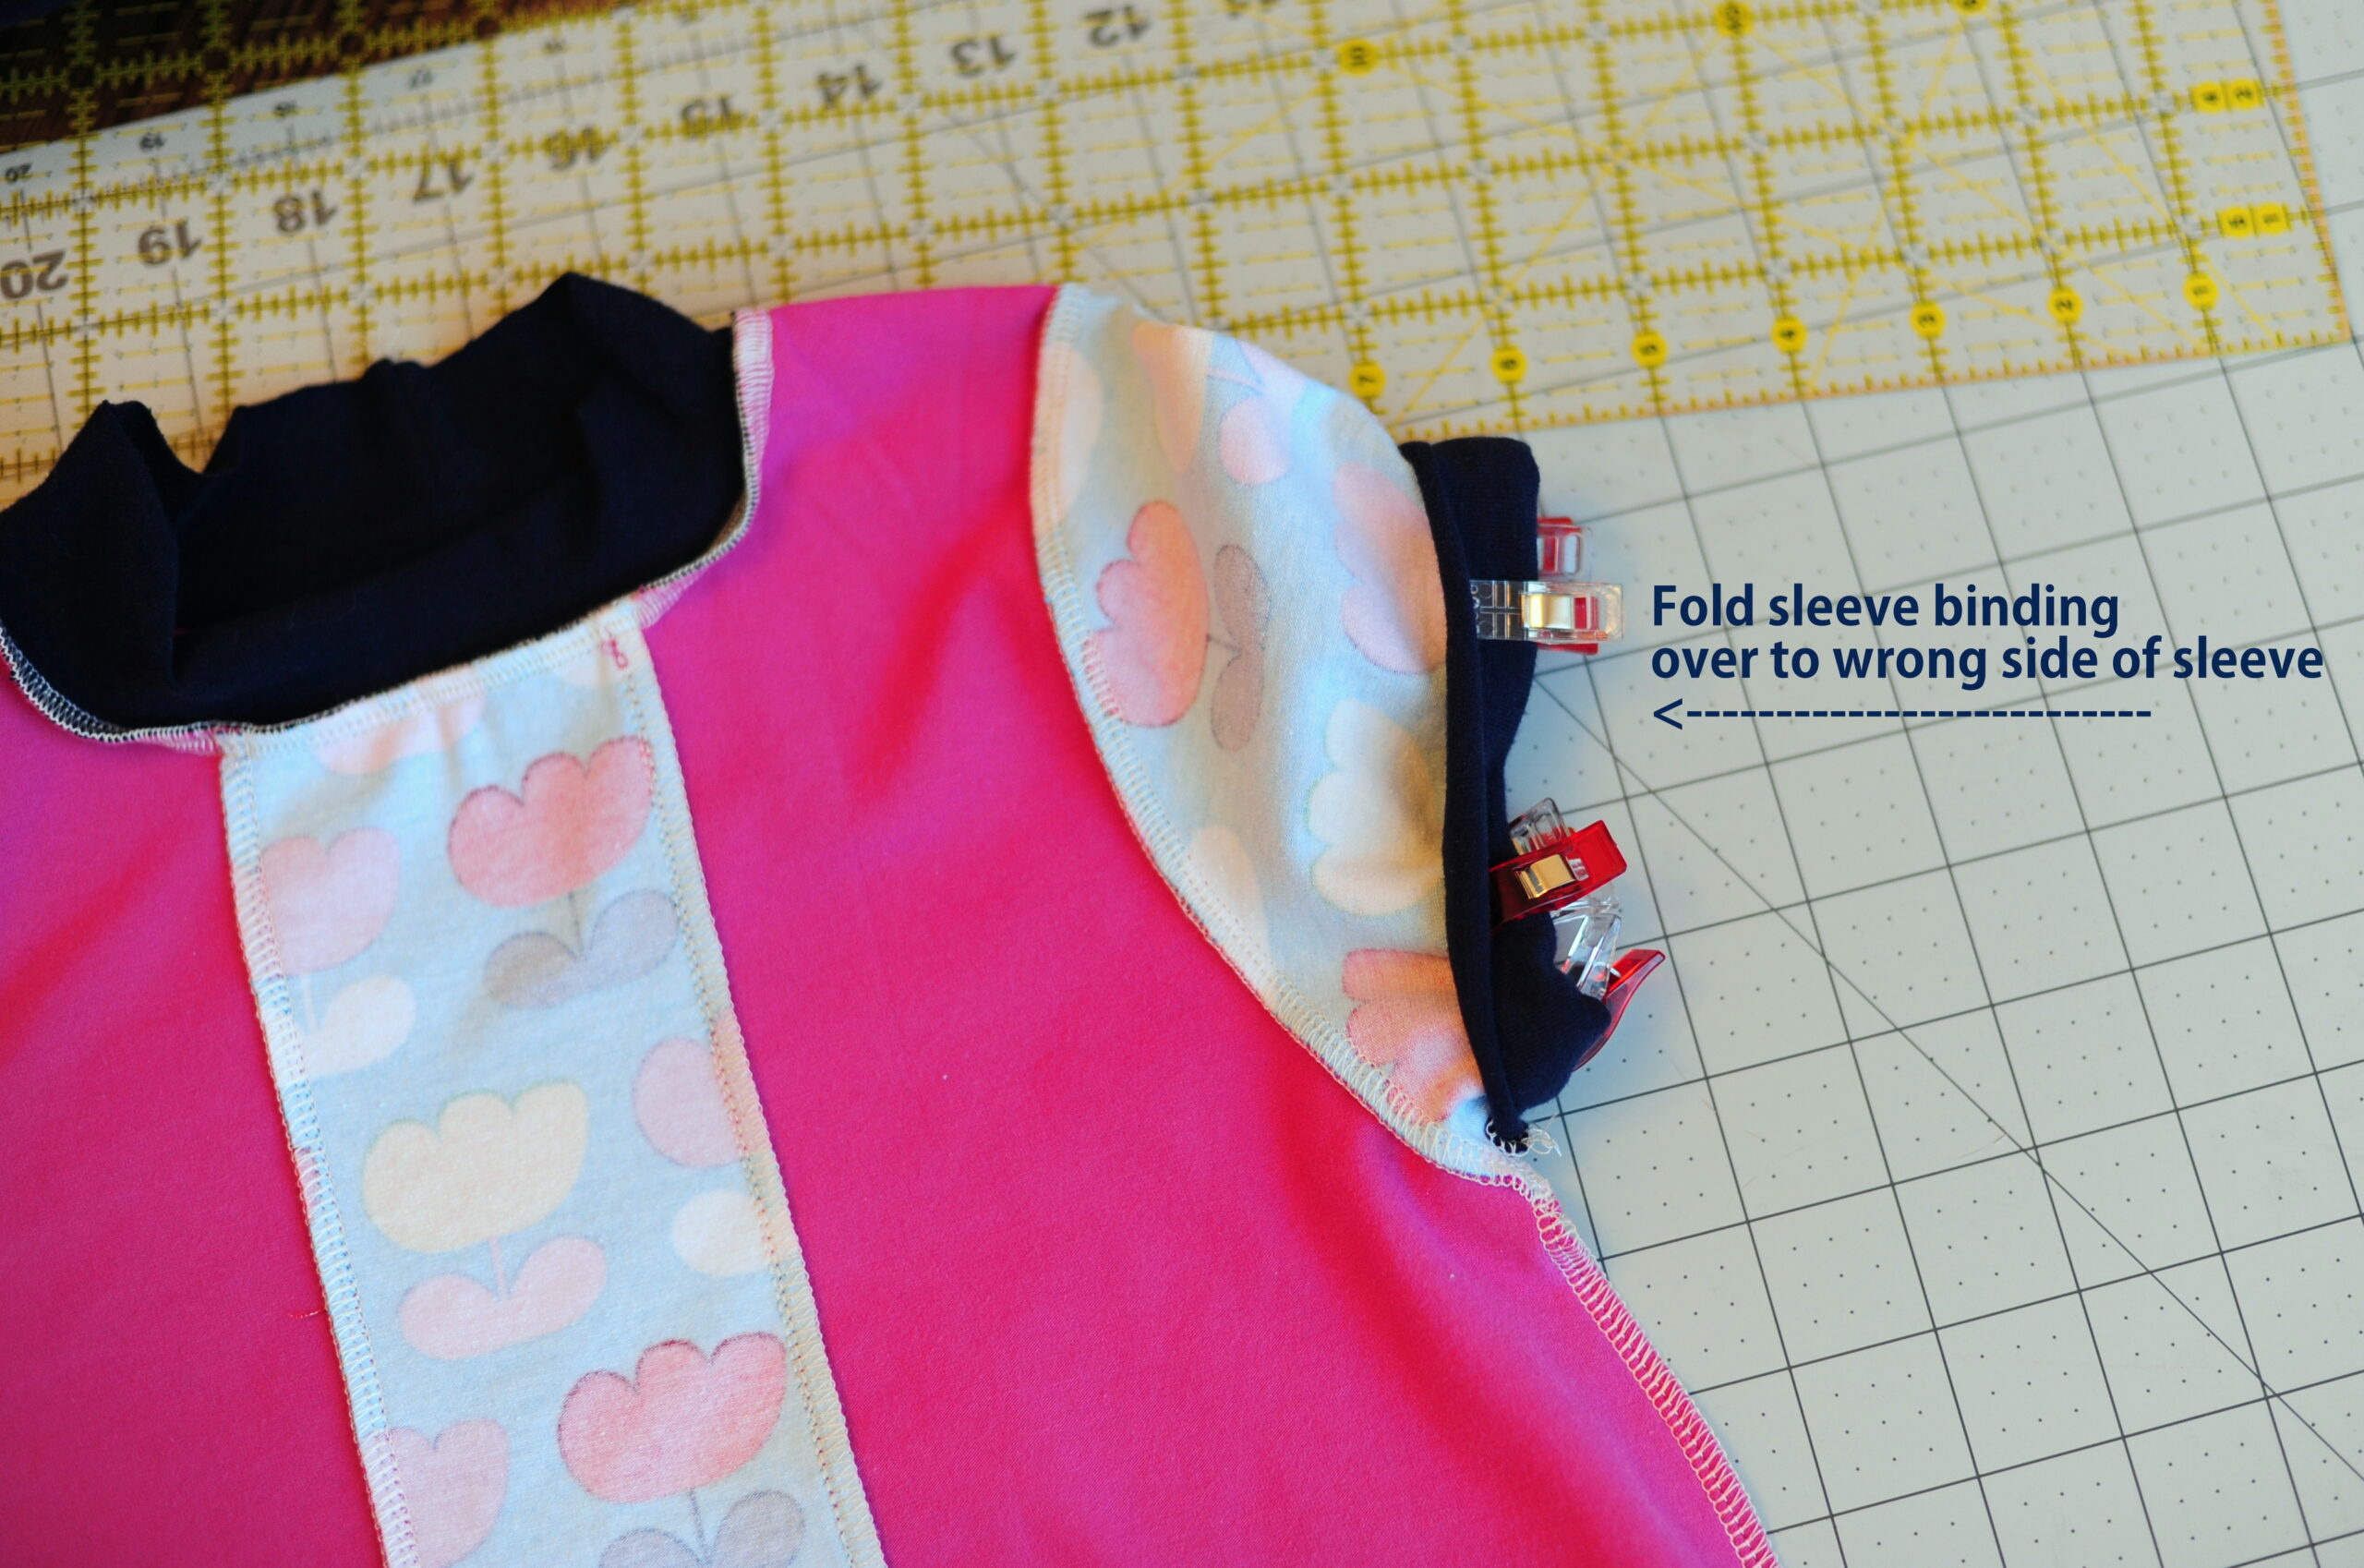
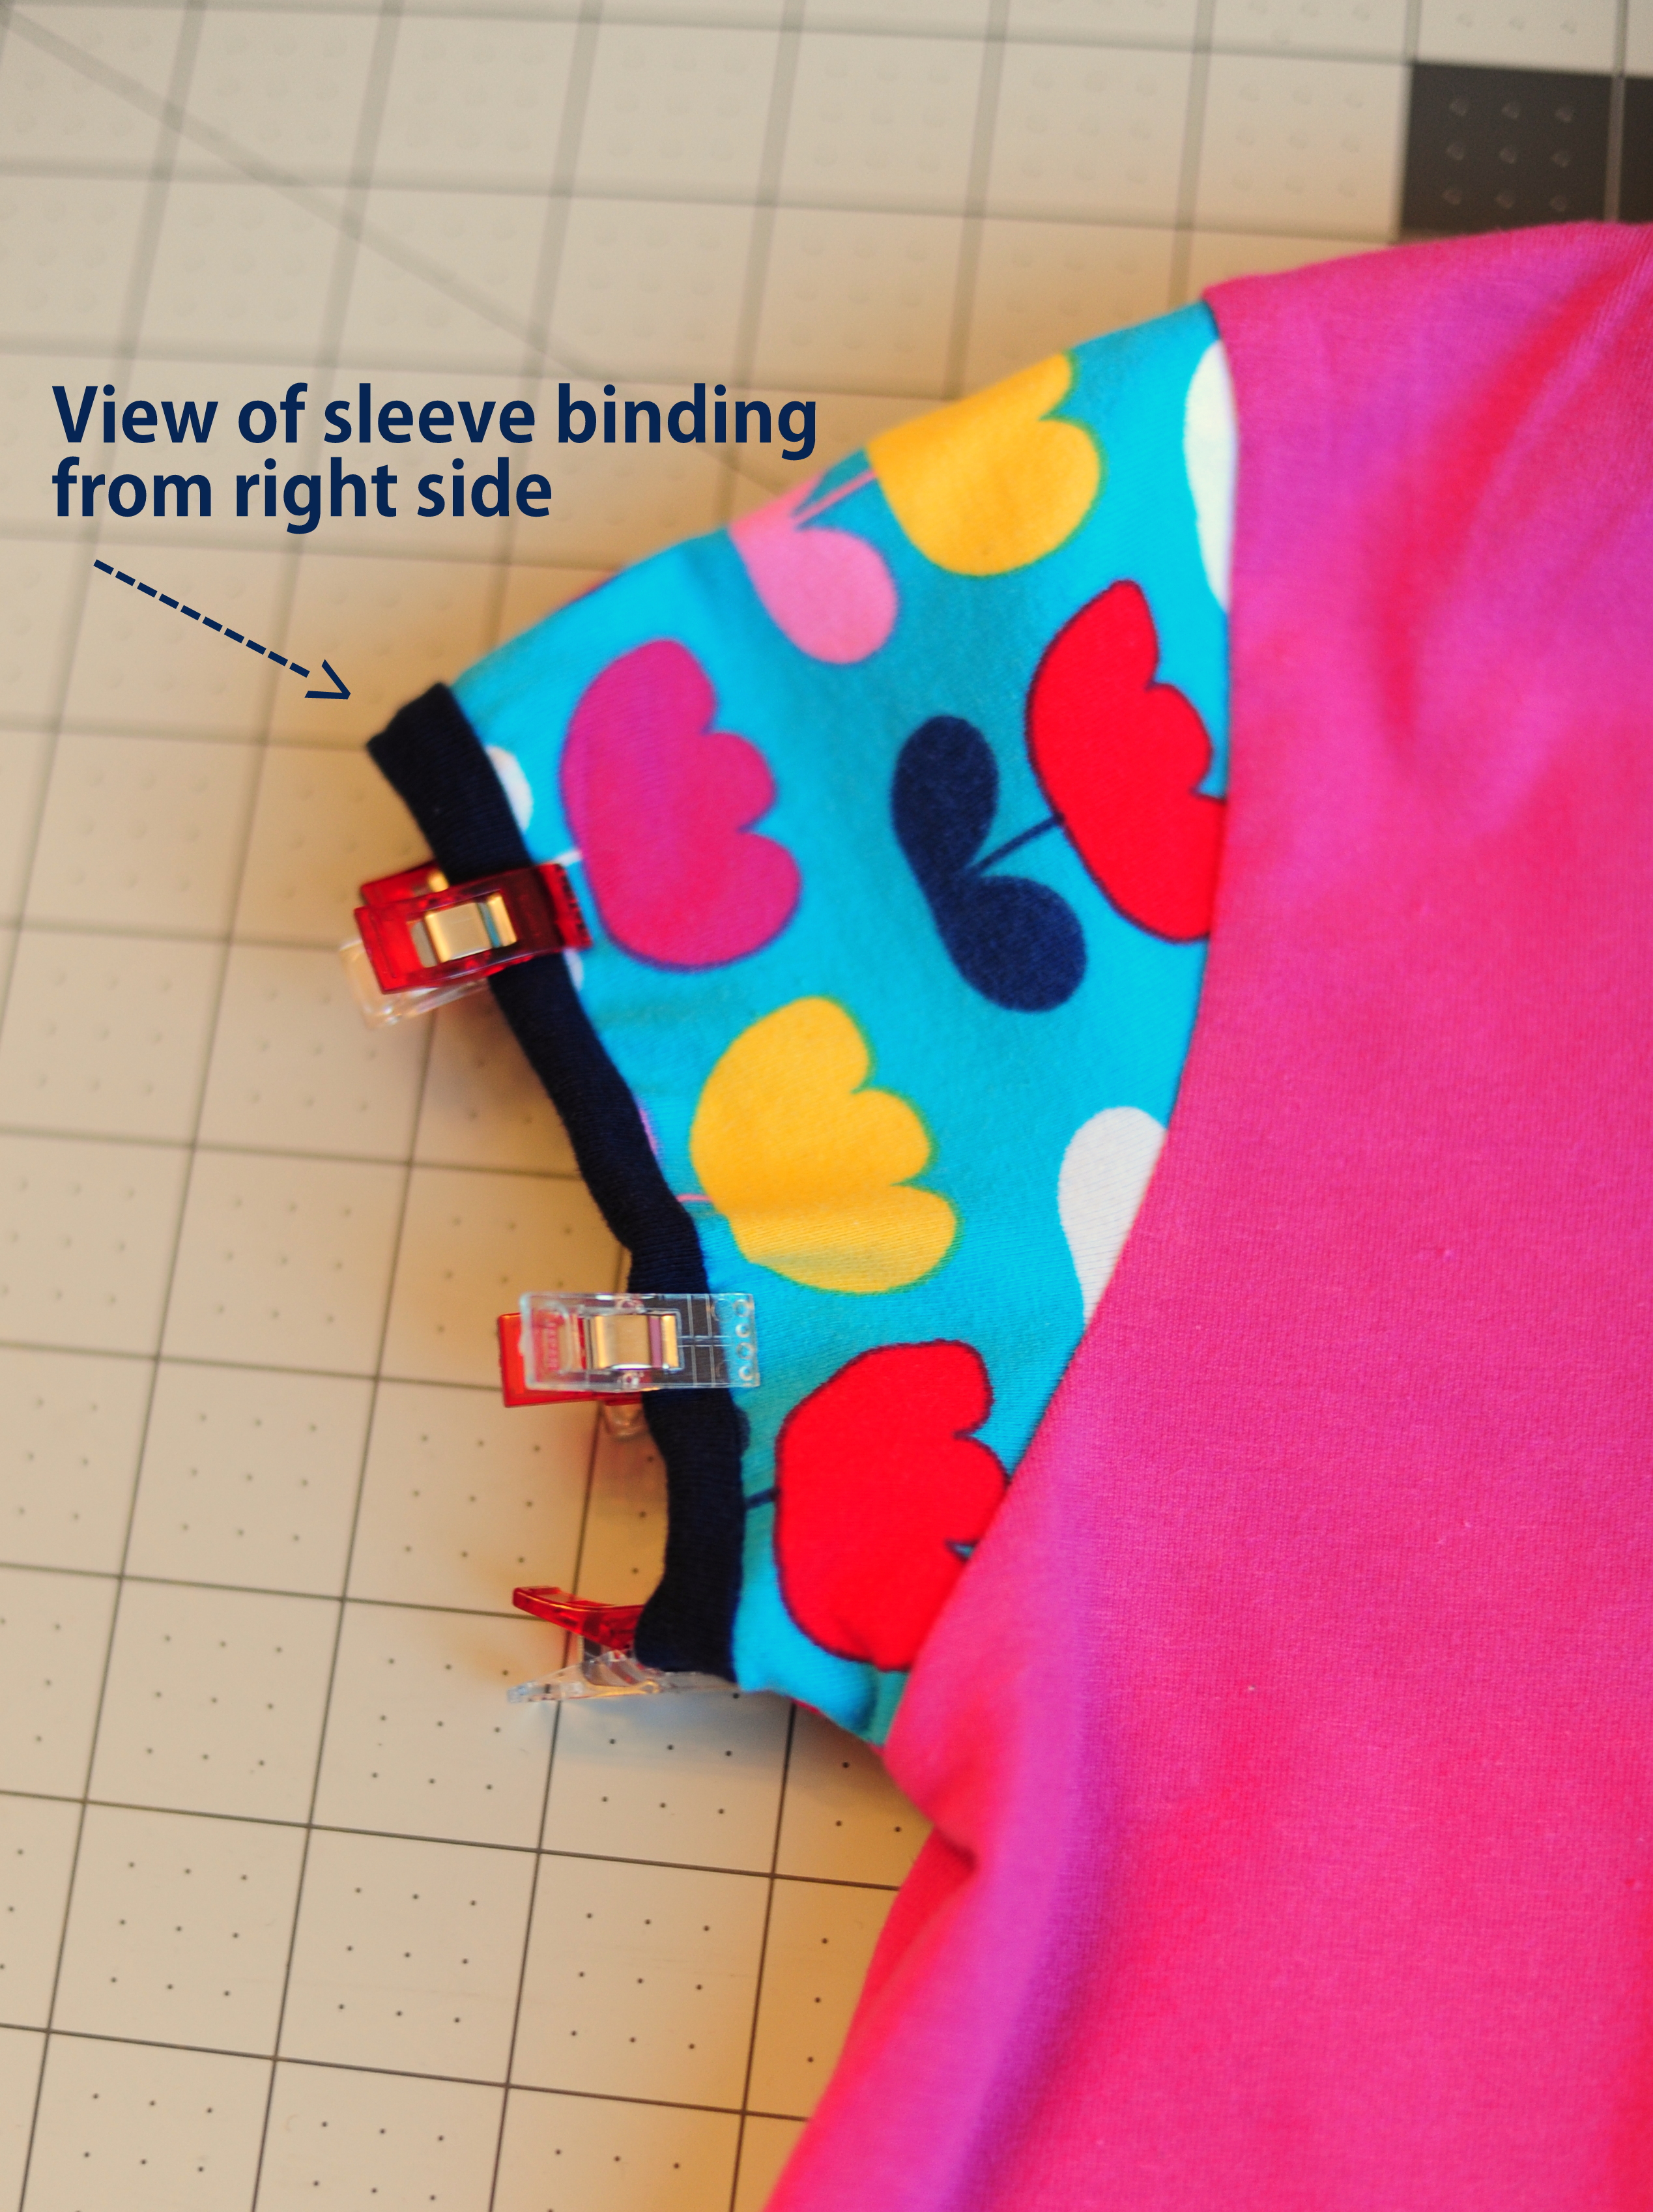
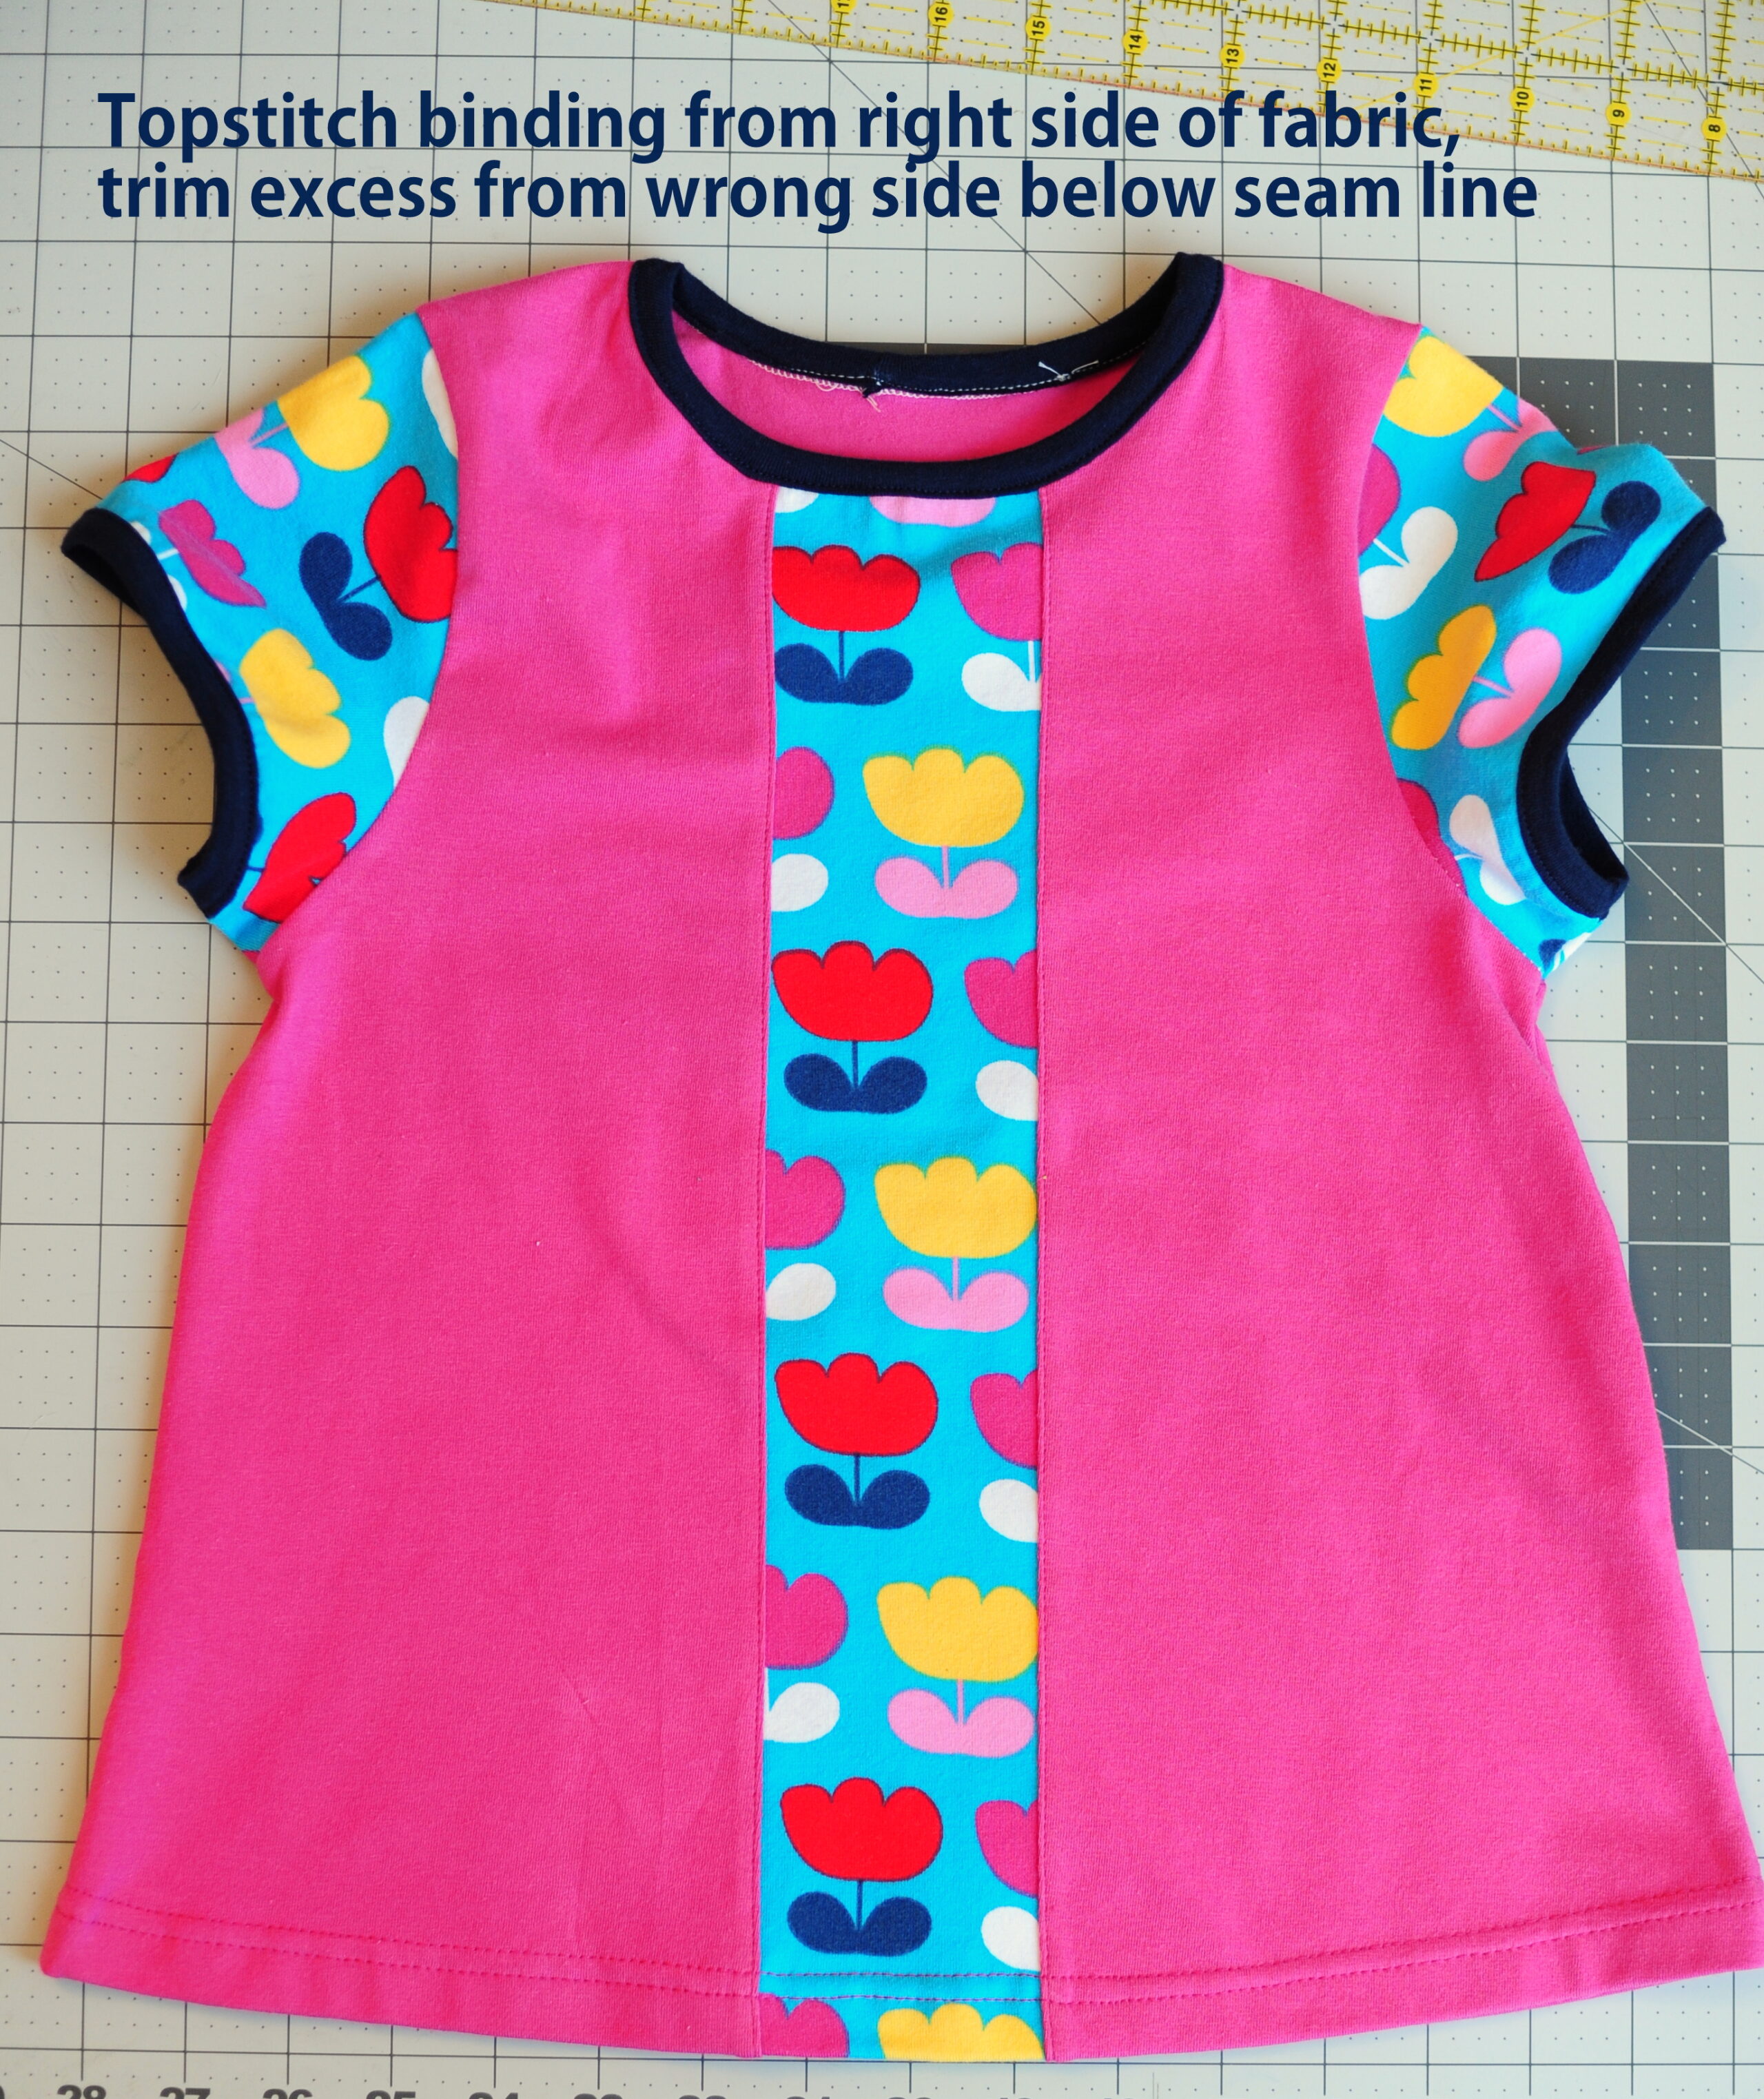
In Amy’s tutorial about bindings, she shows the proper way to do them when sewing with knits, folding the inside edge back up to the seam line so there are no raw edges exposed. The way I did them here was just a little quicker (and a little less neat), since I didn’t refold the binding under and just trimmed off the excess instead.

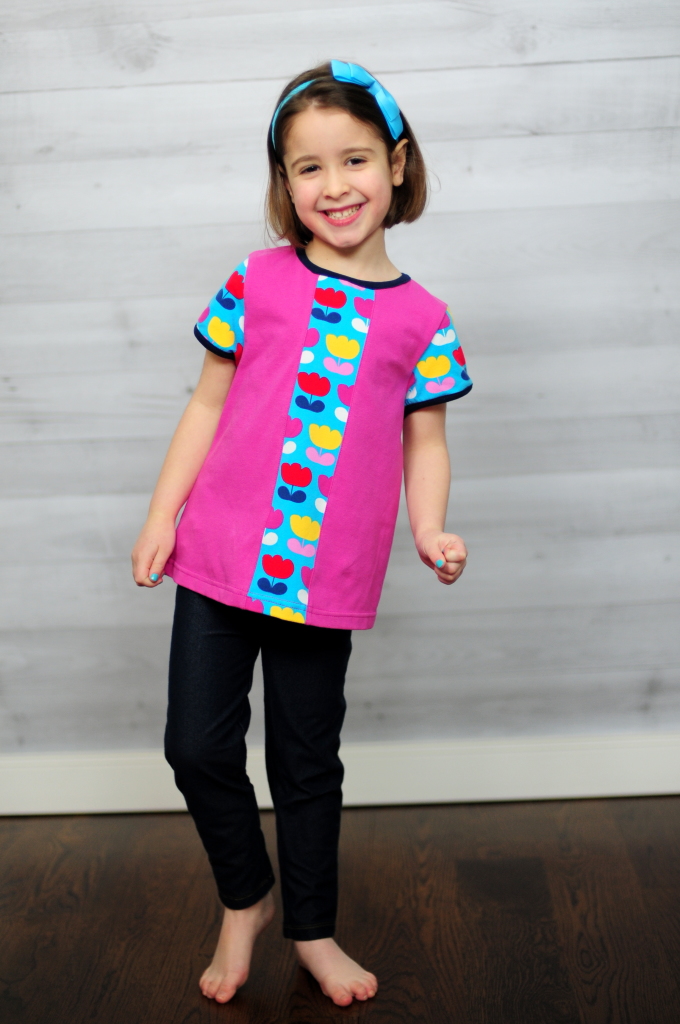
Here’s the finished product – I love how it turned out, and it fit Miss P quite well. She loved how comfy it was (I used cotton lycra knit fabric for the main fabric, accent panel, and bindings), and I love how sweet and springy it looks. Spring is still a ways off here, but I can dream, right? 🙂 The Evelyn pattern is a great way to use a small piece of fancy/custom/precious/leftover fabric for the accent panel, and would be cute just colorblocked with different knit solids as well. I’ll definitely be making more of these – I love the versatility of a pattern that I can use with both wovens and knits.
Basic Tips for How to Sew Knits on a Regular Machine
As mentioned earlier, we have a whole tutorial on sewing knit fabric with a sewing machine...but I'll give you a few tips today too:
- Stitches: A straight stitch is not recommended for knit fabric (if its all you have then make sure you use a medium (2.5 to 3mm stitch length). One popular stitch option is the narrow zigzag stitch, which allows the fabric to stretch without causing any popped seams. The zigzag stitch also allows for an increased width to your stitch - similar to a serger or overlock. Another stitch option that adds extra durability is the stretch stitch or lightning bolt stitch. These stitches have a built-in stretch to accommodate the fabric's movement. For a clean and professional finish. Also keep in mind your stitch length .
- Needle: Make sure you get the right needle. Ballpoint needles are meant for knit fabric. Also - keep an eye on needle size. Finally, if you want to do some topstitching with a regular sewing machine then you might want to use a double needle, aka twin needle. We also have a tutorial on Sewing with a Double needle.

- Thread: Using polyester thread in your bobbin is recommended as it helps with the stretch of the fabric.
- Presser Foot Pressure: Lowering the presser foot pressure will help keep your seems good looking and consistent.
How Important is a Test Garment When Sewing Knit Fabric?
Testing the fit of a test garment before sewing the final piece is crucial for achieving a perfect fit. It allows for necessary adjustments, helps determine the best seam finish and hemming techniques, and ensures a professional-looking final product.
Why is Pre-shrinking Your Fabric Essential Before Sewing?
Pre-shrinking your fabric before sewing is essential to ensure the final garment retains its shape after washing. It prevents unexpected fit issues and eliminates the risk of fabric shrinking more than sewn seams, causing distortion. Pre-shrinking also allows you to test colorfastness and address any bleeding or fading before sewing, reducing the risk of a misshapen or unwearable finished garment.
Conclusion
Understanding the basics and choosing the right tools and techniques is crucial to learning how to sew knit fabric like a pro. Knit fabric has unique characteristics that require special attention. From selecting the right needle and thread to making necessary adjustments on your sewing machine, every step contributes to a successful project. Don't forget the importance of a test garment to ensure a perfect fit and consider investing in special tools and notions that can make your sewing experience seamless. While a serger machine is unnecessary, pre-shrinking your knit fabric is essential before sewing to prevent any unwanted surprises later on. Remember, practice makes perfect, so don't be afraid to experiment and have fun with sewing knit fabric!
Thank you for joining us today to learn how to sew knit fabric! Before you leave make sure to join our Facebook Group to share what you make and ask questions from over 90,000 sewists. Also, keep in touch on social media by following us on Instagram. Happy Sewing!