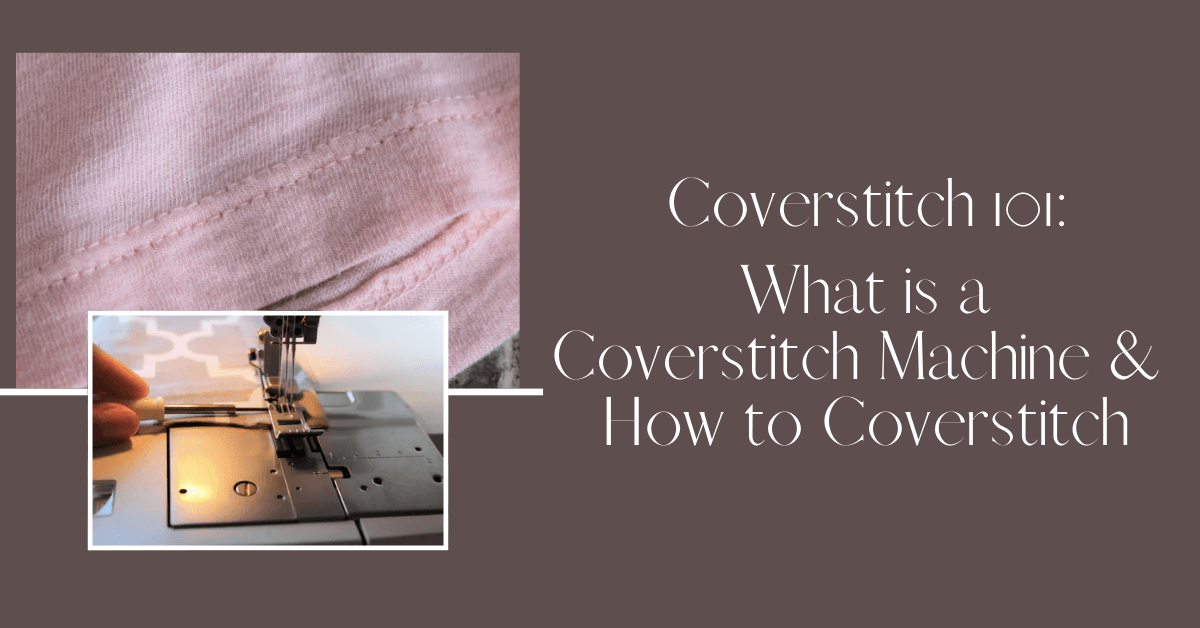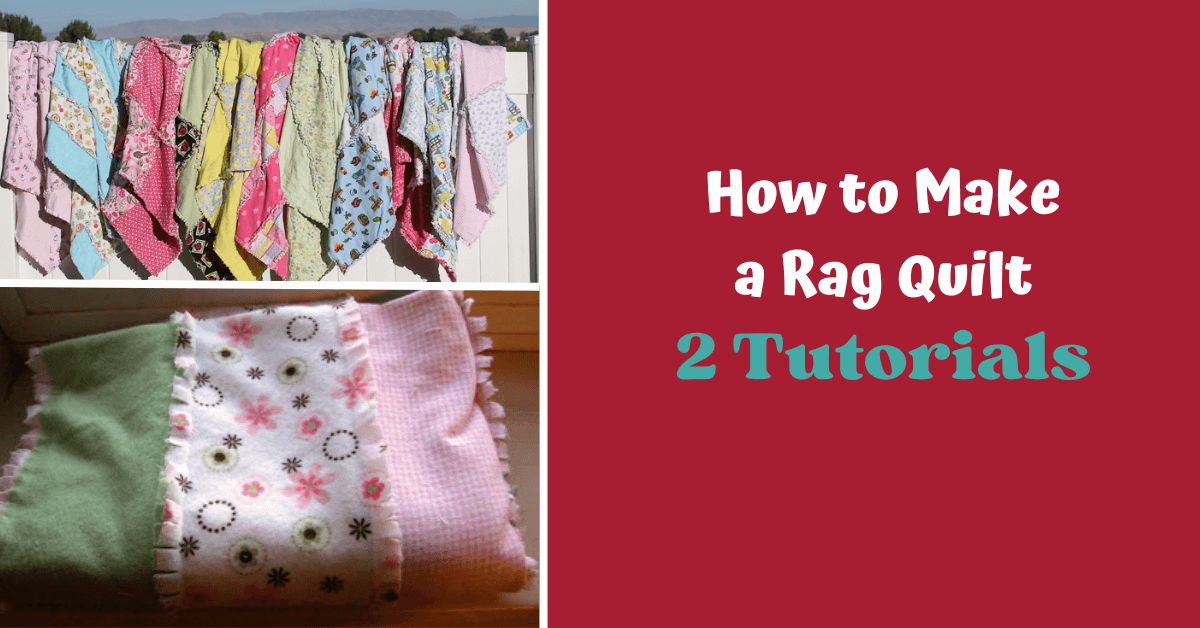
How to Make a Rag Quilt: A Step-by-Step Guide
Today's project is how to make a rag quilt. Are you a fan of cozy blankets and DIY projects? If so, then making a rag quilt might be the perfect project for you! Rag quilts are unique and charming, with their frayed edges and soft, warm feel. In this step-by-step guide, we will explain everything you need to know about making a rag quilt. We'll start with the basics, including what exactly is a rag quilt and how to choose the right fabrics for your project. Then we will dive into the nitty-gritty details of designing, cutting, sewing, and finishing your rag quilt. We'll even cover common issues in rag quilting and offer tips and techniques for success. By the end of this post, you'll have all the knowledge you need to create your very own cozy masterpiece!
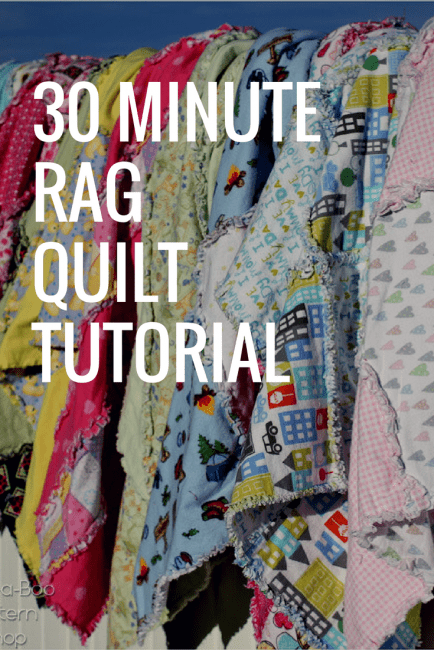
If you can sew a straight line you can make a rag quilt with this rag quilt pattern tutorial. I've made a ton of these and had a lot of fun coming up with a few different rag quilt designs. All of these were made with 1 1/4 yard cuts of flannel. This gives you a 44" square approximately to start your project with.
Understanding the Basics
A rag quilt is a unique type of quilt with exposed seams, giving it a cozy and rustic appearance. The process of "ragging" the quilt creates a soft and textured feel, perfect for snuggling up in. To make one, you sew together layers of fabric squares, exposing the raw edges for a ragged effect. Once your quilt is complete, washing it in a washing machine is important to encourage the fabric to fray and give it that signature rag look.
Selecting the Right Fabrics
When selecting fabrics, it's important to choose ones that will fray nicely, such as flannel or denim or maybe even minky. These types of fabrics will give your quilt that rustic and cozy look. Consider using different fabrics for a patchwork effect, adding visual interest to your quilt. Opt for soft and cozy fabrics that will make the finished quilt comfortable to snuggle up with. Keep in mind the size of the squares when selecting fabrics, as this will determine the overall look of your quilt. Don't be afraid to experiment with different color combinations to achieve your desired aesthetic. Remember, the right fabrics can take your project up a notch!
You can get new fabric from the store or make them with scraps or old clothing that you have laying around the house. Rag quilts are a fun beginner project because they look harder to make then they are. In reality, these quilts come together quickly and are a fun beginner quilting project if you're starting out sewing or quilting and looking to get your feet wet.
Determining the Size and Design
One of the first steps is to determine the size and design. Consider the desired finished size, such as a baby or lap quilt. Plan the pattern by arranging fabric squares in your desired layout. Consider the block size and the number of squares needed for your design. Experimenting with different arrangements and color combinations before sewing is important to ensure you achieve the desired look. You can turn to online resources like Pinterest or Instagram to find inspiration and ideas. You can create a beautiful one by carefully considering the size and design.
How to Plan Your DIY Rag Quilt Pattern?
When planning your rag quilt pattern, start by sketching it out on paper. Mix different-sized squares for visual interest and experiment with arrangements. Use quilting software or online tools to create and visualize your pattern. Look for tutorials and patterns for guidance and inspiration.
Gathering the Essential Supplies for Your Rag Quilt
You'll need a few essential supplies to create your first rag quilt. First and foremost, a sewing machine will be necessary to stitch the fabric squares together. Basic sewing tools like scissors and a rotary cutter are also essential for precision cutting. Since rag quilts typically have seam allowances of 1 inch, a ruler will come in handy for accurate measurements. To sew through multiple layers of fabric, consider using a walking foot. Lastly, don't forget to gather batting and backing fabric to complete the quilt sandwich. With these supplies in hand, you'll be well-equipped to begin your project.
Preparations Before You Begin Sewing
Before you start sewing your rag quilt, there are a few important preparations to make. First, be sure to wash and dry your fabrics before cutting them to prevent any potential shrinkage later on. Ironing the fabrics is also crucial to remove any wrinkles and ensure accurate cutting. Set up a clean and organized work surface where you can comfortably sew. Take some time to familiarize yourself with the settings and functions of your sewing machine. Lastly, prepare your fabric squares by cutting them to the desired size. By taking these necessary preparations, you'll be ready to dive into creating your first option.
How to Make a Rag Quilt | Step-By-Step Tutorial
1: Cut Squares for a Square Blanket
To start, you will need to cut out squares of fabric. Flannel is a popular choice, but you can use other fabrics like denim or woven material as well. Depending on the size of your desired quilt, the number of squares you need may vary. For instance, for a 16-square rag quilt, each square should measure around 11 inches. It's important to ensure that each square is cut uniformly to make the sewing process easier and to ensure that the finished product looks neat and tidy.

I made some others using nine (9) 14" squares of fabric. Just make sure that you have enough squares to get a perfect square laid out in a symmetrical pattern.

2: A Quilt with Diagonal Stripes
While rag quilts are traditionally made with squares, they can be created with a variety of different designs. A diagonal stripe pattern is one example of an alternative design that can add visual interest to your quilt. However, this design can be challenging to sew since the fabric tends to stretch along the bias. To combat this, trimming the edges at the end can help even out any inconsistencies. In this particular example, the stripes used are around 6 inches in width. With some patience and attention to detail, you can create a beautiful and unique blanket using non-traditional patterns and designs.

3: Basic Stripes
I made another using some basic Stripes.

4: Triangles rag quilt pattern
For a triangle quilt pattern, you can cut your fabric into 4 equal squares and then cut through each square from corner to corner to create your triangles. I could sew each of these rag quilts in under 30 minutes. Then I had a group of women at church help me snip the fringe and we donated them to a children's shelter.
This tutorial is a great project to work on with a group because anyone can snip fringe and it's fun to chat while you snip :) We didn't get through the whole pile, so some of the 8-12 year old girls also worked on a few. It's a great way to get the kids involved!

Here's a quick look at the back of the rag quilt. On the front you have fringe and the back is all finished seams.

Step by Step Instructions
Let's get sewing! Here's the steps I used to make my 30 minute rag quilts.
Step 1. Decide on your design and get your fabric cut. You can use of the quilt designs above or you can come up with something else. If you google designs for these, you'll see a TON of different options you can make easily. For an alternating pattern, flip half of the pieces over. Each piece should still be double thickness with the wrong sides together
Step 2. Get started sewing. Grab one piece (remember still double thickness) and sew it to the next piece in your row (also double thickness). Repeat the process across the row, ensuring your exposed seams are all on the top of the quilt.

Step 3. Sew your rows together. Again the exposed seams are on the top of the quilt.

Step 4: Trim any uneven edges around the quilt and then sew around the entire quilt 1/2" from the edge. Now snip, snip, snip! I snipped my fringe about every 1/4". After you're done toss it in the dryer and it will fluff up.

And there you have it - all the details of how to make a rag quilt. You can make it in as little as 30 minutes. I hope you enjoyed this tutorial and can start making your own. You'll find this quilt project is easy and fulfilling.
Post-Sewing Steps: Washing and Drying
To ensure it retains its cozy and textured look, you should follow a few post-sewing steps. Start by pre-washing all the fabrics before assembling the quilt to prevent any shrinkage after completion. Once your quilt is finished, machine wash it gently using liquid fabric softener to keep it soft and fluffy. When it comes to drying, tumble dry the quilt on low heat to enhance its ragged effect. Remember to fluff the quilt in the dryer to achieve maximum softness. Finally, sit back, relax, and enjoy the cozy texture of your finished quilt.
How to Care for Your Finished Rag Quilt?
To care for your finished rag quilt, wash it separately to prevent color bleeding. Use a mild detergent and avoid fabric softener in subsequent washes. Air dry or tumble dry on low to maintain its texture. Avoid excessive exposure to direct sunlight to prevent fading. Store the quilt in a cool, dry place to preserve its quality.
Troubleshooting Common Issues in Rag Quilting
If your quilt blocks aren't aligning properly, consider adjusting the seam allowances for better accuracy. It's important to check that your fabric squares are consistently sized to ensure proper alignment. To prevent shifting during sewing, use pins to secure the fabric squares in place. Additionally, adjusting the tension settings on your sewing machine can help achieve balanced stitching. Remember to take your time and be patient throughout the process to achieve precise results. By following these troubleshooting tips, you can overcome common issues and create a beautiful rag quilt.
What to Do if Your Quilt Blocks Don't Align?
If your quilt blocks don't align, there are a few steps you can take to fix the issue. Double-check measurements and seam allowances for accuracy, adjust fabric squares and re-sew seams to realign the blocks, use a ruler or template to cut fabric squares accurately, take extra care when joining rows to maintain block alignment, and press seams flat to improve overall alignment.
Tips and Techniques for Better Rag Quilting
Experiment with a variety of fabrics to add unique textures to your quilt. Flannel squares can provide extra warmth and coziness, while denim can give your quilt a durable and rustic look. If you're a beginner, watching video tutorials or following online guides can provide step-by-step instructions for better rag quilting. To connect with other quilters and share your progress, consider joining quilting communities on social media platforms like Facebook. By incorporating these tips and techniques into your rag quilting process, you can create a one-of-a-kind quilt that showcases your creativity and skills.
Can You Make a Rag Quilt Without a Sewing Machine?
Yes, it is possible to make a rag quilt without a sewing machine. You can hand-sew the fabric squares together using a sturdy needle and strong thread. Secure the squares with knots or running stitches for durability. Embrace the imperfections for a charming handmade look. Alternatively, consider borrowing or renting a sewing machine for more efficiency.
Thank you for joining us today to learn how to make a rag quilt. Making a rag quilt is a fun and creative project that allows you to personalize your own cozy masterpiece. By understanding the basics of a rag quilt, selecting the right fabrics, determining the size and design, gathering the essential supplies, and following the step-by-step sewing process, you can create a beautiful and durable rag quilt. Remember to take care of your finished quilt by washing and drying it properly to maintain its softness and shape. If you encounter any issues during the quilting process, don't worry! There are troubleshooting tips and techniques to help you overcome common problems. So grab your fabrics and tools, unleash your creativity, and enjoy the rewarding experience of making your very own rag quilt.
Before you leave, make sure to come join our Peek-a-Boo Pattern Shop Facebook Group. Happy quilting!