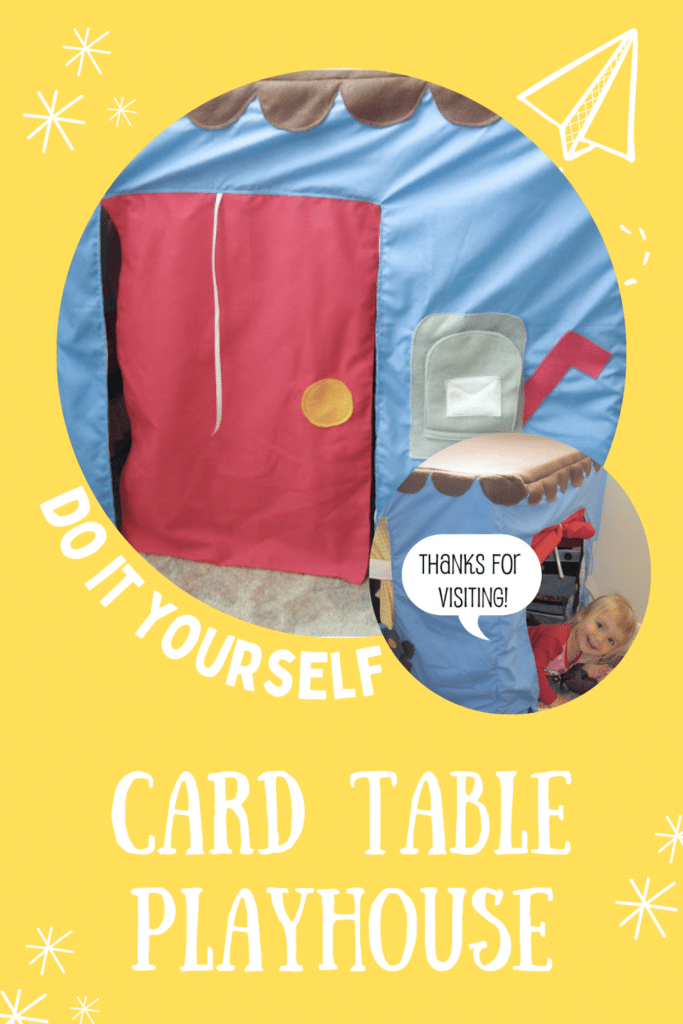
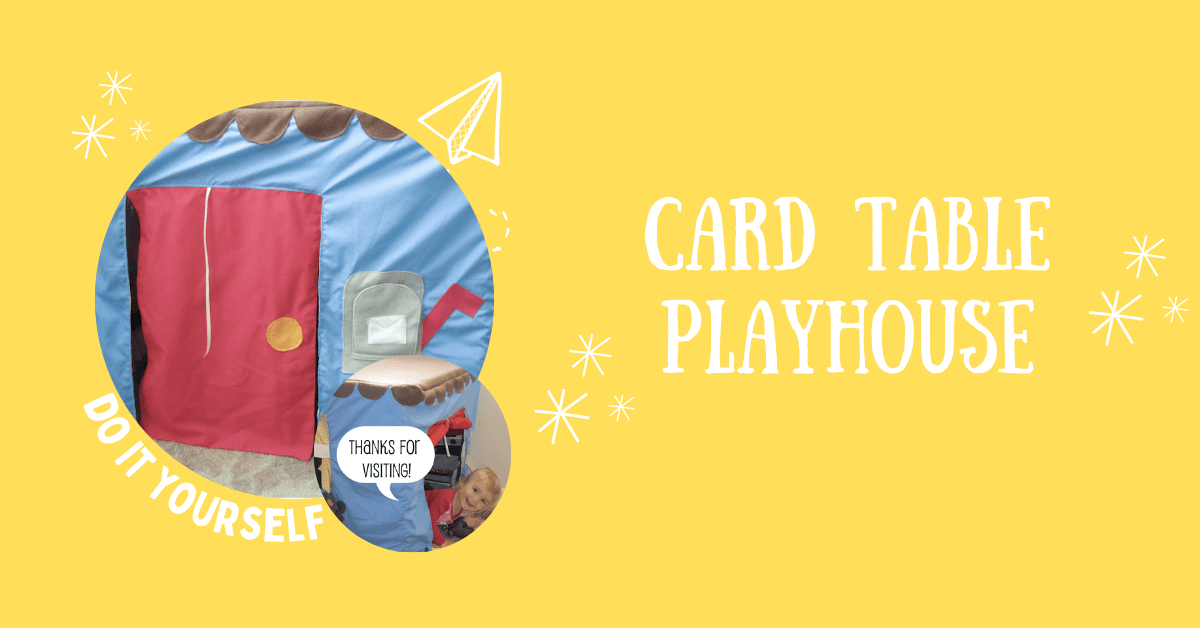
I finally did it! I made a diy card table playhouse for little miss and it’s our new favorite toy! I’ve been wanting to make a diy card table playhouse for over a year now and I finally got around to it in time for her 2nd birthday. I didn’t do a tutorial, but I do have some tips for you:)
How to Make a Card Table Playhouse
Table Playhouse Tour
First let’s take a tour…
The front door complete with a mailbox:
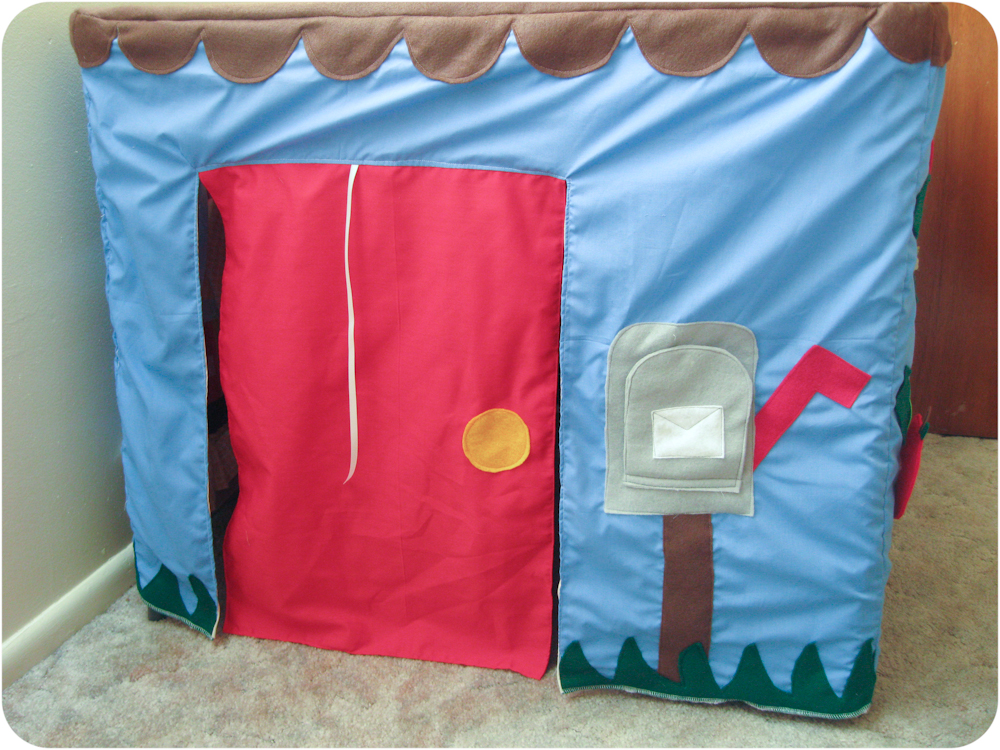
I used ribbon ties on either side of the door so it can be held open:
And of course the mailbox opens up and comes with some letters:
A very popular feature:)
Around back is a home for fido (little miss is a big time dog lover) with a doggie door that goes through to the inside (I saw this idea over at Homemade by Jill)
On one wall I made a little window (essential or the playhouse would be a bit dark inside) and beneath it is a flower box with watering can. The flower heads and watering can are attached with Velcro so the flowers can be watered and picked.
And around the other side is an apple tree. All of the apples can be picked and gathered in the basket. And since little miss is a major doll lover I added a little rag doll who Velcros to the swing (she flops around a bit but it’s still fun)
My 1st attempt at making a doll- definitely could use some practice:)
And then because I’m a bit crazy I decided to make this house fully lined so I could decorate the inside too. Her playhouse might just have more amenities than our apartment:)
I slaved over this kitchen and in the end it was totally worth it!
The fridge and freezer both open up and they’re stocked with ice cream sandwiches, ice cream cones and 2 bowls for holding produce. And then you can put all of that yummy food into a pot to make soup.
Just doing a bit of cooking…
Along the back wall is a fireplace (the doggie door from outside opens up through the fire). Above it is a picture frame, which I still need to fill with a family photo or something.
And of course I had to make a little bed for the baby and finish off the window with some curtains
(sorry about the horrible photo- taking pictures underneath a card table is ridiculously hard)
By the front door, I made a little bookshelf to hold some of her favorite reads. The hole is where the mail comes through.
Phew…and that completes our tour!
Card Table Playhouse Tips
- Do your research: there are a LOT of cute ideas out there and you only have so many walls, so make sure you come up with your game plan before you get started
- Make it gender neutral: these are super fun for little girls and boys so stick with a theme that will work with all of your kids (and future kids)
- Make a materials list and then wait until you have a lot of coupons or there’s a sale- this takes quite a bit of fabric but it’s not too expensive if you shop smart
- I used broadcloth for the walls and I liked that it was a bit lighter than felt. This worked great for a lined house but for a single layer you might want to stick with felt. The broadcloth also wrinkles a bit during storage
- Felt is your best friend for embellishing- it doesn’t fray, it’s cheap, and you can even put a few things together with your glue gun:)
- If you’re planning on lining your house keep in mind that a wall with a window on the outside will have a window on the inside too. Common sense but you do need to plan around it
How I made the Table Play House
For my card table and design here’s what I ended up buying:
- 3 1/4 yards broadcloth for the walls (I bought 2 colors since my house is lined). If you use felt you won’t need as much because it comes on a wider bolt
- 1 yard brown felt for the roof, tree, shelves, etc.
- 1/2 yard white felt for the kitchen
- 1/3 (maybe it was 1/2?) yard black felt for the kitchen, dog house, and fireplace
- 1/2 yard red broadcloth for the front door
- 1/4 yard felt in various colors for the embellishments
And here’s how I put the card table playhouse together:
- Embellish each wall- remember to leave a seam allowance on each side
- Sew the 4 walls together along the side seams (repeat with the inside of the house if you have one)
- Baste the top edge of the inside of the house to the top edge of the outside of the house with wrong sides together
- And then sew on the roof!
If you have any questions just let me know- I’m happy to help:)
Other Baby Related Tutorials
Also, come and join our sewing community in the Peek-a-Boo Pattern Shop Facebook Group.
46 Responses
I too love this. I am making several of the walls. I have a question re. the felt. Did you use a type of stitch witchery to applique the felt–especially the kitchen area? or simply sew it on? or glue it on? Did you need snaps or velcro for the food in the refrigerator? Thank you so much for your encouragement for me to make this!
Maja
Hello,
Adorable! May I ask approx how many hours total you think it took to complete?
Thanks!
What would you think about making this out of the nylon flag fabric? I was thinking it would be light weight and fold very compact. Plan to make it for grandchildren for Christmas, but they have very limited storage.
That should work. The only problem you may run into is fraying edges.
this is awesome play house!
but i have a question- how do you wash it?
I haven’t washed our play house yet and we’ve had it for a few years. I would spot clean any spills. I don’t think felt is machine washable
just curious, now that you daughter is older does she still play with this? Wondering how it would go over with my 5 year old
She’s 4.5 now and still loves it 🙂 I keep it up most of the time but anytime I get it down she has a blast with it
Of all the patterns online for a play house, I liked yours the best. Thank you so much for sharing this!
Glad you like it 🙂 It’s one of my kids favorite toys ever!
Fantastic. It looks like so mch fun. Are you a preschool teacher. Lucky child to have a creative mom. Congrats!
I love it.
Stopping by from your Fridays Fav Party. Amy, This is super cute!!! you did an amazing job!!!
Amy,this is fabulous. I had always wanted to make one of these for my kids, but they grew up too fast. I am thinking I need to make one and keep it for when the grandchildren come to visit. What great ideas you had. Thanks for sharing.
Capi
was the top of your table rounded? How did that affect sewing the sides onto the roof? any suggestions? and does it fit tightly to your table? It looks like it. I’ve got all my sides sewn together, but I’m afraid it’s not going to fit tightly over my table. Where did you buy your table from?
What did you use at the “bookshelf” so that the books were visible? Vinyl?
Super cute, you have obviously visited this shop many times: http://www.etsy.com/shop/missprettypretty.
Amy, I love your playhouse and am plan on making one for my 2 year old twin daughters for Christmas. I was wondering if you used a pattern to make everything or did you just free hand it?
Thanks
super cute! I think your pictures turned out great. Way better than mine did anyways. (corduroyscloset).
I’ve seen a lot of these floating around, but this is by FAR the coolest! Thanks for the tips. Can’t wait to make one myself!
Just want you to know your playhouse is the best I’ve seen and I am planning on starting on one very soon. I’ve had this bookmarked since I first saw it…
Absolutely unbelievable ! Amazing, what can I say ? I wish I could sew !!!
Virginie @ thatcutelittlecake.blogspot.com
I can’t even believe my eyes. What an awesome job you did!
OMG!!!! This is AMAZING – seriously amazing!! My daughter’s 2nd birthday is also coming up, I had better hurry up!!! I do have a couple of questions for you though…. 1. How long would you say you spent on this project? Obviously it was time consuming… 2. How much would you say you ended up spending on this project? Just a ballpark would be WONDERFUL! 🙂 Thanks again for sharing!!
I used quite a few coupons for my materials and I think I came in around $30. I ended up overbuying on some stuff though. And it probably took me around 20 hours??? Hard to say but I think I made it over about 2 weeks. If you don’t line the inside you could get it done pretty quickly
Thanks so much for responding!!! I bought a bunch of materials and I’m excited to start one for my little girl this weekend. My next question is – did you put some kind of interfacing or anything between the two layers? Your’s looks like it’s a litle poofy, and possibly more stable than just two pieces of broadcloth sewn together. 🙂 thanks again!
I didn’t use interfacing and it’s holding up well. By the time you applique on so much felt it ends up being pretty sturdy
I have 6 weeks until my daughter’s second birthday. During that time I have to finish making Valentines, throw a baby shower, and plan her party. I think I can do this!! I may call in help from my mom and sisters for this one. Thanks for posting this amazing project!
Love this. I am going to pin it… and i will HOPEFULLY one day… maybe make this 🙂
Amy, you are AMAZING!!! I am just so impressed and can’t imagine putting this together myself. Maybe one day I will be motivated enough! 🙂
That is fantastic! I love all the thoughtful details!
Wow Amy!! It looks like you really put a lot of work and thought into this! SO neat!
holy cow, amy! this is AMAZING!!! I love love love it! I know lucy would have loved to play with little miss in it!! maybe one day i’ll make one… a big maybe. 🙂
Amy that is simply wonderful. It is really, really cute and well done. By the way, I have an awesome little boy Hindman quilt all done.
Oh wow this is incredible!!! I am SO making this! Thanks for the tips Amy!
Just plain amazing! You did such a great job! Thanks for the information, I love that give a rough idea of about how much fabric is needed. I, too, have wanted to make one of these for a while.
I love it! Pity my boys are too old now for one. I love how you’ve put in a fireplace and kitchen and everything else.
Wow, Amy! This would provide hours and hours of entertainment for my little two! Awesome job!
PINNING it 😀
I’m not a grandma yet (kiddo is almost 19 and only newly engaged so wait a few years) but this WILL come in handy when the time is right!
Smiles, Suzanne in NW IL
Your Follower
You did a great job! I’m sure your little darling loves it!
Thanks for sharing!
That is the cutest one I’ve ever seen! You are so talented. I LOVE it! This is something she will treasure forever and I’m sure it will be saved and used over and over. When I see your projects, you make me want to finally learn how to sew. Great job!!!
Very cute! I bet she loves it!
Wow Amy!!! That’s all I can say…. I’ve thought about making one of these on and off for a while, cause I saw one on the makeit-loveit blog, but yours is SOOO awesome! I don’t know if I will attempt it yet, but someday I want to try! You are simply amazing 🙂
This turned out so great! I love all of your ideas. I made a playhouse a couple of years ago, and for some strange reason, I have the itch to make another one. I like the idea of lining it and having fun on the inside, too! 🙂