DIY Garden Flag: How to Make a Garden Flag
Hi, Peek-a-Boo readers! Kelly here again with tutorial on how to make a garden flag. Has spring arrived at your house? It has here, and I love it! After a long, cold winter of lifeless brown blahness, nothing is better than seeing the green grass and rainbow flowers bloom.
Your outdoor space is an extension of your home, and personalizing your yard or patio can transform it into a welcoming oasis. DIY garden flags or banners are a fun and easy way to add a personal touch to your backyard or front yard. They not only make your outdoor space look more inviting but also serve as a great conversation starter. In this blog, we will introduce you to the world of DIY garden flags, their benefits, and how you can create them on your own with essential materials. We will guide you step by step in making your first garden flag, give you tips for designing visually appealing flags, and help you weatherproof them so that they last long. Let's get started on creating beautiful garden flags that make your outdoor space stand out!
And to celebrate spring and add even more fun color to the yard, I thought a garden flag would be the perfect addition! These would make great, easy Mother’s Day gifts! You can personalize these in so many ways! You could create a set with one for every season. It would be the Mother’s Day gift that is year round!
DIY Garden Flag Tutorial
DIY Garden Flag Supplies
- 14″x20″ piece of fabric that is sturdy. Duct cloth, bottomweight, or outdoor fabric are all great choices.
- Scraps of solid color woven fabric to applique with
- Scraps of ribbons
- Sharpie, or other drawing utensil
- Ruler
- Heat n Bond
- Basic sewing supplies / sewing machine
Choosing the Right Fabric for Your Flag
When choosing the fabric for your DIY garden flag, there are a few key factors to consider. Opt for lightweight fabrics that flutter in the breeze, adding movement and visual appeal to your outdoor space. Look for fabrics with vibrant colors that won't fade over time, ensuring that your flag remains eye-catching and attractive. Additionally, consider using weather-resistant fabrics that can withstand the elements when displayed outside. Experiment with different fabric textures to add depth and visual interest to your flag. Lastly, choose fabrics that can be easily washed and dried, allowing for easy maintenance and longevity.
Garden Flag Sewing Instructions
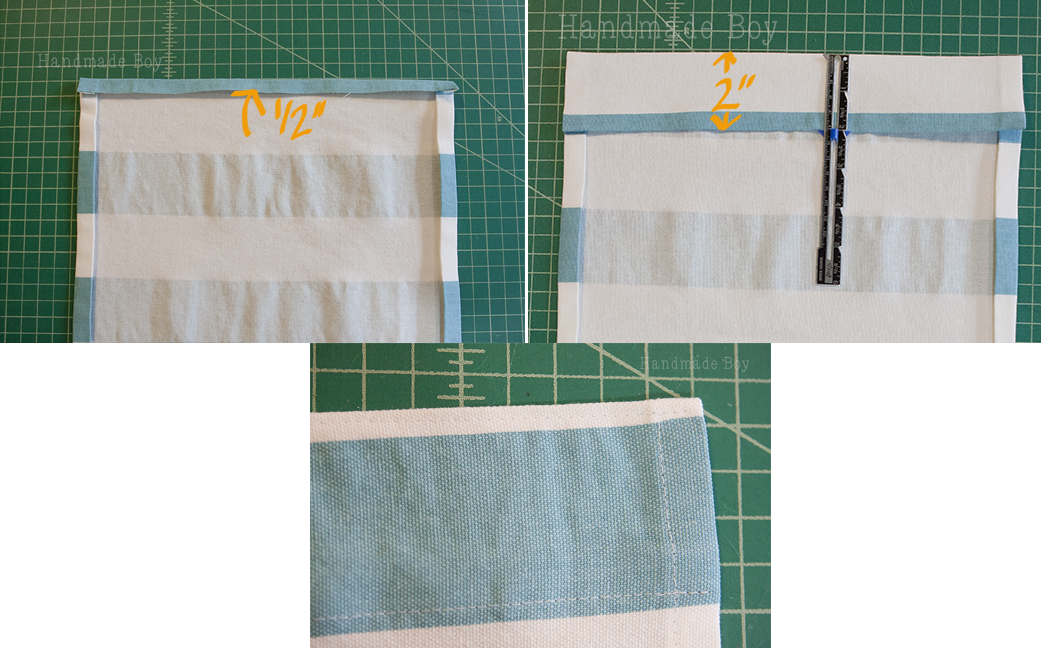
If you haven’t already done so, cut your main fabric into a 14″x20.5″ rectangle. Hem the long sides by folding over 1/2″ and pressing, then fold over another 1/2″ and press again. Topstitch into place from right side 3/8″ from edge.
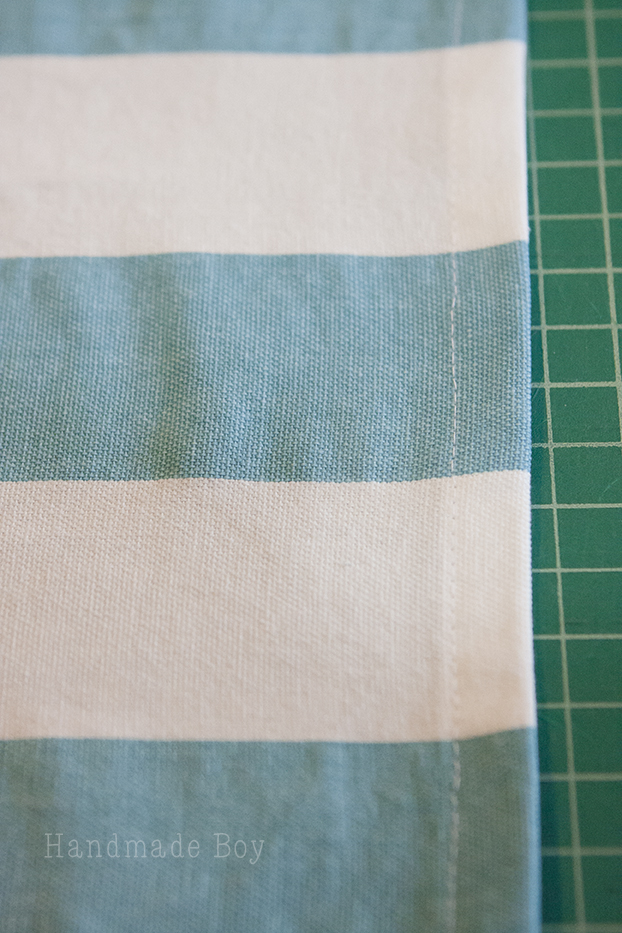
Repeat with the bottom hem.
Create a pocket at the top to slide the hanger into by folding the edge over 1/2″ and pressing. Now fold over again 2″ and press. Stitch into place from right side. You can also stitch 1/8″ from the top fold to help the pocket keep it’s shape.
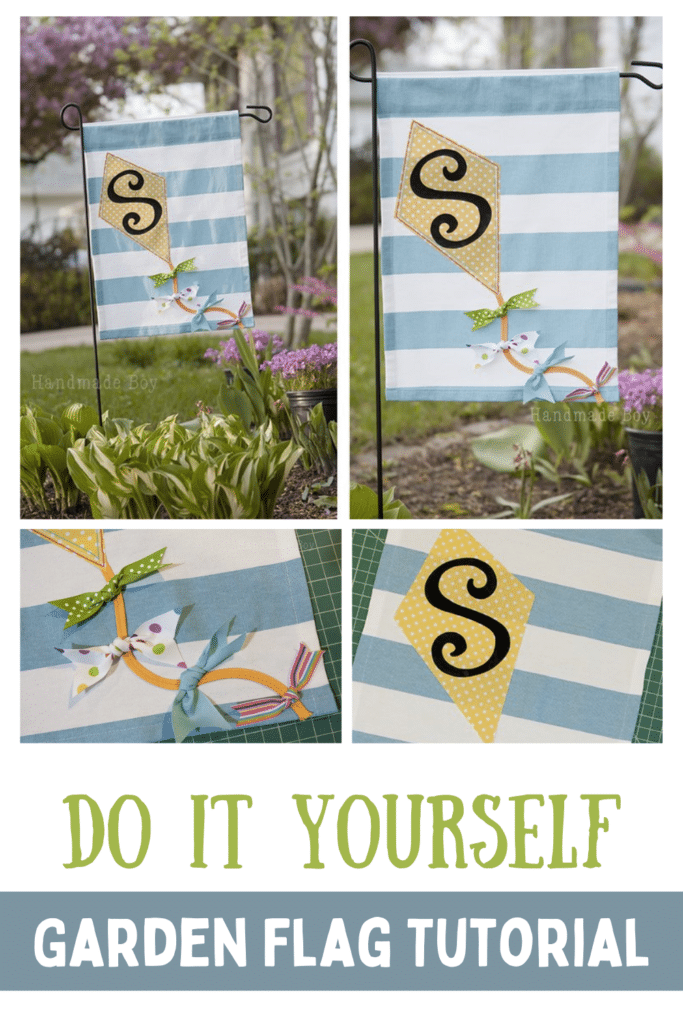
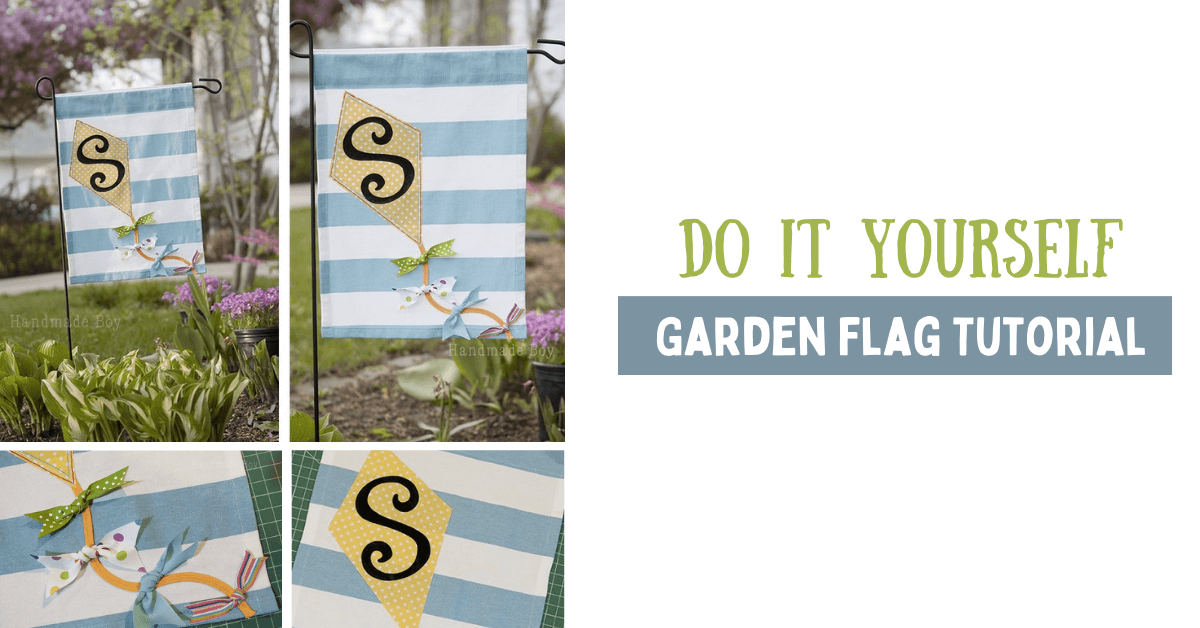
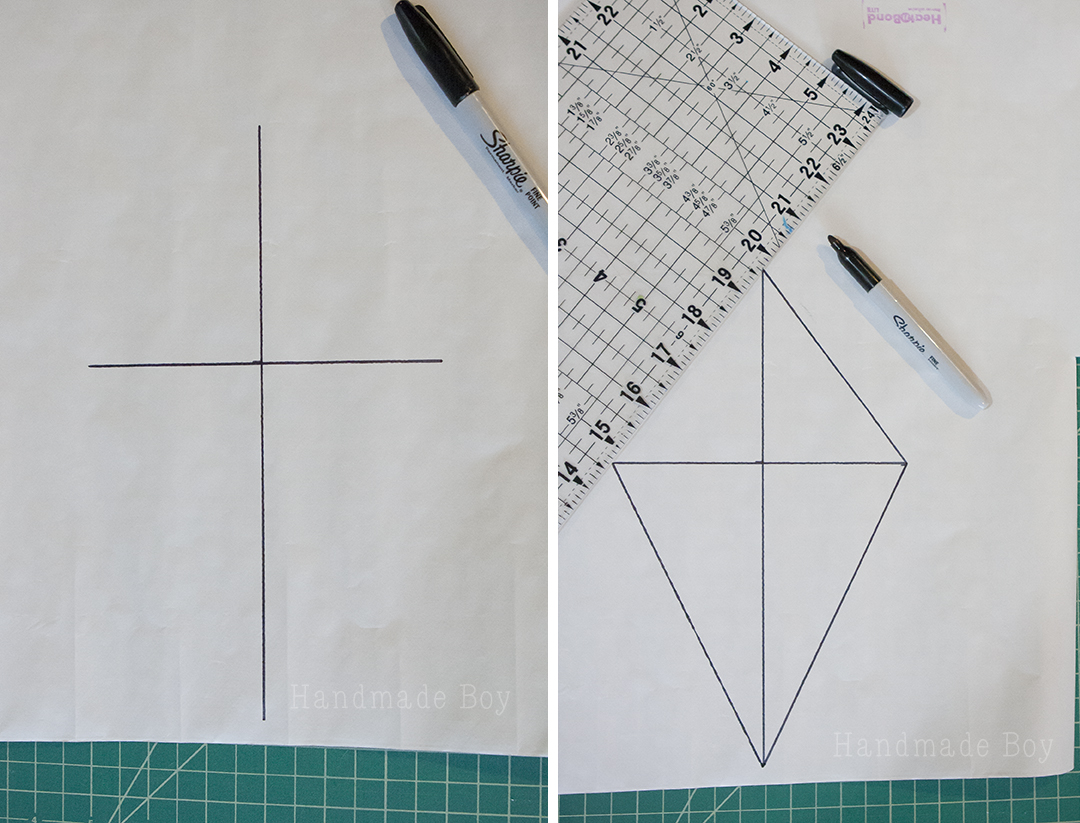
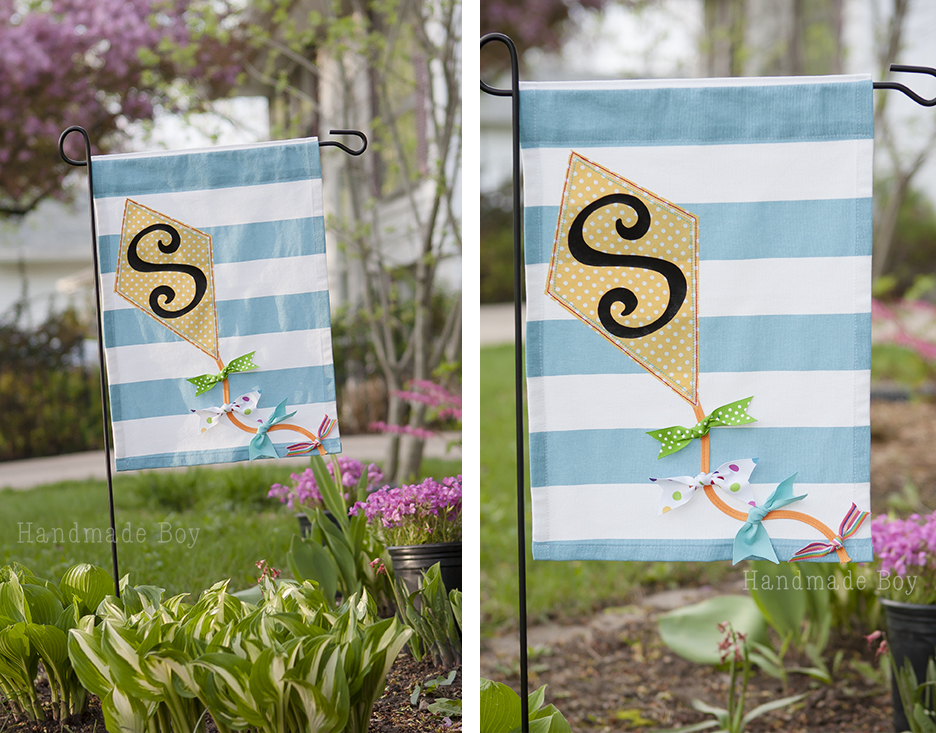
To create your kite, on the paper side of your heat and bond, draw a line 10″ long. 4″ from the top, draw an intersecting line 6″ long. Now connect the lines to create a diamond. Cut out your diamond, around your shape, not on the lines.
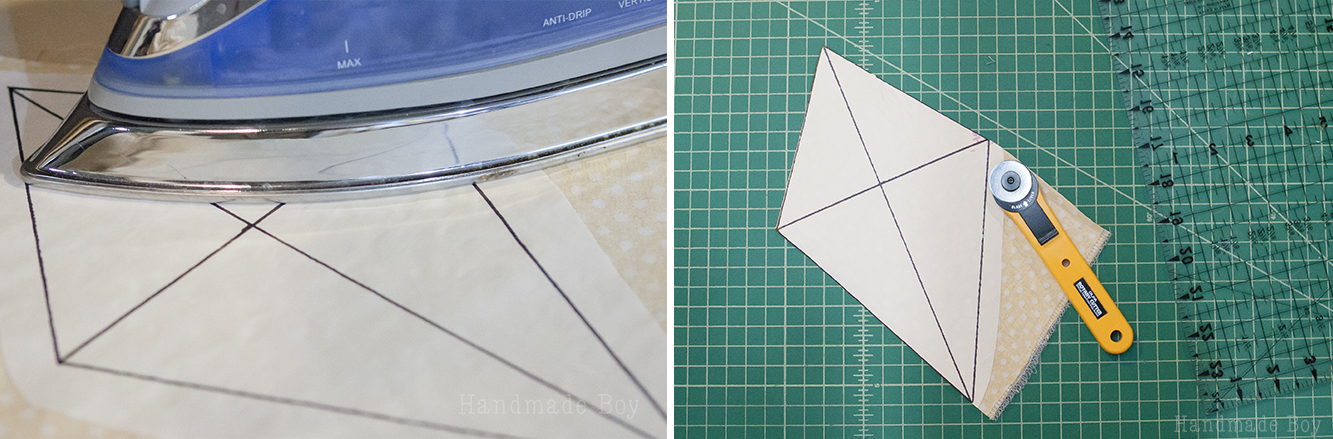
Iron onto the wrong side of your fabric for your kite.
Once cool, cut out along the outer lines. Do NOT remove the paper backing yet!
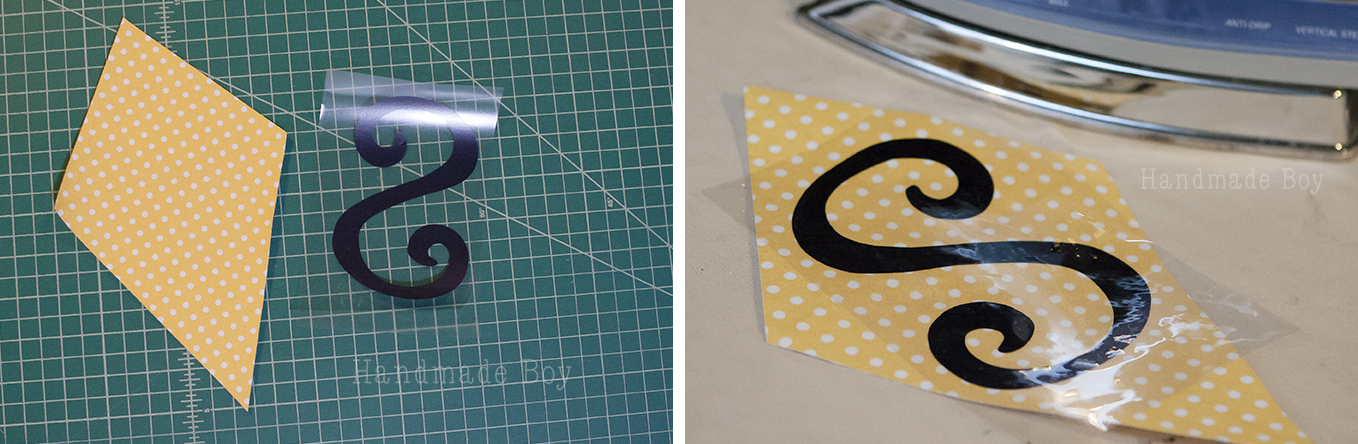
To place an initial on your kite, you can either use a freezer paper stencil (tutorial for how to here) or you can use heat transfer vinyl (HTV). I used HTV. You can either print off a letter and trace it onto the HTV like Nienke used here for her tulip pillows, or use an electric cutter like a Silhouette Cameo. Just remember to cut the mirror image of your letter onto your HTV if you use an electric cutter!
After you have your letter cut and excess vinyl removed, iron it onto your kite following the directions on your HTV.
Remove the paper backing from your kite and place it onto the flag. Don’t iron it on yet. First, tuck your kite tail under the end, arrange the tail how you like and pin into place. Remove kite and stitch tail into place.
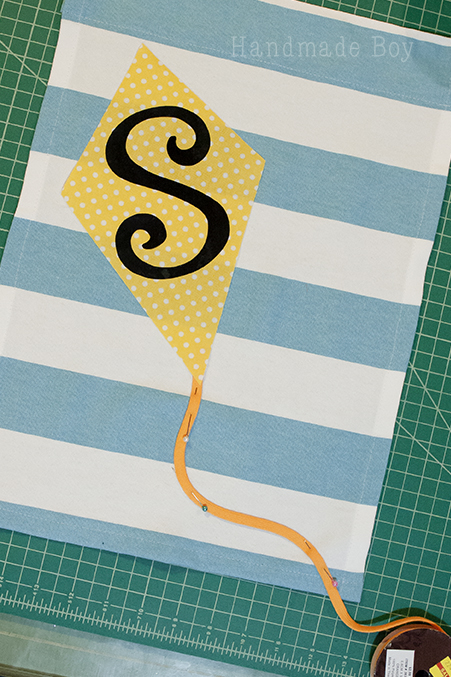
Place kite back into place and iron onto flag. Be careful not to touch your letter directly with the iron. Just iron the edges to secure it into place. Once secure, you can flip your flag over and iron the back to be sure the kite is attached well.
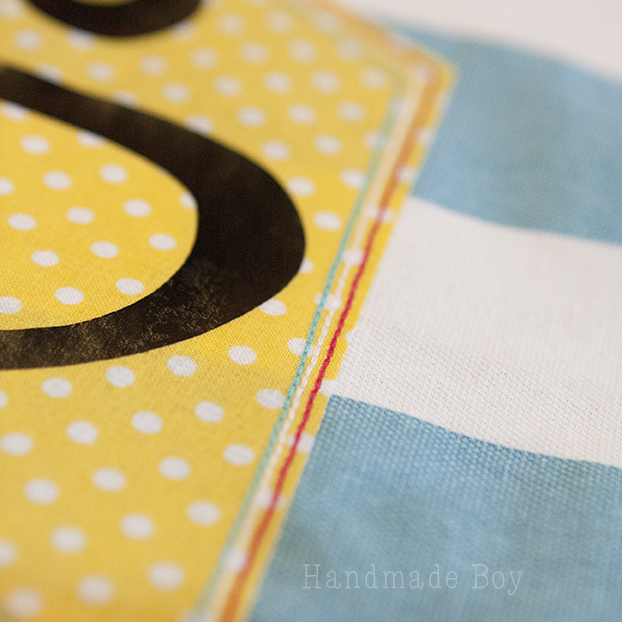
Stitch around the edge of the kite. You can use a zig zag stitch, straight stitch, or a decorative stitch for fun! Since this isn’t going to be washed and dried, and I’m not worried about fraying, I used a triple stitch (the stitch that looks like three parallel lines) in three different colors to give my kite a little detailing.
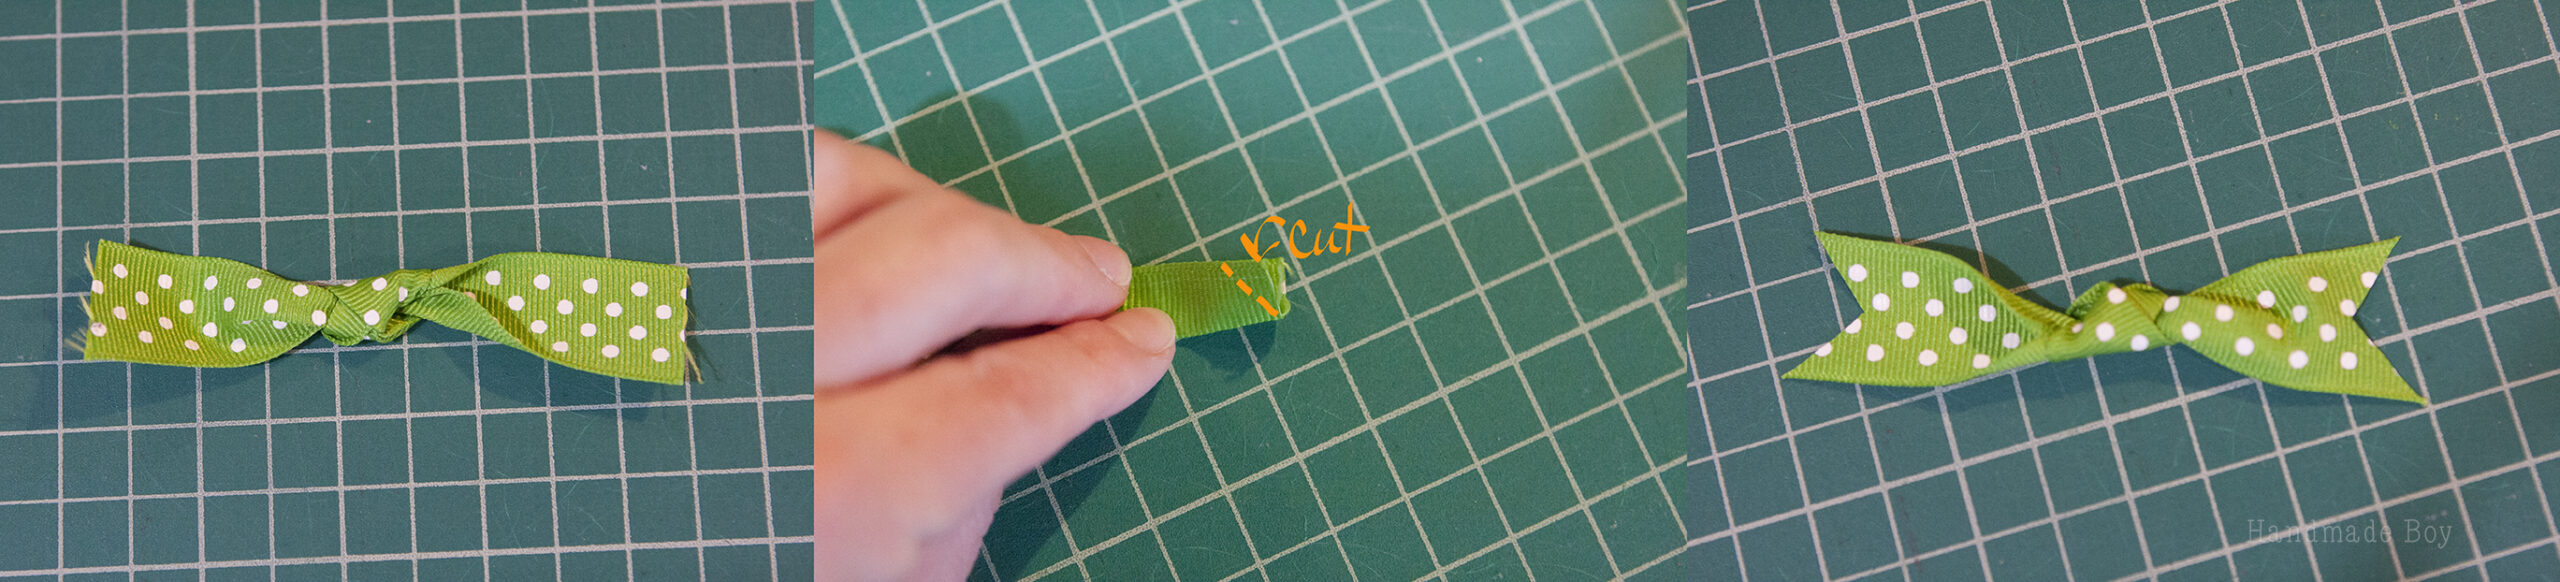
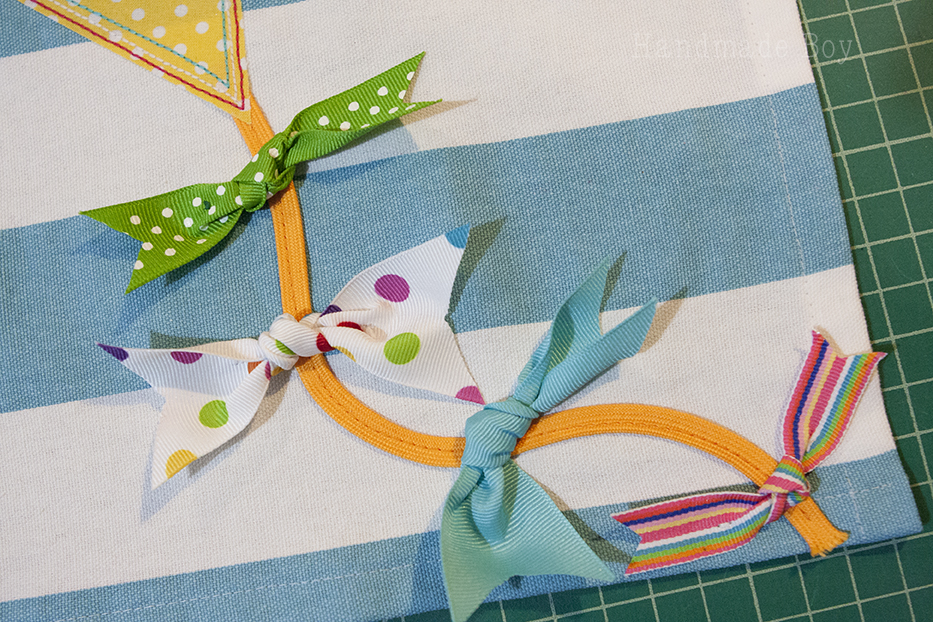
Using bit of ribbon, make the ties on your kite’s tail. Cut a piece of ribbon approx 6 inches long. Tie a knot in the middle of it. Fold the ends in half and make a 45-degree angle cut.
Arrange your ties onto your tail and tack them into place. My knots were too thick to sew through, so I tacked on each side as close to the knot as I could get. I used my machine with a zig-zag stitch set to a stitch length of zero. You can hand-sew sew into place if you like.
And that’s it! A cute little garden flag perfect for spring!
How to Hang Your DIY Garden Flag?
To hang your DIY garden flag, you have several options. Use a sturdy bracket or pole, attach hooks or clips to a fence or railing, thread rope through the grommets and tie it to a post or tree, use a shepherd's hook, or display it on a flagpole.
How to Weatherproof Your Garden Flag?
To weatherproof your DIY garden flag, use weather-resistant fabric or materials. Apply a waterproof sealant to protect it from moisture and add UV protection to prevent fading. Reinforce edges and seams to prevent fraying. Store it during extreme weather conditions for longevity.
What Makes a Garden Flag Stand Out?
To make your garden flag stand out, choose vibrant colors and contrasting patterns. Add decorative elements like ruffles or appliques for a unique touch. Personalize it with meaningful messages or monograms. Don't be afraid to experiment with different shapes and sizes for a visually appealing flag.
Conclusion
In conclusion, DIY garden flags are a fantastic way to personalize your outdoor space and add a touch of creativity to your garden. They not only make your garden look more inviting and visually appealing but also reflect your unique style and personality. By following the step-by-step guide and using the right materials, you can easily create your own garden flags that withstand different weather conditions. Don't be afraid to let your creativity shine through when designing your flags, and remember to hang them securely and in a visible spot. Whether it's adding a splash of color or showcasing a special message, your DIY garden flags will definitely make your outdoor space stand out.
Thank you for joining us today. Before you leave, make sure to join our Facebook Group and follow us on Instagram and YouTube. You can also sign up for our Newsletter below. Happy sewing!